RESTORATIVE
Douglas A. Terry, DDS, Karl F. Leinfelder, DDS, MS, Chuck Maragos, CDT
Developments in materials science and adhesive technology have provided the restorative dentist with a variety of treatment options. Restorative dentistry continues to evolve through innovations in bonding systems and restorative materials that establish function, shape, contour, and color as well as recapture strength and aesthetics. Contemporary restorative materials and techniques allow preservation of remaining tooth structure, conservation of tooth structure during preparation while reinforcing the remaining tooth structure, and improving the longevity and aesthetics of the restoration.
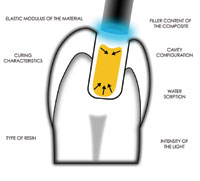
The utilization of composite resin systems for intracoronal restoration of posterior teeth has increased dramatically with the improvements in physical and mechanical properties of these resin systems and patient demand for tooth-colored restorations. The clinical shortcomings with direct adhesive restorations in clinical dentistry are due to the complex interplay between polymerization shrinkage of composite resin and adhesion at the restorative interface. Although polymerization is the cause of shrinkage stress, such stress may be the mechanism for the development of gap formation due to a loss of adhesion.2 Bacterial and fluid penetration through the marginal gaps may occur, leading to colonization of microorganisms,3 recurrent caries, and postoperative sensitivity with possible subsequent irritation of the pulp.4 These events can lead to clinical failure.5
To overcome these challenges of direct resin composite posterior restorations, several approaches have been proposed, including the application of liners and bases that act as shock absorbers,6 selective bonding in appropriate cavity configurations,7,8 the reduction of light intensity from curing units,9-11 and utilizing a combination of selective bonding and incremental layering of small increments of composite resin. Although these methods may provide stability of the restorative interface for smaller cavity preparations, more extensive cavity preparations require other approaches.
Indirect composite resin systems are an alternative aesthetic restorative solution for these larger direct posterior composites. These materials re-store mechanical and biological function while achieving optimal aesthetic results with minimal tooth reduction. Because this adhesive procedure strengthens the cusps and provides additional support for the remaining tooth structure, a more conservative preparation design can be utilized. New generation indirect resins, also known as “ceromers” (ceramic optimized polymers),12 maintain a higher density of inorganic ceramic microfillers compared to the earlier direct and indirect systems.13 Ceromers provide the advantages of composite resins and porcelain without being confined by their inherent limitations.14
The materials known as “microhybrids” are a combination of inorganic particles (fillers) and an organic polymer (matrix), with a filler content that is twice the organic matrix content (approximately 66% inorganic fillers and 33% resin matrix). The filler is the primary determinant of the clinical and physiochemical properties of composite resin. These submicron-particle fillers demonstrate exceptional surface characteristics, including polishability and wear resistance.15 Wear is influenced by the filler size, shape, load, and matrix bonding.16-18 In fact, a significant reduction in wear resistance is observed by decreasing the size of the filler particle.16,19
Newer formulations, with changes in size, shape, composition, and concentration of the filler have significantly enhanced the mechanical characteristics of newer generation composite resins by reducing polymerization shrinkage while increasing flexural and tensile strength, resistance to abrasion and fracture, and color stability.20,21 In addition, when curing these materials, the various combinations of intense light, heat, pressure, and vacuum processing that increase the degree of conversion through post-curing have continued to improve the physical and mechanical properties of indirect resin systems. The curing process eliminates residual monomer and ensures a uniform cure with an optimum level of polymerization. This increased polymerization increases fracture toughness, flexural and diametral tensile strength, wear resistance, incisal edge strength, and color stability.22,23 Examples of the next generation indirect resin composite systems that include these characteristics are Gradia Light-Cured (GC America); belleGlass NG (Sybron Kerr), Cristobal+ (DENTSPLY Ceramco), Tescera ATL (Bisco), and Sculpture Plus (Pentron).
Clinical benefits seen with intracoronal composite restorations with these indirect resin systems include tooth reinforcement, conservation of tooth structure, precise marginal integrity, wear resistance similar to enamel, wear that is comparable with opposing natural dentition, ideal proximal contacts, the ability to develop excellent anatomical morphology, and optimal aesthetics.24,25
This 2-part article de-scribes the clinical and laboratory development of an intracoronal restoration utili-zing the indirect technique. Part 1 will provide a de-tailed review of adhesive preparation design for in-lays and onlays, protocol for proper tissue management for capturing an accurate impression, the importance of provisionalization, and the laboratory fabrication of a maxillary left first molar utilizing a next generation light-cured hybrid composite resin (Gradia Light-Cured, GC America).
PREPARATION DESIGN REQUIREMENTS
Tooth preparation for indirect resin inlays differs from that for conventional cast metal restorations. The preparation design is based on knowledge of the physical and mechanical properties of these new restorative biomaterials. Since resistance and retention are determined primarily by adhesion to enamel and dentin, a more conservative preparation is acceptable.26-28
To attain optimal functional and aesthetic results, the following guidelines should be considered:
•All enamel should be supported by sound dentin.
•All internal angles and edges should be rounded to avoid stress and facilitate the fabrication of the restoration.
•Isthmus width should be at least 2 mm with a depth of at least 1.5 mm.14
•All proximal walls should be flared or diverged 5º to 15º (no undercuts).
•Gingival margins should be prepared to a 90º cavosurface line angle (butt joint).
•Establish sharp cavosurface margins.
•Occlusal margins should not coincide with an occlusal contact site.
•No feather-edge margins.14,20,24,26,27,29
As a general guide, when the isthmus preparation exceeds one half of the distance from the central fossa to the cusp tip, coverage of the cusps should be considered. In areas of low stress and where there is minimal potential of tooth flexure, an increased buccolingual dimension may be inlayed but requires the sound judgment and experience of the clinician.
FIBER REINFORCEMENT
For large restorations or teeth with minimal remaining enamel, fibers should be included as a base on which to veneer the composite.14 An important consideration for achieving optimal long-term clinical success of laboratory-fabricated resin in-lays is tooth reinforcement. To reinforce the composite resin, additional fibers are integrated into the resin matrix27,30 during fabrication and before the curing process. These fibers have been surface treated to enhance the adhesion to any synthetic restorative material. Although no long-term clinical trials are available to determine the clinical success of these materials, a recent short-term study of 60 single-crown restorations demonstrated no breakage after 1 year.14,31
CASE REPORT
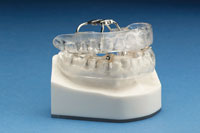
A 42-year-old woman presented with marginal (proximal) ridge fracture of a composite resin restoration on the maxillary left first molar. The existing restoration had open margins with recurrent caries (Figure 1).
 |
| Figure 1. Preoperative occlusal view of defective composite restoration with recurrent decay on the maxillary left first molar. |
After thorough examination and assessment, the patient’s concerns were discussed. The patient expressed interest in re-placement of the existing composite restorations with more durable, tooth-colored restorations. The preoperative considerations included preoperative models to assess the occlusion and anatomical contour (and how it is de-fined by function), custom shade selection, an occlusal and shade diagram, and caries assessment.
Before establishing the parameters of the cavosurface boundaries of the preparation, it was necessary to evaluate the mesiolingual fissure at the cusp of Carabelli with light-induced fluorescence (DIAGnodent; KaVo). This system identifies caries on the basis of the fluorescence properties of enamel and dentin being altered by mineral loss. This device is a useful adjunct to clinical and radiographic diagnosis of fissure caries. The DIAGNOdent scale ranges from 0 to 99 as follows: 0 to 14 indicates no caries or histological enamel caries limited to the outer half of the enamel thickness; 15 to 20 indicates histological caries extending beyond the outer half but confined to the enamel; 21 to 99 indicates histological dentinal caries. In this case a reading of 09 indicated no caries present and the region should be monitored.
Prior to administration of anesthesia and rubber dam isolation, the preoperative occlusal stops and excursive guiding planes were recorded with articulating paper and transferred to a diagram of the occlusal surface (hand drawn); this information can be recorded on an intraoral or digital camera or indicated and reviewed on a stone model. This initial registration is valuable in preparation design when considering placement of centric stops be-yond or within the confines of the restoration and in minimizing finishing procedures.32 The preoperative selection of composite resins, tints, and modifiers—with their shade and orientation—was recorded. Shade selection should be accomplished prior to rubber dam placement. Placement of the dam dries the area, and shade selection under conditions of dehydration results in elevated color values.33 When teeth dehydrate, air replaces the water between the enamel rods, changing the refractive index and making the enamel appear opaque and white.34 The use of a color-corrected daylight source of 5,500 Kelvin is necessary for proper color registration.30 Cloud-Diffused North Noon Day-light provides a uniform spectral power distribution and a color temperature of 5,500 Kelvin. This optimum light quality and quantity provides a more ideal spectrum balance that allows the clinician or technician to distinguish subtle color differences and prevent inaccurate aesthetic shade matching in the laboratory and dental environment. A shade map or restorative “road-map” can be used to diagram the existing colors of the tooth and will indicate anatomical details such as developmental grooves, shape of embrasures, prominences, convexities, facets, angles, planes, and other characteristics that can provide helpful information when reconstructing tooth surfaces.33
CLINICAL PREPARATION
The clinical protocol utilized an indirect restorative technique, which required 2 appointments. At the first appointment, once anesthesia was administered, the treatment site was isolated with a rubber dam. A modified technique was used that involved the creation of an elongated hole that allowed placement of the rubber dam over the retainers. This resulted in ease of placement and removal, adequate field control, and protection against contamination.35,36 After removal of the composite restorations and recurrent caries under the rubber dam, the dam was removed and a second evaluation of the underlying dentin color was performed. This occurred prior to completion of the preparation in order to reduce the influences of tooth dehydration (Figure 2). The rubber dam was replaced, and the preparations were refined following the aforementioned guidelines (Figure 3).
 |
 |
| Figure 2. Photographic custom shade comparison to the natural tooth structure. | Figure 3. Completed preparation. |
Prior to taking the impression, it is important to seal the dentin tubules with a hybrid layer.25,37,38 This resin-coating technique protects the pulp from invasion of microorganisms and reduces sensitivity during the provisional stage.39 The preparation was cleaned with a 2% chlorhexidine disinfectant (Consepsis/ Consepsis Scrub, Ultradent), rinsed, and lightly air dried. A self-priming etchant (UniFil Bond, GC America) was applied to the entire cavity surface with an applicator tip, allowed to remain in place for 20 seconds, then lightly air dried for 5 seconds. A thin layer of bonding agent was applied onto the primed surface with an applicator tip, air thinned, and light cured for 20 seconds.
Impression Procedure
The impression procedure is paramount in the development of indirect restorations, and an accurate and detailed final impression requires proper tissue management. Gingival retraction and moisture control prior to the final impression are considered the most problematic and time-consuming aspects of fixed prosthodontic procedures.40 The following protocol describes a dual-retraction technique for capturing an accurate impression. Prior to preparation, initial displacement of the tissue is accomplished with a retraction cord (No. 00 Ultradak, Ultradent Products) that is placed to the base of the sulcus. After preparation, a secondary displacement of the free margin of the gingiva is accomplished with a kaolin hemostatic agent (Expa-syl, Kerr/Sybron) that is injected into the sulcus, displacing the tissue in a lateral and apical direction. This material holds the tissue in a displaced position until it is removed by rinsing and the impression is performed.
A hydrophilic vinyl polysiloxane impression material (Examix NDS, GC America) was selected, along with a low-viscosity injection material (Examix NDS, GC America) and a rigid tray. The low-viscosity material was injected into the sulcus and into the preparation while the rigid material drives the injected material to the depth of the initial cord when the tray is seated. If the sulcus has been adequately displaced, then the impression will capture marginal detail and some root structure beyond the finish line.
Provisionalization
The intracoronal provisional restoration is intended to seal and protect the remaining tooth structure from bacteria, prevent tooth fracture and movement, maintain centric holding areas, and provide occlusal function during the provisionary phase.41,42 A direct provisional restoration was placed with a matrix band (Automatrix, DENTSPLY Caulk) using a light-cured, semiflexible material (Temp-Fil, Sybron Kerr). The occlusion was inspected and should be adjusted if necessary.
Laboratory Procedure
The laboratory procedure in this case illustrates how the preoperative clinical information that records the existing color of the natural tooth can be used with the optical properties of the restorative material to create an ideal restoration.
Upon review of the clinical photographs and color diagram, a die stone was mixed with the correct powder/liquid ratio under vacuum, and the impression was poured for a master cast and a working cast. The casts were mounted on an articulator for the duplication of occlusal movements. The working model was mounted on dies to facilitate the layering process, and the cavosurface margins were outlined. After blocking out any undercuts in the preparation, a thin coat of die hardner (Gradia Die Hardner, GC America) was applied to the cavity and air dried, and then a layer of separator (Gradia Separator, GC America) was placed and air dried (Figures 4a and 4b). A final thin layer of intensive color (ICO, GC America) was painted onto the intracoronal surface and light cured.
Prior to the composite layering procedure, the color of the underlying substrate must be compared photographically to an existing shade tab. To mask the discolored sclerotic dentin region on the pulpal floor, an opaque layer (OA3, Gradia Light-Cured, GC America) was applied only to that specific region and light cured for 10 seconds (Steplight SL-1, GC America, Figure 5). An increment of cervical translucency (CT4, Gradia Light-Cured, GC America) was applied over the entire pulpal floor; this translucent layer displayed the underlying distribution of color (Figure 6).
 |
 |
| Figures 4a and 4b. The working model is fabricated, and the cavosurface margins are outlined with a marker. Undercuts are blocked out and a separator applied. | |
 |
 |
| Figure 5. An opaque layer was applied to mask the discolored sclerotic dentin region on the pulpal floor. | Figure 6. An increment of cervical translucency was applied over the entire pulpal floor. |
The preparation’s dimension was measured in a mesio-distal direction for the placement of reinforcement fibers. These fibers are adapted internally to the initial dentin layer. Successive increments of cervical translucency were applied over the reinforcement fibers and light cured (Figures 7a and 7b).
 |
 |
| Figures 7a and 7b. Reinforcement fibers are internally adapted to the initial dentin layer, and incremental layers of composite are smoothed over the fibers and light cured. | |
During the laboratory phase, each composite increment was light cured under the curing unit for 10 seconds, which allowed placement of subsequent increments without deforming the underlying layer. An enamel envelope was developed on the mesial surface by sculpting and adapting an interproximal wall with successive increments of E3 shaded composite (Gradia Light-Cured, GC America, Figure 8). In order to create integration between layers of different color, a translucent A-2 shaded dentin composite was placed in the center of the preparation, identifying the position of the central groove (Figure 9).
 |
 |
| Figure 8. An enamel envelope is developed on the mesial surface by sculpting and adapting an interproximal wall with successive increments of E3 shaded composite. | Figure 9. A translucent A-2 shaded dentin composite is placed in the center of the preparation, identifying the position of the central groove and cusp division. |
Successive increments were placed to develop the cusps and inclined planes (Figure 10) and then shaped and smoothed with a nylon brush. It is important to visualize the final result and observe the required boundaries of the artificial enamel layer and not trespass beyond this zone. The initial enamel layer was developed by placing small, ellipticalshaped increments of EI3 shaded composite for the inclined ridges (Figure 11) while integrating PE1 for the inclined planes (Figure 12). These increments were formed into the proper anatomical contours with the edge of a nylon brush.
While the material was still soft, an invagination was made, and the internal characteristics (pits and fissures, staining of grooves, or the creation of internal color within the restoration) were applied using an endodontic file and a round, tapered, nylon brush. To create a warm internal hue, a yellow tint was diluted with an untinted resin and applied away from specific occlusal and lingual grooves corresponding to the shade-mapping diagram (Figure 13).
 |
 |
| Figure 10. Successive increments are placed to develop the cusps and incline planes and shaped with a curved instrument. | Figure 11. The initial enamel layer is developed by placing small, elliptical-shaped increments of EI3 shaded composite for the inclined ridges. |
 |
 |
| Figure 12. A PE1 enamel layer is integrated for the inclined planes. | Figure 13. A yellow tint is diluted with an untinted resin and applied away from specific occlusal and lingual grooves corresponding to the shade-mapping diagram. |
A diluted dark, red-brown-tinted resin was applied in the previously formed invagination ac-cording to the preoperative photographs and shade diagram. The serrations of a clean endodontic file were used to enfold the layers, compressing the layers together, which causes a narrowing of the invagination and allows the brown stain to migrate to the occlusal, creating a fine line of stain from the base of the invagination to the occlusal surface (Figure 14). This allows intraoral oc-clusal adjustment without loss of internal characterization. These tints should be polymerized prior to the placement of additional stratification materials to stabilize the characterization and prevent mixing of colors. A very small amount of black stain (IC12, Gradia Light-Cured, GC America) was placed into specific regions corresponding to the shade- mapping diagram and then light cured. In order to re-create the natural translucency of enamel, a gray tint was thinned with an untinted resin and applied in a very thin wash on the mesial marginal ridge area and other specific regions corresponding to the shade-mapping diagram. It was then light cured. To establish a more realistic depth of color, a final “artificial enamel” was created with small increments of PE3 shaded composite (Gradia Light-Cured, GC America) that were placed in a thin layer over the developed anatomical contours. This layer was shaped and contoured with a nylon brush to reproduce form and the optical effects of enamel (Figure 15).
 |
 |
| Figure 14. A diluted dark, red-brown-tinted resin was applied in the previously formed invagination, and the layers were compressed together creating a fine line of stain from the base of the invagination to the occlusal surface. | Figure 15. Small increments of PE3 shaded composite were placed in a thin layer over the developed anatomical contours as an occlusal envelope, then shaped and contoured with a nylon brush. |
After placing the last layer of composite, an oxygen inhibitor (Air Barrier, GC America) was applied in a thin layer with a brush to the surface of the restoration to eliminate the air inhibition layer and ensure complete polymerization. The restoration remained on the working die and was placed in the light-curing unit (Labolight LV-III, GC America) for 3 minutes. The die was removed from the curing unit, and the oxygen inhibitor was removed with water. The die was then returned to the master model.
The finishing step was begun by marking the premature interproximal contact on the solid master model with articulating paper. The interproximal surface of the inlay was adjusted with a rubber wheel (Composi Pro 1 Step, Brasseler USA); the flat surface of the wheel can be used for minor adjustments while polishing the contact zone. The initial finishing of the gingival, proximal, and occlusal cavosurface margins can be accomplished with a short-tapered, straight-edge finishing bur (ET-3, Brasseler USA), using a sequential increase in the number of flutes to achieve a smooth surface. Also, these surface margins can be finished with aluminum oxide disks (Optidisc, Kerr Hawe) used sequentially by grit—coarse to extrafine.
Shaping and contouring of the occlusal surface or any minor modifications in the occlusion can be accomplished with a flame-shaped finishing bur (7404, Brasseler USA; 9406, BluWhite Diamond, Sybron/Kerr) that conforms to the appropriate curvature of the tooth surface (Figure 16). A smooth surface can be achieved by following a sequential in-crease in the number of flutes (8 to 12 to 30). The initial polishing of the occlusal surface was accomplished with silicone pointed brushes (ComposiPro, Brasseler USA), which reach into the occlusal grooves, and prepolish and high-shine rubber points (DC1M, DC1, Diacomp, Brasseler USA) following the occlusal anatomical contours (Figure 17).
 |
 |
| Figure 16. After the gingival and proximal surface margins are finished with aluminum oxide disks that are used sequentially according to grit, shaping and contouring of the occlusal surface or any minor modifications in the occlusion is accomplished with a flame-shaped finishing bur. | Figure 17. The initial polishing of the occlusal surface is accomplished with prepolish and high-shine rubber points following the anatomical contours. The definitive polish of the restoration was accomplished with a goat-hair brush with diamond paste and a cloth wheel using staccato motion. |
To impart a high luster or surface reflectivity on the restoration while maintaining the existing texture and surface anatomy, the final polishing of the occlusal surface of the restoration can be accomplished with loose abrasive aluminum oxide or diamond pastes (Gradia Diapolisher, GC America) and goat-hair brushes, applied at conventional speed. A final polishing surface gloss can be achieved with a dry cotton buff (Ceroshine, Brasseler USA) using an intermittent motion applied at conventional speed.
The completed laboratory result reveals the enhanced optical characteristics and the anatomical morphological detail that can be achieved utilizing this indirect resin system (Figure 18).
 |
| Figure 18. The completed laboratory-fabricated, fiber-reinforced composite resin inlay. |
CONCLUSION
As the demand for tooth-colored restorations for posterior teeth continues to in-crease, contemporary indirect composite resins will complement other restorative alternatives. Advanced biomaterials known as “ceromers” are not de-signed to replace all other restorative materials and techniques, but to supplement the services that are offered to certain patients.25 This manuscript has provided a detailed description of the initial clinical procedure for an intracoronal restoration, including preoperative considerations, preparation design, impression taking, and provisionalization. In addition, the laboratory procedure for fabrication of the restoration is demonstrated. A protocol is described that involves the incremental application of composite resins, tints, and modifiers to develop the restoration from an advanced indirect composite resin system.
The next manuscript will describe the principles that should be followed to achieve long-term success with these restorations by demonstrating adhesive con