


In the first 3 articles in this series, Access to Success, I’ve discussed the importance of endodontic access, emphasizing the significance of creating the ideal access opening as one of the most important things you can do to help ensure a successful endodontic procedure. I’ve also focused on the “success” component of the series title, talking about how you can improve your bottom line by performing endodontic procedures on anterior teeth—a procedure too many general dentists refer to specialists—particularly by applying a few tricks of the trade to improve your efficiency and the quality of your work.
With this article, I’d like to discuss improving your diagnostic ability and your ability to perform general as well as endodontic procedures successfully by taking advantage of recent developments in magnification technology. It’s an area many dentists ignore because they’re unaware of the possibilities. But it’s also an area where some dentists are actually over-equipped because they’re not fully advised of the levels of magnification required for their practice. Consequently, they can wind up with overlapping magnification capacity that represents wasted money and resources.
The idea is, of course, to determine the correct levels of magnification for the kind of work you do and then to make the best buying decision. After you’ve equipped your office, there are some procedural tips that will help you make the most of the latest technological developments in magnification.
I’VE DONE FINE WITHOUT MAGNIFICATION ALL THESE YEARS. WHY START NOW?
The quick answer to that question, which we get frequently in our Endodontic Root Camp seminars, is “What you don’t see can hurt you.” The use of magnification in dentistry has grown rapidly during the past several years, and for several good reasons.
The first reason is that magnification can significantly improve your diagnostic capability. Whether you determine that dental loupes are the “right tool for the job” for you, you decide that you need a microscope for the type of work you do, or you determine that you need both in your practice, among the primary benefits you will realize by incorporating magnification into your practice is better visualization of the treatment area. That will translate into more accurate diagnoses.
There are a number of other benefits associated with bringing magnification into your practice. The use of loupes and microscopes has been shown to reduce the occurrences of repetitive stress injuries related to bad posture by improving working posture. While you’ll have to make certain changes in the way you perform procedures after you begin using magnification, those changes will often result in better working posture and a reduction of the physical stress that is one of the constant conditions we deal with in our profession. Magnification also reduces eyestrain, and although this should go without saying, provides significantly clearer and more detailed visibility.
It’s not that bringing magnification into your practice doesn’t have a potential downside, but I’m betting that after you’ve become acquainted with the benefits, you’ll understand why the use of magnification may become the standard of care for the profession in the near future.
THE RIGHT TOOL FOR THE JOB
There are 2 types of magnification equipment that are becoming integral to contemporary dental practices: loupes and microscopes. While there is some overlap in their functionality, if you analyze your needs correctly in advance, then you’ll be able to purchase the right magnification instrument for your practice and take advantage of what it can do to make you a better dentist. There are a number of excellent loupes and microscopes available from companies such as Seiler, Zeiss, Global, Orascoptic, Designs for Vision, and others. In this article my own preferences will be cited with the caveat that readers’ individual preferences may differ. Here’s a quick overview of some of the applications for loupes and microscopes.
LOUPES
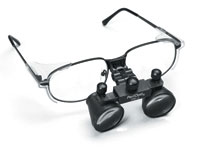 |
| Figure 1. Dental loupes on the market offer a wide variety of magnification capabilities. The author recommends that you look at a pair of loupes capable of magnifications ranging from 2.5x to 3.5x. |
If you’re a general dentist, you’ll want to consider loupes as your entry magnification technology. There are dental loupes on the market with a wide variety of magnification capabilities; I recommend that you look at a pair of loupes capable of magnifications ranging from 2.5x to 3.5x. The loupes we use and recommend at our Root Camp seminars are manufactured by Perioptix (Figure 1).
 |
| Figure 2. The Perioptix Performance Plus series of dental loupes are available in 3 different magnifications (2.5x, 3.0x, and 3.5x) and 2 working distances (regular and long). |
The Perioptix Performance Plus series of dental loupes (Figure 2) are available in 3 different magnifications (2.5x, 3.0x, and 3.5x) and 2 working distances (regular and long).
The Perioptix Hogies series of dental loupes features a magnetic mounting system for quick connect and disconnect of optics, shields, and adjustable nosepad. They, too, are offered in 2.5x, 3.0x, and 3.5x magnifications.
MICROSCOPES
Dental microscopes have gained a foothold particularly among dentists specializing in endodontics, although I anticipate their use will be more widely adopted in the future among general dentists who also perform endodontic procedures. The benefits of using a microscope during an endodontic procedure again have to do with diagnostics, but you’ll find that using a microscope enables you to perform endodontic procedures with much greater accuracy and completeness as well.
 |
| Figure 3. The Seiler Model 202 provides magnification levels of 5x, 8x, and 13x, the appropriate range for endodontic treatment. |
The Seiler Model 202 shown in Figure 3 provides magnification levels of 5x, 8x, and 13x, the appropriate range for endodontic treatment. It’s the one we use and recommend in our Root Camp seminars. Seiler microscopes offer either manual or motorized focus and a range of objective lenses from 200 mm to 400 mm. I decided to buy and subsequently recommend the Seiler Model 202 microscope because it was one of the first truly affordable scopes for the GP. Prior to buying the Seiler, I wasn’t comfortable recommending that a general practitioner purchase a scope costing 3 or 4 times as much just for endodontic work. Incidentally, I now believe that microscopes have a definite place in other areas of dentistry, and their usefulness is not limited to endodontics.
British endodontist Andrew Powell-Cullingsford says that “the microscope has become the single most important part of an endodontist’s armamentarium.” He further suggests that “it is becoming apparent that it is not just the endodontist who may benefit from the advantages a microscope provides.”
Diagnosis in endodontics can be one of the most difficult and yet most rewarding aspects of the specialty. Dr. Powell-Cullingsford points out that “Often a sinus can be detected under the microscope that would have been impossible to detect with the naked eye. By tracking such a sinus using a fine gutta-percha cone it is possible to hone directly in on an area associated with an infected tooth. Caries, cracks, loose or decemented crowns and bridges are also quickly identified with the aid of magnification.”
Dr. Powell-Cullingsford further states that using a medium- to high-power magnification (about 10x to 15x) allows the dentist to identify cracks and complex root canal anatomy easily. He says that “The mesio-buccal root of the maxillary first molar contains a second root canal approximately 70% of the time. The histological evidence suggests that there are two mesio-buccal canals in almost 100% of cases. There are communications throughout their length and they terminate separately in two or more portals of exit more than 50% of the time.”
It’s prudent to assume all maxillary first molars have 4 canals until proven otherwise, and good access combined with magnification will make the job of identifying these canals much easier.
PRACTICAL TIPS FOR USING LOUPES
Conventional wisdom says that there is a fairly steep learning curve involved in the adoption of any type of magnification instrument into a dental practice. If you’re not familiar with using loupes or microscopes, you’ll almost inevitably find that you have to make some adaptations in your work habits to accommodate them. I want to emphasize, though, that this certainly does not have to be the case. I’ll discuss this more in the section on microscopes, but for now I want you to refrain from assuming that it’s going to be difficult to adapt to the use of magnification.
One of the ways to make the transition quickly is to start using dental loupes at the low end of magnification, either 2.0x or 2.5x, during the period you’re adapting your work procedures to using them. The higher the magnification, the greater the adjustment you’ll need to make, and if you begin at a lower-end magnification, then you can gradually work your way up to higher magnifications as you become accustomed to their use.
Using dental loupes means that your focus is restricted to a specific area and that your eyes will not be able to adjust simply by changing focus if you want to look up from your work. Your dental assistant will be an integral part of your adjustment to using loupes in your practice. You’ll find that you need to rely on your assistant in many cases where previously, before you began using loupes, you might have simply looked around to find the particular instrument you needed.
Very important in your decision to make dental loupes part of your practice are ergonomic considerations, and here you’ll find that improved ergonomics is an important benefit. Using loupes can enable you to reorient yourself to your patient, allowing you to practice in a more upright and posturally sound position.
You’ll also find that using loupes causes you to reorient yourself to the fundamentals of procedures you’ve been doing since you began practicing. This involves considerations of such things as working distance, depth of field, and the angle of vision. Of these, working distance is the most noticeably affected.
During the time you’ve practiced, you’ve developed comfort levels with regard to your “working distance;” that is, how far away from the patient’s mouth your eyes are while you are working. This working distance varies based on a number of factors, but each of us develops a working distance with which we’re comfortable. Introducing a magnification device will almost certainly affect the working distance to which you are accustomed. You should select loupes based on their capability to allow you to maintain the working distance close to which you are accustomed.
If you exhibit bad posture as you provide treatment without loupes, you might find that loupes enable you to correct that. For instance, because they reduce the need to lean over to get a closer look into the patient’s mouth, loupes can make it possible for you to sit up straighter while you work. This might involve experimenting with a number of different loupes to get a sense of your comfort level with your accustomed working distance.
And while working distance is an important consideration, you should also consider such factors as depth of field (the range at which you can maintain visual accuracy based on your working distance) and the angle at which you’ll be viewing your work through the loupes. The bottom line is that, despite reports to the contrary, you can adjust very well to using loupes in a very short time, often in a week or so. The benefits of using loupes so far outweigh the negatives that, in addition to general dentists, many hygienists are also adopting them.
THE DENTAL MICROSCOPE: IMPORTANT FOR ENDODONTIC WORK
While loupes are becoming more widely used by general dentists and dental hygienists, microscopes are becoming increasingly important to endodontic treatment. One 2004 survey on magnification use indicates that 68% of endodontists reported that they either sometimes or always use a microscope in diagnosing and performing endodontic procedures.
Using a microscope involves a somewhat different set of adaptations to your usual procedures. Here again, I want to go counter to conventional wisdom, which says that a microscope may well take quite a bit longer than loupes to get used to. To reassure you that the use of a microscope for endodontic treatment is something you can adapt to quickly, I want to call on the expertise of my good friend, Dr. John McSpadden, who was one of the very first dentists to use a microscope routinely for all endodontic procedures. Dr. McSpadden first began using a microscope for endodontic work in 1976, having to adapt a laboratory microscope for this purpose, since there were no surgical scopes at the time. Dr. McSpadden was the person who influenced me to adopt this technology.
Dr. McSpadden says directly that “the elitist attitude that it requires months to learn to use the scope and that it requires more time in doing a procedure is only an attitude that can come from lack of experience. If used routinely it should require only a few hours to learn to use the scope effectively, and the time savings occur immediately, particularly in view of the mistakes you are able to avoid.”
Let me give you some specific examples of how using this magnification technology will enable you to improve your diagnoses and treatment outcomes.
 |
| Figure 4. This demonstrates the ideal working posture when using a dental microscope. Note that the patient is inclined at a 45° angle to the dentist and that the dentist is seated upright behind the patient. |
Figure 4 demonstrates what I consider to be the ideal working posture when using a dental microscope. Note that the patient is inclined at a 45O angle to the dentist and that the dentist is seated upright behind the patient. Many practitioners position the patient fully reclined and parallel to the floor, but in that position the dentist is not afforded direct vision of the lower arch, and the patients frequently complain that the chair is too far back.
Additionally, if the patient is parallel to the floor, I am forced to use a mirror to see the mandibular arch, and working with a mirror on lower teeth feels unnatural. As dentists, we are accustomed to using the mirror on the upper, but everything seems backwards and awkward when using the mirror on the lower.
 |
| Figure 5. Having a monitor directly behind the dentist means the assistant does not need a second eyepiece to follow the procedure. |
Figure 5 demonstrates the use of a monitor as an important adjunct to using a microscope in endodontic treatment. Having a monitor directly behind the dentist means the assistant does not need a second eyepiece to follow the procedure. As an aside, I predict that as the quality of stereoscopic eyeglasses with built-in monitors improves, we will see practitioners no longer having to look directly through a microscope’s eyepieces. Eliminating the eyepiece would make the microscope head lighter, smaller, easier to position, and less likely to infringe on the operating field.
 |
 |
| Figure 6. Without the use of magnification, a fourth canal in a molar often is missed. | Figure 7. This demonstrates how magnification and proper illumination facilitate the location of a fourth canal. |
Without the use of magnification, a fourth canal in a molar often is missed (Figure 6). With magnification and proper illumination, the fourth canal was located (Figure 7).
 |
| Figure 8. Even with good magnification, cracks may not show up if the lighting is poor. This can occur when using loupes and nothing but the overhead dental light. |
Even with good magnification, cracks may not show up if the lighting is poor. This can occur when using loupes and nothing but the overhead dental light (Figure 8).
 |
| Figure 9. With magnification and improved lighting, the crack in the tooth becomes obvious. (All photos courtesy Dr. Andrew Powell-Cullingsford.) |
With magnification and improved lighting, the crack in the tooth becomes obvious (Figure 9).
In addition to the procedural improvements I’ve illustrated and discussed, using a microscope along with digital imaging (including a digital camera, DVD recorder, or other digital capture device) can enable you to capture an image of what you are seeing through the microscope. I use the DEXIS digital radiography system, the one featured at our Endodontic Root Camp, to capture microscope images. Capturing and displaying these images for patients on a video or computer monitor will give them a clearer picture of what is going to be involved in treatment, making it easier for them to decide whether it is worth it, for instance, to try to save a tooth. The more information we can share with patients, the less likely we are to end up with a patient who is dissatisfied with treatment. Telling them in advance exactly what to expect based on the improved information available through using a microscope is an excellent step toward achieving that goal.
WRAP-UP
As I mentioned earlier, I can foresee a time in the not-too-distant future when the use of magnification will be the standard of care for the dental industry. The use of dental loupes with 2x to 5x magnification capabilities will improve your diagnostic and treatment capabilities. And if you perform endodontic procedures, you’ll find that the improved visualization a microscope affords will make it possible to see and treat conditions that were simply not visible without magnification.
Recently a friend of mine whose practice is reaching maturity (a nice way of saying that he’s getting old) commented on the growing use of magnification in dentistry. “The good news,” he said, “is that as your eyesight gets worse and worse, you can always use your loupes to find your microscope.”
Dr. Weathers has informed audiences of dental professionals for more than 30 years. His lectures and publications on technologies, products, and processes designed to simplify the practice of endodontics have attracted thousands of dentists and their team members. Dr. Weathers pioneered a simplified system of nickel-titanium files to enhance patient comfort with a one-visit endodontic procedure. The Hands-on Endodontic Root Camp seminar series, which Dr. Weathers hosts, offers multiday, hands-on training to improve dental techniques while explaining his theory of “Endonomics,” the economics of endodontic case management. The editor of the DentalMagic! Newsletter and the author of numerous articles on innovations in endodontic treatment products and processes as well as intraosseous anesthesia delivery systems, Dr. Weathers has also introduced the C.E.Magic! “edutainment” interactive learning system to the field of continuing education in dentistry. He can be contacted at (770) 227-3636 or by visiting CE-Magic.com.
To share your comments regarding this article, please e-mail comments@dentistrytoday.net.


