This year’s digital photo update will hopefully provide you with an assortment of goodies that will broaden the digital photo horizons of those with experience as well as open doors for those seeking to take the plunge. As there is much to cover, let’s jump in!
WHICH CAMERA SHOULD I BUY, MARTY?
This question never gets old. It is the one that I hear the most and, of course, the answer changes a little each year as new models are introduced. Before I name a few favorites, let’s set the groundwork first.
First, as I have urged in the past, buy your new system (Yes! It is a system!) from a reputable dental photo specialist, who will not only properly adjust the camera for you, but will provide you with a convenient way to retrieve those settings should they be lost. Dealers such as PhotoMed, Lester A. Dine, and Norman Camera (to name just a few) will handle those chores nicely. I am particularly fond of PhotoMed’s Quick Start guides. These color, illustrated, how-to cookbooks insulate the user from having to experiment with proper photo settings. I have received too many e-mails from frustrated dental photographers who, in the name of thrift, buy from online wholesalers who do not know dental and want nothing but to wash their hands of you once the deal is done. Would you buy a digital x-ray system on Amazon.com or Ebay.com?
AND THE WINNER IS…
 |
| Figure 1. Canon EOS Rebel XTi with Canon lens and flash. |
Well, there isn’t one really, as these recommendations are just my opinions. With that said, it seems as if the Canon EOS Rebel XTi equipped with either a Sigma or Canon 100-mm macro lens and ring flash remains the sweet spot when it comes to price versus performance (Figure 1). Ranging in price from $1,700 to $2,200 (price is lens dependent), the XTi system will likely serve your digital photo needs far into the future. For details on the XTi system and the components frequently offered with it, visit photomed.net. Take note! By the time you read this, the Rebel XTi will be joined by the Rebel XSi and ultimately replaced by it. The XSi ups the ante on megapixels (10.1 increased to 12.2) and LCD screen size (2.5 increased to 3.0 inches), and offers many of the niceties found in the prosumer Canon EOS 40D. These include a live-view mode (of little use in dentistry), the Digic III microprocessor (very fast), and Canon’s new integrated sensor cleaning system. Of particular note is the XSi’s compatibility with secure digital (SD) and secure digital high-capacity (SDHC) memory cards, something new to the line of Canon single-lens reflex (SLR) cameras that have relied upon the larger compact flash format. While I’m mentioning the Canon 40D (the XTi’s big brother and my current main squeeze), I would share that it is the finest and fastest digital SLR camera that I have yet to own (when coupled with a Canon 100-mm macro lens and Canon MR Ex14 ring flash). While more expensive than the XTi, those willing to spend the extra dollars will be rewarded with superior performance with respect to speed of focus, metering accuracy, and overall image quality. Note: It is also 25% larger and heavier than the XTi, so those with small hands, be advised.
THE OTHER 40…WHY DO THEY DO THIS?
 |
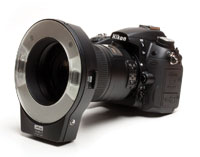
| Figure 2. Nikon D40 with Sigma lens and flash. |
The above-mentioned Canon 40D is not to be confused with (but likely will be) Nikon’s D40 digital SLR. The 6-megapixel D40, Nikon’s answer to the XTi, is Nikon’s entry-level SLR. Many of the dental photo dealers offer the D40 as part of a dental package. The one caution when considering this camera is that unless you purchase a Nikon lens with it, you will be limited to manual focus only, as Nikon keeps the auto-focusing mechanism in the lens instead of the camera body. You can attach any Nikon AF lens to the camera, but unless it is AF-S or AF-I, you can only use it in manual focus mode. Still, image quality in D40-based systems is excellent, and the dental packages are cost effective (Figure 2). Note: The newly released D40x increases the megapixels from 6 to 10.
WANT IT SMALLER?
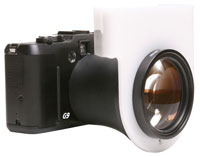 |
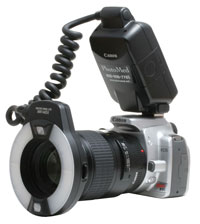
| Figure 3. Canon G9 with PhotoMed macro device. |
If a point-and-shoot solution is more to your liking, perhaps because of the easy conversion to a recreational camera, my vote goes to the Canon PowerShot G9 when equipped with a PhotoMed macro-diffuser device, enabling consistent, closeup dental imaging. Interestingly, as the price of SLR bodies has dropped below $1,000, the price point difference between a point-and-shoot system and an SLR system has diminished. Prices are so close that the desired form factors (feel, size, and weight of the camera) have more to do with the purchasing decision than does the actual cost. Point-and-shoot systems also gain staff acceptance with greater ease due to the familiar look and feel. The G9 feels very good in my hands and features an ultra-sharp, spacious LCD screen for easy focusing and composition. Image quality is, for the most part, indistinguishable from an SLR. Be aware, though, that there is a manual component to focusing such systems (moving the camera back and forth physically to achieve image sharpness) that is assisted by the camera’s autofocus mechanism when exposing the shot. This results in a slight but easy learning curve from the get-go (Figure 3).
HONORABLE MENTION…
 |
 |
| Figure 4a. 4×6 photo taken with Dine Digital Solution. | Figure 4b. Hygenist uses DDS Camera. |
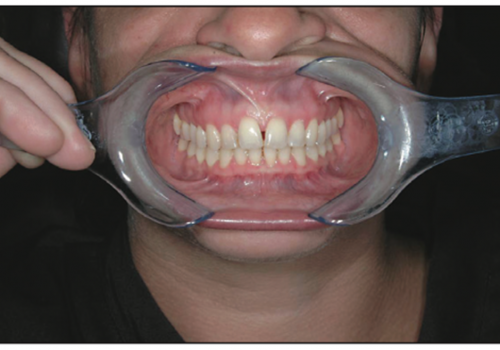
For those on a very limited budget wanting to be up and running for less than $1,000, Lester A. Dine’s Dine Digital Solution (DDS) offers just that. For more details on this system, visit dinecorp.com. The DDS is centered on a small, 8-megapixel, point-and-shoot Pentax camera that is configured by Dine to properly expose dental images. It ships with imaging software, cheek retractors, and mirror. It also has several other accessories that round out the package. In my office we have furnished several members of our hygiene team with this small Pentax camera. When coupled with an Epson Picturemate Zoom or Dash photo printer, it becomes easy to produce serviceable 4×6 instant color photos of teeth in need of repair. Patients leave with these photos as a reminder of why they made that restorative appointment on their way out of the office. This process has been an invaluable practice builder (Figures 4a and 4b).
EXPANDED USE: WHAT THE EYES CAN’T SEE…
 |
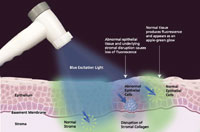 |
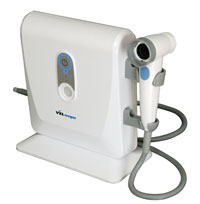
| Figure 5. VELscope. | Figure 6. VELscope’s blue excitation light. |
 |
 |
|
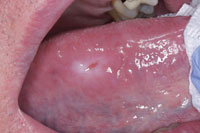
Figure 7. Tongue lesion with standard flash. |
Figure 8. Tongue as viewed through VELscope. |
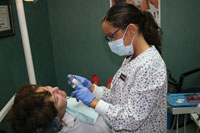
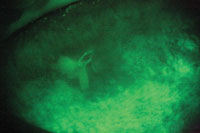
By now, many of you have heard of VELscope (LED Dental), a device designed to screen for oral cancer (Figure 5). The VELscope generates a blue excitation light that stimulates fluorescence from normal tissue that is seen as a green glow when viewed through the VELscope. Areas of abnormal epithelium and abnormal underlying stromal tissue fail to fluoresce, resulting in darker zones of nonfluorescence; often they appear dark or maroon in color and map-like in shape. The beauty of the system is the ease of use, and thus, the ability for a practitioner to offer an excellent cancer screening that doesn’t require much time to complete; typically 90 seconds will suffice. The challenge arises when attempting to capture an image for documentation. As the VELscope uses a very narrow section of the visible light spectrum, the amount of light reaching a camera is quite small. PhotoMed has developed a solution that enables the practitioner to use digital SLR cameras to easily record findings as viewed through the VELscope. The package consists of a set of adapters that allow for a direct connection between your camera and your VEL-scope, a simple set of camera setting instructions, and image-processing software that allows the dark images to be screen rendered in similar fashion to how they were viewed through the VELscope. On a personal level, having put the VELscope through its paces in my office, I found it easiest to view and study findings on a monitor after having captured the image with my SLR. When paired with my Canon 40D, the VELscope generated clear images suitable for case documentation. Note: The Rebel XTi is also capable of enhancing the use of the VELscope, offering an ISO setting of 1,600 in similar fashion to the 40D. ISO settings reflect the camera’s light sensitivity. The higher the ISO setting, the less light needed to generate an image (Figures 6 to 8).
CLEARMATCH SHADE-MAPPING SOFTWARE
 |
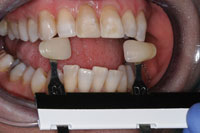 |
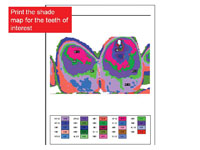
| Figure 9a. ClearMatch shade map. | Figure 9b. ClearMatch black and white reference with shade tab. |
If you have been longing for assistance in the shade-mapping department, and are already employing a digital camera in your practice, then half of the problem is solved. Clear-Match (Clarity Dental) is a shade analysis and communication tool for dentists and their labs. It is a software-only system that allows doctors to use their digital camera and existing PC to perform highly accurate analysis of shade, value, and anatomical features of teeth. One simply takes a photo with a shade tab and the included ClearMatch black and white reference target and then loads it into the ClearMatch software. The doctor then follows a simple instruction set with one’s mouse, and ClearMatch creates a shade map that can be printed and sent to the lab. All of the most popular shade-matching systems are supported so you need not change gears. I have used this system and can report that it works! For more information on this system and a brief presentation, visit photomed.net/clearmatch.htm (Figures 9a and 9b). As of this writing the system may be purchased for $1,695 and offers a trial package at an introductory price.
DIGITAL PHOTO TIDBITS…THE MISSING LINK
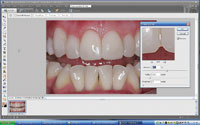 |
| Figure 10. Photoshop Elements Unsharp Mask tool. |
Many of you have already become adept at producing well-composed and exposed digital images of your patient’s dentitions. But there is one area that you may have overlooked, as had I for quite some time. I thank Dr. Greg Lutke of Texas (dental-solutions.com) for having pointed out that digital photos—despite the many million pixels being poured into them—may still lack the punch and clarity of a film-based image, unless they are digitally sharpened. While Dr. Lutke makes note of multiple methods to improve one’s digital images, the most dramatic might be the use of Adobe Photoshop Element’s (or Adobe Photoshop’s) Unsharp Mask tool. Ironically, the Unsharp Mask does just the opposite of what its name might indicate. The following settings seem to be ideal for dental images: amount=100%, radius=3 pixels, threshold=0%. Don’t worry what these values mean. Just open an image in one of the Adobe Photoshop products (Photoshop Elements 6.0 recommended here), go to the Image Enhancement drop-down menu, find the Unsharp Mask tool, Apply, and Save the change. You will be delighted at how the images come to life (Figure 10). This is not to say that other image management products do not have sharpening tools. In fact, a similar product by Corel, Paint Shop Pro XII, in addition to featuring an Unsharp Mask tool also offers a skin-smoothing tool as well as a teeth-whitening tool that lend themselves to portrait enhancement. This can be particularly useful when engaging in cosmetic simulations as part of a case marketing and case design approach. I often use these tools even when preparing images for upload to Smile-Vision for high-end cosmetic simulation and subsequent case presentation (smile-vision.net). No one has ever complained that they looked too good!
NEW AND NOTABLE
Yes, you can send your images from camera to PC wirelessly, thanks to the new Eye-Fi, a wireless memory card, if you have a digital camera that uses SD or SDHC flash media (Nikon and soon the Canon EOS Rebel XSi). Also, if your PC is part of a wireless network, the Eye-Fi will automatically upload images to your PC to whatever folder you tell it to. Simply by place the camera in range of the wireless network, and be sure your camera is turned on. The Eye-Fi appeals to me in that it can automate the image transfer process while you are talking to your patient, having just taken photos, as opposed to uploading and cataloging manually. As an aside, there is the wow factor, as in, “How did you get those images on screen so fast, doc?” For more information, visit eye.fi.
THE CARE AND FEEDING OF YOUR OWN WEB SITE
If you have felt that launching a Web site was out of reach due to cost and difficulty, your ship has arrived. ProSites (prosites.com) offers point, click, and launch ease. Preformatted Web sites (more than 40 designs available) with preloaded content are ready to go. All you do is upload whatever digital photos you would like to add, along with office specific information (location, fees, services offered, etc). Our office recently enrolled in the ProSites program, allowing us to upload digital images of casework, staff, and even a virtual tour of our office. The basis for Pro-Sites’ capability is a sophisticated yet easy to use online editor that allows the site owner to add and subtract content quickly and intuitively. All the formatting is done for you on the fly, and you can preview the changes before taking them live. What a great way to put your digital camera investment to work! You’ll be surprised at how affordable this is. If you don’t think you need a Web site, think again. Check out our Web site at wolcottsmiles.com.
NOT SO NEW, BUT NOTABLE
 |
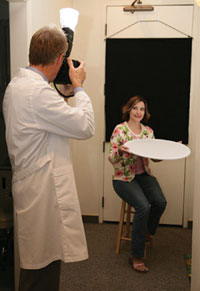 |
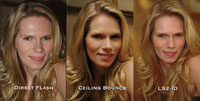
| Figure 11a. Portrait kit lighting effect. | Figure 11b. PhotoMed’s “Quick & Easy” Portrait Package. |
The PhotoMed “Quick & Easy” Portrait Package, although mentioned in last year’s photo update article, is worth mentioning again just in case you missed it. This 3-piece ensemble (if purchased as a package) includes a custom flash diffuser for softer facial lighting, a unique nonreflective black background, as well as a collapsible silver/white 22-inch reflector. To make a long story short, your patient portraits will bear a professional look owing to the absence of flash hot spots on your patient’s faces and a non-distracting background. Let’s face it, lighting is everything when it comes to photographing people’s faces. Most appealing about this kit, developed by Drs. James Dunn and Richard Young, is that the set-up takes no additional office space and the diffuser may work with a flash that you already own (Figures 11a and 11b). For more details, go to photomed.net.
ARE ALL DENTAL MIRRORS ALIKE?
 |
| Figure 12. Doctorseyes occlusal mirror. |
Well, yes and no! Quite accidentally I was acquainted with Doctorseyes Ultrabright mirrors (doctorseyes.com). I liked them for 3 reasons. They have a built-in handle with a removable silicone grip and are anatomically shaped to help capture those tough areas, such as the upper second molars. Best of all, they seem to be considerably brighter than the average mirror. Yes, they cost twice as much as the more commonly encountered mirrors (around $80), but once you use one, you will understand why (Figure 12). For more information about them, visit the Doctorseyes Web site. To obtain Ultra-bright mirrors in the United States, contact J.L. Blosser at (800) 200-3594 or (816) 781-3206. The No. 13 occlusal mirror is highly recommended.
CONCLUSION
As you can see, purchasing a digital photo system is only just a start. As your skill and knowledge grow, you will seek and find new uses for digital photography and new gadgets to help you accomplish them. You will also note that there are many portals to beginning the process. If you start small, and it takes hold, don’t hesitate to avail yourself of higher-end equipment and accessories. Such investments will provide both monetary and professional return with increased satisfaction. Improved images will not only enhance your patient communication skills, but also lend greater personal conviction to the restorative process. There’s no time like the present. Get going!
Dr. Goldstein, a member of the International Academy of Dento-Facial Esthetics, practices general dentistry in Wolcott, Conn. Recognized as a Top Clinician in Continuing Education by Dentistry Today for the past 5 years, he lectures and writes extensively concerning cosmetics and the integration of digital photography into the general practice. A regular contributing editor for Dentistry Today, he has also authored numerous articles for multiple dental periodicals both in the United States and abroad. He can be reached at martyg924@cox.net. His current speaking schedule can be found on his Web site, drgoldsteinspeaks.com.
Disclosure: Dr. Goldstein is an international consultant for PhotoMed.