Another year has gone by since our last peek at several digital photo outfits deemed appropriate for dentistry. If you took the plunge within the past 12 months and purchased one of the outfits discussed last May, fear not. Your equipment, even though replaced with newer models, will perform admirably for years to come. Yes, megapixel counts are up and LCD screens have become larger and easier to view, and in some instances design quirks and bugs have been worked out or improved upon. For the most part, however, this year’s image quality is consistent with that of last year’s models.
If you are currently in the market to purchase or upgrade a digital photo system for your office, choices abound, but I will caution you on two very important points. First, do not mistake off-the-shelf digital cameras as dental-ready systems. While some of the parts may be the same as those sold by dental photo specialists, they are not system integrated to the extent that they will be consistently functional. Second, please understand that the equipment you select is as critical to the process as the actual photo techniques themselves. Buy the right equipment from a reputable dental photo dealer who properly sets up the camera for you, and dental digital photography becomes akin to shooting fish in a barrel. You can’t miss!
When it comes to single lens reflex (SLR) systems, dealers such as PhotoMed, Norman Camera, Lester A. Dine, Calumet Photographic, and Clinipix (to name but a few) have been doing this for years, and they know how to piece together integrated camera systems based on the latest camera bodies from Canon and Nikon. Along with companies like Kodak, they may also have managed to equip the smaller point-and-shoot digital cameras with proper macro lens and flash attachments, making them dental ready at entry-level prices. That said, let’s take a look at a few newer entries in both the SLR and point-and-shoot categories. I will follow this with a little bonus in the form of a streamlined approach to more professional-looking patient portraits. As will be explained later, this ability can help you quickly “recoup” your digital photo equipment investment. Let’s begin.
THE SLRS: WHAT A BODY!
Dental photo systems are unique in that they require a lens that allows us to move in close (a macro lens) and a light source that is close enough to the lens so as not to cast shadows on the subject (a ring light or something similar). The macro lens most commonly employed in dentistry is typically a 100-mm to 105-mm macro lens. The cost of this component can impact the bottom line by as much as $400. If a Canon body is matched to a Canon lens (my preferred configuration), then the system will typically cost more, owing to the higher-priced lens. Contrast this to a system configured with another lens such as Sigma’s 105-mm macro lens. Optically, image quality between a Canon and a Sigma lens is indiscernible. Ease and speed of focus (particularly autofocus), however, are optimized in a full Canon setup. Those wishing to pocket the difference in cost, however, will not be disappointed with the less expensive lens. As mentioned, side-by-side results are, for all practical purposes, identical.
Latest Entries From Canon And Nikon
 |
 |
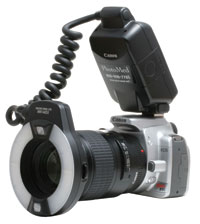
| Figure 1.The Canon Rebel XTi shown with Canon 100-mm macro lens and MR-14EX ring flash. |
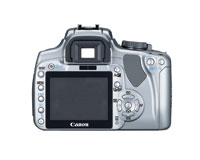
Figure 2. The new, larger LCD on the Canon Rebel XTi. |
 |
 |
|
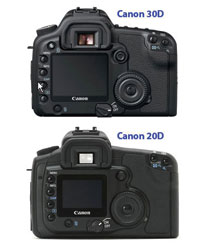
Figure 3. Comparing the Canon EOS 20D and the 30D. |
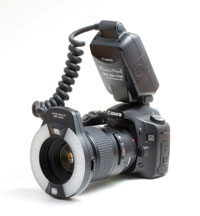
Figure 4. The Canon EOS 30D with Canon lens and ring flash. |
 |
 |
|
Figure 5. Similar body size and shape in the Canon Rebel XTi and Nikon D40. |
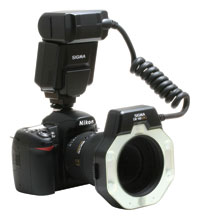
Figure 6. The Nikon D80 with Sigma lens and flash: an economic setup. |
Those familiar with the Canon Digital Rebel should know that its latest version is the Rebel XTi. The new XTi gets an increase in resolution over the XT (10 megapixels versus 8 megapixels) and a new, larger LCD screen on the back of the camera. Canon has increased the screen size from 1.8 in to 2.5 in and the screen resolution from 115,000 pixels to 230,000 pixels. Canon also eliminated the separate camera settings display and now uses the full LCD monitor to show you the camera settings and for playback. Canon designed the Rebel XTi to be compatible with most of its EOS 35-mm camera accessories, including the MR-14EX macro ring flash. This allows evaluative through-the-lens (ETTL) metering for automatic exposure. In manual focusing mode you set the magnification and f-stop and move toward the subject until it is in focus. The XTi handles the rest. Alternatively, autofocus can speed the process, so long as you are willing to accept less consistent levels of magnification and illumination. This occurs as a result of the varying camera-to-subject distances allowed when using autofocus. In everyday practice I lean toward autofocus, as it speeds the photo process. It helps to know how to do it both ways (Figures 1 and 2).
Those Canon owners who purchased the EOS 20D are likely aware of the newer 30D. The chief differences would be an increase in LCD size to 2.5 in from 1.8 in, and like the XTi, screen resolution has increased to 230,000 pixels, making for a crisper, easier-to-view display. Almost everything else stays the same (Figures 3 and 4). The 30D is about 25% larger and heavier than the XTi. If the intended user has large hands, the 30D might be a better fit from an ergonomic standpoint. The XTi’s diminutive size and less-than-robust grip can make it difficult to hold for those with big hands. I would suggest holding each in a consumer electronics store to get a feel for the difference. If cost is a factor, consider that the XTi equipped with a Sigma lens averages about $400 less than a comparable 30D with the same lens. Excellent system price comparisons can be found at photomed.net. Both camera systems are outstanding instruments and will not be outgrown.
Nikon, formerly relegated to second place with respect to the “ease-of-use” category, has elevated its status with its D40, D80, and D200 models. Physically, the D40 most resembles the XTi in size and shape, yet it houses a 6-mega-pixel sensor compared to the XTi’s 10-megapixel sensor. When equipped with a non-Nikon lens such as the Sigma, it becomes the lowest priced SLR dental system on the market. Please note: unless you are using the Nikon AF-S 105-mm VR macro lens, autofocus is not available. The user must rely solely upon manual focus. This could pose a drawback for some.
This takes us to the D80, a mid priced model that is perhaps the best Nikon fit for dentistry both from its price position and its capabilities. The D80 is similar in size to the Canon EOS 30D. It im-proved upon its predecessor, the D70, via a larger screen and increased pixel count (from 6 megapixels to 10). Most importantly, it has capitalized on the same ETTL approach taken by Canon in that the D80’s flash metering automatically adjusts the flash output for a correct exposure, even when used in autofocus mode. The D80 can be equipped with a Sigma macro lens and Sigma ring flash to keep the price tag down. As of this writing, it weighed in just above the $2,000 range, as compared to the XTi, which comes in just below the $2,000 range. In this user’s opinion, the Canon XTi and the Nikon D80 hit the digital dental sweet spots in so far as SLRs are concerned. The blend between cost and features seems to be ideal (Figures 5 and 6).
THE POINT-AND-SHOOTS
There’s something to be said for a dental camera that can easily double as a compact weekend camera, or at least one that does not require a lunch box-sized case, as does the SLR family. That’s where the point and shoot cameras come in handy. They are smaller, lighter, cheaper, and, some say, less apt to frighten a staff member called into service to be the office photographer. Having recently attended the Chicago Midwinter meeting and spent some time with the latest models, I have some suggestions if this is the route you wish to go.
The Canon
 |
 |
|
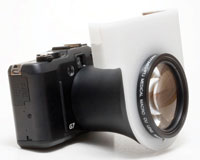
Figure 7. The Canon PowerShot G7 with PhotoMed macro/flash attachment. |
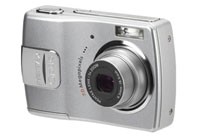
Figure 8. Lester A. Dine’s answer to the sub-$1,000 digital outfit: the Pentax Optio M20. |
Canon models PowerShot G7 and A640 become outstanding dental cameras when equipped with PhotoMed’s custom macro diffusers. While the G7 is the more expensive of the two, I was quite taken by it. The look and feel are pleasantly retro. The screen resolution and size, as well as camera responsiveness, make the G7 a standout. It, too, features 10 megapixels as well as a 6x optical zoom. As of this writing, the G7 PhotoMed kit drops your investment to just less than $1,600. The A640 kit will get you as low as $1,400, and it features a 10-megapixel sensor and a 4x optical zoom. Either outfit will capture wonderful images, indiscernible from their SLR cousins. The “sacrifices” made are that these cameras are manually focused with an “autofocus” assist, and you must frame and compose via the camera’s LCD. This process, while easily mastered, does possess a short learning curve. You should also know that the point-and-shoots in general will make capturing posterior shots, where you seek to capture just a few teeth (for example, an intracoronal fracture), more difficult than if the same shot is taken with an SLR (Figure 7).
Kodak’s Entry
Kodak’s latest entry, the P712 Dental Digital Photography System, features a 7.1-mega-pixel point-and-shoot that is equipped with an upgraded macro lens and lighting device that emulates a ring flash by harnessing the camera’s on-board flash. Again, it relies upon a distancing cord and several camera presets to frame the subject. The camera remains perched on a printer/charger when not in use. This system’s strong suit is its recipe-based photo techniques, positioning it best for auxiliaries having little experience. A convenient manual with an easy-to-follow flow chart will assist staff members in dialing the proper settings for the desired shot. Be advised, however, that indirect imaging, such as is done with a mirror, is less predictable with this type of system, attributable to the distancing cord needed for positioning the camera. Still, for the doctor possessing no desire to get involved in the photo process, the P712 may do the trick. It weighs in at approximately $1,600 to $1,700. For a more complete description and image, go to Kodak’s Web site (kodak.com) and look under the “Medical and Dental Imaging” tab.
The Sub-$1,000 Solution
Yes, Alice….there is a digital camera system for less than $1,000. Actually it’s $995 and is sold by Lester A. Dine (dinecorp.com), and is centered around a small Pentax Optio M20 camera (Figure 8). In kit form, the user will find an imaging software package, Dine’s Pixelease, and most of the items associated with dental digital photo kits. Dine claims to have modified the camera internally for den-tal purposes, but it is not specific on how it’s accomplished this. I’ve played with the camera and can report that it works surprisingly well. While not necessarily the best choice for the doctor wishing to maximize his dental photography potential, the Dine Digital Solution might be well-suited for the newbie on a tight budget wishing to get the ball rolling.
BONUS: ADVANCED PORTRAITURE MADE SIMPLE
 |
 |
| Figure 9. Preoperative portrait. | Figure 10. Smile Vision simulation based on Figure 9. |
 |
 |
|
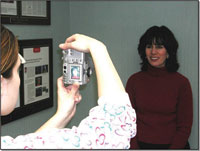
Figure 11. Six feet away and perpendicular to the face for consistent portraits. |
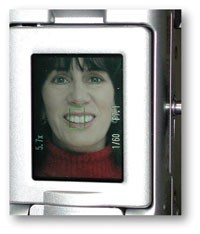
Figure 12. Be sure to focus first on the teeth. |
Why are portraits so important? Portraits enable simulations (smile-vision.net), which not only assist us in getting our patients excited about treatment but also assist us in case design…that is, making the smile fit the face. Needless to say, the better our portraits, the better they are received by our patients and the more useful they are to a simulation artist (Figures 9 and 10).
First I’ll summarize basic technique in the bullets below:
- Distance from subject: 6 to 8 feet from patient; zoom in to fill up the LCD.
- F 5.6-6.7
- Camera turned vertically. (As images will be recorded sideways, you’ll need to upright them via the “rotate” command.)
- Lens perpendicular to the nose.
- Focus on the teeth, then lift camera to center the face.
- Lock focus before fully pressing the shutter release button (halfway press).
- Instruct your patient to say “Hieeeee” and sustain it to initiate a smile.
- Steady as she goes: count 1…1,000 after you hit the shutter release.
- Check for little, white focus points in the eyes and teeth in the LCD to make sure your shots are in focus.
- Take at least 6 shots so as to choose the best one (Figures 11 and 12).
 |
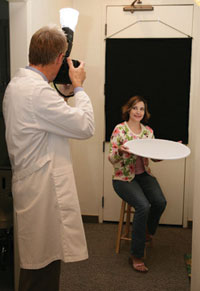 |
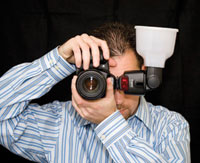
| Figure 13. PhotoMed’s Lightsphere II Portrait Diffuser. | Figure 14. A mini studio with PhotoMed’s “Quick and Easy” Portrait Package. |
 |
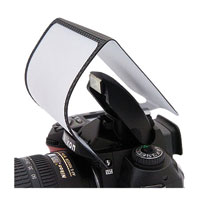 |
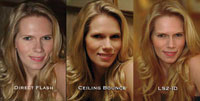
| Figure 15. Best lighting seen on far right with the Lightsphere II Portrait Diffuser (LS2 ID). | Figure 16. LumiQuest’s Soft Screen diffuser perched atop a Nikon camera. |
To make your portraits look professional, diffuse and bounce your flash. This will eliminate unsightly shadows and facial glare. The easiest way to do this is with a flash diffuser, reflector, and nonreflective background. Photo-Med’s “Quick and Easy” Portrait package is a short route to this end (Figures 13 to 15). Putting this package to use has dramatically improved the quality of my portraits. This approach requires only a free wall space to hang the black backdrop. This portrait method takes but a few minutes when set up and ready to go. It is not complicated! Here’s the catch: You must remove your ring flash and replace it with a standard flash such as the Sigma EF 500DG ST flash or one of Canon’s or Nikon’s hot shoe-mounted flashes in order to mount the flash diffuser. This can admittedly be a nuisance. Upon using this system, however, I became so enamored with the results that I now refuse to take portraits any other way. To streamline the process, I purchased an additional Canon Rebel XTi system (substituting the Canon’s Speedlite 430 EX flash instead of a ring flash) that is always ready for portraits, diffuser in place. I just pull the Compact Flash card from my intraoral setup and pop it into the portrait camera, and I’m ready to go. Yes, this ups the ante, but the convenience factor makes up for it.
There are less expensive flash diffusers such as the one shown in Figure 16 by LumiQuest. The LumiQuest Soft Screen is mounted in front of the camera’s on-board flash. It will diffuse the flash but not bounce off the ceiling as effectively (lumiquest.com).
Software Enhancements
 |
 |
| Figure 17. Portrait seen pre-Canon Easy-PhotoPrint facial smoothing. |
Figure 18. Portrait seen after the “digital facial” with Canon’s Easy- PhotoPrint. |
Here’s the crowning touch. If you own a Canon ink jet printer, you have access to its Easy-PhotoPrint program, either on the printer’s disc or online at canon.com. This printing utility, functional only with Canon printers, contains a skin-smoothing tool that has to be seen to be appreciated. With one or two clicks, your patient’s skin is selectively “touched up” and smoothed in a very professional manner. It’s amazing. I use this approach when presenting simulations and have never had patients complain that they looked too good! If you don’t have a Canon printer, imagenomic.com offers a Photoshop/Photoshop Elements plug-in for enhancing portraits that does the same and more. You’ll just have to pay $169 to own the program. For that amount, you can buy a new Canon printer (Figures 17 and 18)!
CONCLUSION
OK…You’ve been updated. The new gear is great! Bear this in mind: If you wish to become more involved with anterior dentistry, there isn’t a better way to jump-start the process than becoming more proficient at portraiture and its “offspring,” cosmetic imaging. If you need more info, just drop me an e-mail or come to one of my photography presentations.
Dr. Goldstein practices general dentistry in Wolcott, CT. He lectures and writes extensively concerning cosmetics and the integration of digital photography into the general practice. A regular contributing editor for Dentistry Today, he has also authored numerous articles for multiple dental periodicals both in the United States and abroad. He can be contacted at martyg924@cox.net or at (203) 879-4649. His current speaking schedule can be found at the following Web sites: drgoldsteinspeaks.com or dentistrytoday.com.


