INTRODUCTION
It is time for Dentistry Today’s annual dental digital photography update, and I have wonderful news! If you’ve purchased a digital dental camera outfit within the last 2 to 3 years, it’s NOT obsolete yet. You may be missing a few bells and whistles but, for the most part, the digital dental camera systems of today bear a close resemblance to the systems that I reviewed last year (and the year before that!) Nice, for a change, isn’t it? However, there are a few new models and added conveniences to be identified, and I will do so shortly. In addition, I’ve been exploring some new software packages that can actually turn your camera system into a return on investment item as opposed to remaining an expensive dust collector. We’ll take a peek under the hood at those packages as well. And finally, as an added bonus, I’ll offer some technique tips regarding the practical use of your camera system. This edition will feature some thoughts regarding your everyday shade-taking responsibilities and how to be more effective at this important task. There’s much to cover, so let’s dive in!
THE CAMERAS
 |
 |
|
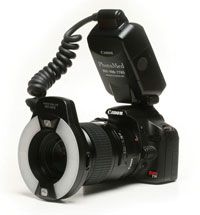
Figure 1. PhotoMed setup of the Canon EOS Rebel XS digital single lens reflex (DSLR) camera system. |
Figure 2. Lester Dine configured Nikon D3000 outfit. |
 |
 |
|
Figure 3. PhotoMed setup Canon EOS Rebel T1i DSLR system. |
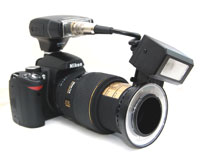
Figure 4. Lester Dine configured Nikon D90 outfit. |
When shopping for a new digital camera system, it’s clear today that the Internet is king. This is particularly true with respect to dental outfits, since Best Buy does not feature a “for dentists only” section in its camera department. PLEASE make no mistake; it is unwise to purchase a system from an off-the-shelf retailer unless you really know what you are doing. Dental camera outfits are best supplied by those companies and representatives who specialize in providing systems for dentistry, since the components are matched and set up according to our specific professional needs. In that vein, I will point you in the direction of the dental system Web sites like dinecorp.com, normancamera.com, dlcenters.com, or photomed.net, for example. With regard to Web site quality, whether you buy from PhotoMed or not, their Web site deserves an award for its ease of navigation and content. Multiple dental camera systems from the major players (Canon and Nikon) are presented and compared with one another in wonderful detail without any sales hype.
I’ll make no bones about it. While I own and use both Nikon and Canon systems, I remain a Canon groupie. I’ve just never been disappointed by Canon performance/innovation and have thus remained loyal to the brand. That being said, there are Canon-based outfits available to suit most any budget. For the total newbie, DSLR means digital single lens reflex camera. These cameras feature 3 main components: a camera body, lens, and flash unit. Conversely, point-and-shoot cameras are all-in-one solutions that are often modified by the addition of a macro lens attachment.
Because PhotoMed’s Web site is so thorough in its presentation of specs on camera systems, I will refrain from any detailed outline of which gizmo has what. Instead, I’ll act as a “matchmaker.” Your ultimate choice in a system should not be dictated by your level of expertise, but rather by what you are comfortable spending. More expensive systems are not harder to use. They simply offer higher end capabilities that often become appreciated by the owner as one’s level of expertise grows. Higher priced systems are generally accompanied by more megapixels, higher resolution, larger viewing screens, high-end image processing chips, and more “convenience buttons” on the outside of the camera as opposed to being buried within an internal menu system and added video capability (now in high definition [HD])! These features certainly add value, but the truth is, most dentists can do just fine with entry-level camera systems.
For the Budget-Minded
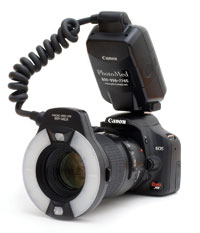
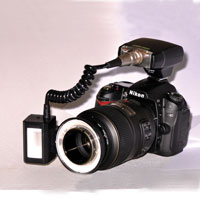
As of this writing, the baseline investment for a very capable dental DSLR system has leveled off at about $1,600. Two 10-megapixel systems are based on the Canon Rebel XS and the Nikon D3000, paired with a Sigma 105-mm macro lens and ring flash system. As of this writing, PhotoMed offers a Canon Rebel XS based system with a Sigma lens and flash for $1,599, while Lester Dine (dinecorp.com) offers a Nikon D3000 system that features its own proprietary flash system possessing both a ring flash and point source flash. Currently, it sells for $1,645 (Figures 1 and 2). Neither system features video capability, which will not be missed clinically unless you want to use your DSLR to record through an operating microscope. If that is the case, read on.
One key point is important when considering either of these 2 systems. When used with the Sigma lens, the Canon system will allow the use of autofocus (AF) when taking pictures. The Nikon will need to be used in manual focus (MF) mode only. (MF requires the photographer to move the camera physically to and from the subject to obtain a sharp image. With AF, the camera automatically moves the glass within the lens body to produce a sharp image.) If a Nikon lens is purchased instead of the Sigma lens, then the Nikon can be used in either the MF or AF mode. The advantage of AF, at least in this author’s opinion, is simply speed and ease-of-use. I would also like to point out that while the lower cost Sigma macro lens is a more than adequate substitute for a matched Canon or Nikon camera body and lens, if you plan on using AF frequently, it pays to upgrade to the matching 100 mm macro lens for each manufacturer, respectively. Yes, this will up the ante several hundred dollars, but the ease of use will more than justify the added expense.
Moving Up
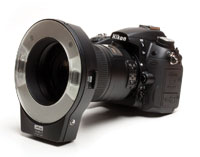
For those willing to crack the $2,000 barrier, take a look to Canon’s Rebel T1i/T2i (the T2i just being released as of this writing), or Nikon’s D90. Again, baseline packages feature the Sigma 105-mm macro lens with PhotoMed; including Sigma’s EM-140DG Macro Flash System, and Dine offering its combination mini-flash (Figures 3 and 4). For the extra dollars, you get: HD video capability, higher resolution, larger view screens, and more megapixels—just as you’d expect. The same caution holds true again, with respect to AF capability, as mentioned above. To go deeper into the specifications for each system, just visit one/all the Web addresses mentioned previously.
For the Connoisseur
 |
|
Figure 5. Canon EOS 7D. |
The just-released Canon EOS 7D is a 18-megapixel semi-pro DSLR that also shoots 1,080p HD video at 30 frames a second. It has all the bells and whistles that you might ever need, and it comes in a form factor that mirrors Canon’s well-known 50D. The 7D body itself sells for just under $1,900. Your final system cost will depend upon what lens and flash with which you equip it. Be aware that Canon now offers high-resolution lenses that can accompany their high-end camera bodies. They are said to have superior optics to what has been typically offered. “Yours truly” plans on scoping out this system sometime this year…it has “Marty” written all over it. Nikon’s D300s would be Canon’s closest competing Nikon body for those of you who live in the Nikon camp and wish to remain there. Microscope users: Heads up on either model (Figure 5)!
Point-and-Shoot Practicality
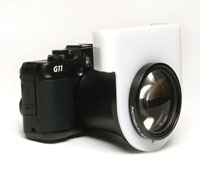
For those who really do not want the complexities involved with a DSLR system, there are 2 point-and-shoot systems that I currently own and operate. The Canon Powershot G10, equipped with PhotoMed’s macro-lens attachment, offers DSLR quality with point-and-shoot ease-of-use. While this is truly a MF system, the camera’s AF will kick in to assist in the final focusing. A slight learning curve will yield excellent results. The latest model, the G11, offers modest changes that don’t have much to do with dental usage. When equipped with the PhotoMed attachment, the G11 prices out similarly to the entry level DLSR systems discussed above, so you wouldn’t buy this system to save money. Instead, you’d consider buying it because you like the familiar form factor, and it’s easy to convert it for use as a recreational camera. Once you take off the macro attachment, you have an impressive travel camera (photomed.net) (Figure 6).
 |
 |
|
Figure 6. PhotoMed equipped Canon Powershot G11 point-and-shoot system. |
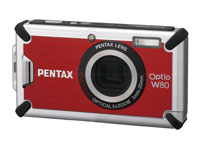
Figure 7. Pentax Optio W80 as part of Lester Dine’s Digital Dental Solution system. |
The second system would be Lester Dine’s (dinecorp.com) Digital Dental Solution, currently based on Pentax’s 12 megapixel Optio W80. This is a pocketable, shockproof, waterproof point-and-shoot solution that is modified by Lester Dine. It allows the practitioner to take effective intraoral and extraoral shots with surprising quality and ease. The baseline kit weighs in at $795 and includes all of the gizmos that you need to get up and running. The Optio W80 can provide surprisingly good images; however, it does have its limitations with respect to resolution and color detail. Consider it a great show-and-tell solution. In our office, these cameras are found in our hygiene rooms instead of intraoral video cameras. Our hygiene team uses them on a daily basis to generate on-the-spot prints, allowing patients to see what needs to be “fixed” (Figure 7).
I think you have enough to get you started in the camera department. As mentioned before, not that much has changed since last year that would really impact what we do. The good news is that a startup DSLR system that used to cost $2,000 now can be had for $1,600. Now that’s progress!
SOFTWARE EXTRAVAGANZA
We all know that our digital camera systems are essential tools for augmenting our patient exams and documenting what we do. The next level of utility no doubt has to do with using our camera systems to augment our bottom lines. Very few dental gizmos that we pour our hard-earned dollars into have more potential to increase our practice production than creative use of a digital camera. To that end I’d like to present 3 software packages that deserve your attention.
ImageCentrik Patient Presentation Software
ImageCentrik (IC) might be “just what the digital doctor ordered.” It is brought to us by Dental Learning Systems, who also happen to market a tidy little dental photography kit (DentalFoto) as well, based on the Canon G10 previously discussed. IC is the new kid on the block. In a nutshell it’s patient and lab presentation software. If you can imagine taking a program as complex as PowerPoint (Microsoft) and one as tricky as Photoshop (Adobe), merging them and at the same time simplifying the use of each for dentistry, then you’d begin to have an idea of what IC is all about.
 |
 |
|
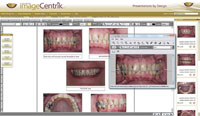
Figure 8. ImageCentrik Patient and Lab Presentation Software (desktop screen shot). |
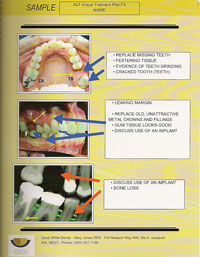
Figure 9. Sample of ImageCentrik printout. |
What truly distinguishes IC is its all-in-one approach to presenting patients with images of their dentition. The stroke of genius is the ability to drag and drop your patient images into one of several preset formats (or one that you design yourself) and edit the images from within the presentation to make your images look their best. This includes cropping, changing brightness and contrast, straightening, and mirror image flip-flopping…to name a few. These are essentially the basic tools that we need as dentists to quickly edit our less-than-perfect images. Annotations and text boxes allow you to highlight areas that need attention. Finally, and most importantly, the user may print the presentation out for your patients to take with them. What better way to bring your point home? For a demo of IC, visit dlcenters.com (Figures 8 and 9).
SNAP Instant Dental Imaging
 |
 |
|
Figure 10. SNAP Dental Imaging Diastema closure. |
Figure 11. SNAP Dental Imaging Veneer case simulation. |
 |
|
Figure 12. Dental GPS screen shot. |
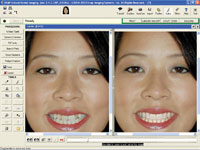
Most who read my articles already know that I am a fan of cosmetic imaging to design and market smile rehabs. You may also know that I consider Smile-Vision the last word in dental simulations with respect to accuracy and have used their services for many years with great success (smilevision.net). However, I have always wanted the ability to generate instant simulations of good quality without having to spend much time doing it, in attempts to spark patient interest in spontaneous fashion. I recently decided to purchase SNAP and take them up on their money back guarantee if I wasn’t satisfied. As it turns out, the software is top notch, does what is says it will do, and is incredibly simple to use. After a few short video lessons, you can generate smile simulations and tooth repairs that are remarkably good. You can also simulate whitening and diastema closure with incredible ease. Where this approach fits into my practice is simply to garner patient interest. Once a case is launched, I still enlist Smile-Vision to assist in the final smile design on a tooth-by-tooth basis. The 2 system approaches complement one another. For more information, you can visit snapdental.com (Figures 10 and 11).
Dental GPS
I was recently introduced to Dental GPS by its Canadian developer, Dr. Alain Methot, at the Chicago Dental Society’s 2010 Midwinter Meeting. It too is a simulation program, but it also goes beyond that. At its highest level, it can generate a virtual wax-up that a dental laboratory technician can follow to build your case. At a simpler level, it can assist you in designing a new set of dentures for your patient, or can simulate whitening. The level of control and accuracy exceeds any software that I’ve yet to witness. It is sold in modular fashion with an Internet-based component. In my opinion, it is reasonably priced to get started, given its level of sophistication. While I avoid superlatives, I was very impressed by what I saw. To learn more, please visit the Web site gpsdentaire.com. Dental GPS may deserve an article of its own once I’ve thoroughly familiarized myself with the content. I consider it to be a groundbreaking tool for the serious aesthetic dentist (Figure 12).
PRACTICAL DENTAL PHOTOGRAPHY: SHADE-TAKING BASICS
As promised, here are some basics regarding use of our cameras for shade-taking and surface-characterization documentation.
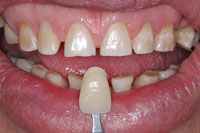
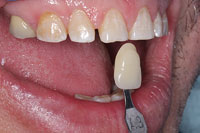
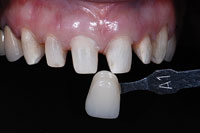
- Hold the shade tab in the exact same plane, distance, and orientation as the tooth you are trying to match so that the light from your flash hits both surfaces the same.
- Include a shot with 2 shade tabs next to the one to be matched and the 2 closest shade tabs you can identify, one on each side of the tooth.
- It is sometimes helpful to moisten the surfaces of the shade tab and tooth with the same medium (water or glycerin) to neutralize the way light hits each surface, particularly with teeth that feature uneven surface contours.
- Take your shade and surface characterization shots at the beginning of your procedure. Tooth dehydration at the end of the visit will render inaccurate shade taking.
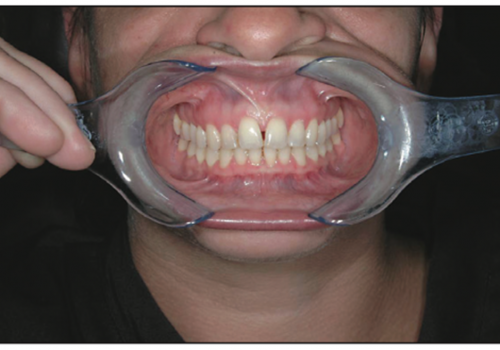
- When using a ring flash, be sure to include a shot of your tooth that is taken from an off angle (65°). This will help to demonstrate surface texture. In addition, this will eliminate the bright white reflection of the ring flash on the tooth surface that often makes shade and surface identification difficult.
 |
 |
| Figure 13. Shade tabs held in same plane as teeth to be matched; 2 closest shades. | Figure 14. Note glare on centrals when using ring flash straight on. |
 |
 |
|
Figure 15. Note absence of glare and surface characterization when shot is taken at 65° off angle. |
Figure 16. Use of a black contraster (photomed.net) can enhance the shade taking process. |
 |
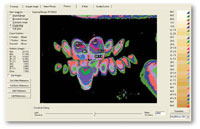 |
| Figure 17. PhotoMed’s R2 Dual Point flash bracket shown with Nikon R1 wireless flash units. | Figure 18. ClearMatch (Vipersoft) shade-mapping software screen shot. |
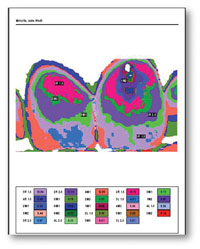 |
| Figure 19. ClearMatch shade map ready for printing. |
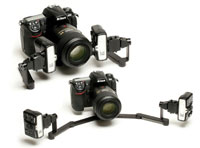
To expand on that last point I’ll make note that my shade-taking shots are no longer done with a ring flash. Instead, I use a dual-point flash source with an expansion bracket that moves the flash units off to either side of the camera. This arrangement nearly eliminates surface glare, and at the same time produces more depth and shadow detail in the image. This is where my Canon loyalty waxes. Instead, I use a Nikon D80 body with Nikon’s R1 wireless dual-point flash system. Combined with PhotoMed’s R2 Dual Point flash bracket, this system will generate a multitude of lighting effects and spot-on shade comparison shots free from reflective glare. Of course this approach has a higher price tag, but for those wanting to know, this is a common method used by a host of top shelf practitioners (Figures 13 to 17).
While we are on the subject, I would be remiss if I didn’t bring up another useful software package called Clearmatch (Vipersoft) that fits this discussion. For those not familiar with Clearmatch, it is a software package that converts your digital camera into the equivalent of a dedicated shade-taking device. I am happy to report that Clearmatch’s latest version allows the user to reduce what some deemed too detailed, to shade maps that include but 2 or 3 basic shades. Pricing (which is now very enticing) along with a detailed video demonstration can be found at photomed.net. I’ve used this package and it works (Figures 18 and 19)!
CLOSING COMMENTS
Let me leave you with words of encouragement to expand your usage of digital photography in your practice, and to give due consideration to harnessing some of the power of the software packages that I have highlighted in this annual update. Visit the included Web sites to get a clearer picture of what each offers…that’s the beauty of the Internet. Your efforts will likely be rewarded both on the fun side as well as the production side. Please understand that, when buying any of the camera systems outlined, you really can’t make a bad choice. They all work well. It’s really a matter of getting to know how your system works best, and getting enough practice with it to use it quickly and effectively. Not a day goes by in my practice where I am not taking digital photos of something…maybe you should do the same! Consider yourself updated! Over and out!
Dr. Goldstein, a Fellow of the International Academy of Dento-Facial Esthetics, practices general dentistry in Wolcott, Conn. Recognized as a Dentistry Today Leader in Continuing Education for the last 6 years and for his expertise in the field of dental digital photography, he lectures and writes extensively concerning cosmetics and the integration of digital photography into the general practice. Known also for his relaxed approach to restoring smiles and for being a contributing editor for Dentistry Today, he has also authored numerous articles for multiple dental periodicals internationally. He can be reached at martyg924@cox.net or visit his Web site at drgoldsteinspeaks.com
Disclosure: Dr. Goldstein reports no conflicts of interest.