INTRODUCTION
Modern restorative dentistry (MRD) relies on the protocol that all sound tooth structure should be saved during tooth preparation, and modern adhesive protocols should be utilized to restore form and function.1 Dentists have used many different tools to ascertain the presence of dental caries versus healthy/uninfected tooth structure including radiographs, tactile feel with explorers and excavators, and caries dye indicators. Defining new diagnostic and treatment strategies and related instrumentation that assists to identify carious lesions is consistent with the principles of MRD.
Dentists are adopting a more minimally invasive approach to restorative care, and as a result, patients are able to keep more of their tooth structure.2 Preservation of enamel vastly improves the seal of our adhesive restorations, and the preservation of dentin is critical to maintaining tooth strength.3 Therefore, the use of technology that allows clinicians to detect caries earlier will improve the lifespan of their patients’ dentition.
Processes focused on diagnosing early lesions with optimum sensitivity have employed laser, fluorescence, autoflorescence, image processing under magnification, and even electric current.4 Though these devices are readily available, their high cost and excessive variable sensitivity have prohibited their use on a daily basis.
LED TECHNOLOGY FOR CARIES DIAGNOSIS INTRODUCED
Now, there is a promising technology that offers the ability to detect tooth decay at different stages of its development with an accuracy that may often be missed by x-rays. The technology is based on the principle of fluorescence, where a specific wavelength of light shines on the tooth and is then reflected back in 2 basic colors: green when the dentin is healthy, and red when the dentin is infected. A device that combines high magnification intraoral imaging with fluorescence becomes a powerful time-saving tool for diagnosing and proposing treatment. The same device can then guide the clinician through the treatment of caries removal. This process has been named light-induced fluorescence evaluation for diagnosis and treatment (LIFEDT).
The SOPROLIFE Camera (ACTEON North America) is a new intraoral LED camera working as 2 devices in one; operating as an intraoral camera as well as a caries detection device. Patients who are routinely seen in hygiene and exam areas with the question in their mind, “Will my dentist find something today?” will find the diagnosis of early caries of asymptomatic teeth much easier to process. A moment of truth or trust issue at the time of this diagnosis can be much easier with this unique intraoral camera showing the patient through magnification the carious grooves and suspicious shadows of interproximal decay. An explanation of the fluorescence concept and reference colors facilitates a co-diagnostic experience.
For the dentist, use of the fluorescence mode becomes a treatment aid to differentiate diseased versus healthy tissue. Another benefit to using the SOPROLIFE camera is that a history of carious lesions can be documented, and changes in their development can guide treatment decisions. Instead of informing patients that you will “watch” this tooth, a pictorial reference is easily made into the patient record.
SCIENCE OF FLUORESCENCE AND AUTOFLUORESCENCE
Fluorescence is the emission of light by a substance that has absorbed light or other electromagnetic radiation of a different wavelength. Dental tissues have fluorescent molecules (fluorophores or fluorchromes) which absorb light, then emit the energy back as fluorescent light—this is called autofluorescence. This process was described by Banerjee, et al5 in 2000. It became the basis for a new method of diagnosing initial caries. Scientists and clinical researchers at SOPRO, a company specializing in dental imaging, found that a blue LED emitting light at 450 nm was able optimize the autofluorescence of the dental structures. The fluorescence signal reflected was extremely low intensity compared to the 450 nm intensity sent by the blue LEDs. By amplifying the fluorescent signal, a new level of tissue distinction could be made.
 Healthy dentin could be clearly discriminated from carious dentin as it fluoresced a bright green signal. The wavelength of the autofluorescence signal varies according to the density and chemical composition of the surface tissue and subsurface. The determination was made that that one of either the inorganic or organic constituents of healthy dentin that emits the acid-green fluorescence partially disappeared during the caries process; subsequently, a red fluorescence signal would appear. The autofluorescence technology allowed detection of early occlusal, even interproximal, decay.
(The process evolved into the patented technology used to develop the SOPROLIFE Camera.)
LED CAMERA OPERATION AND SUGGESTED USE
The camera has a magnification range of more than 50x. Using this magnification reveals anatomy far more precisely then visual and hand probing.6 The use of conventional probing has also been considered controversial based on the possibility of “inoculating” or transferring lesion contents.
The camera has 3 modes: the daylight mode, the diagnostic mode, and the treatment mode. The daylight mode has 4 settings which allow clear images for portraits, smiles, intraoral and macro views.
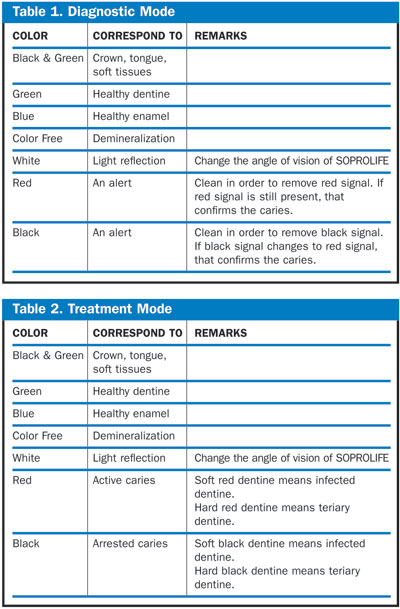
The diagnostic mode, labeled mode I on the images, filters out colors of the surrounding soft tissues of the mouth, rendering them black and white. It amplifies and displays in color the fluorescence signal response sent by the dentin. A healthy tooth appears white with a homogeneous green hue on top of it. The diagnostic mode is focused more on enamel. Differences in thickness of enamel as well as material deposits will affect the fluorescence response. Thicker enamel reduces the fluorescence response and gives a slightly blue image. Demineralized enamel gives a white, color-free response. Since demineralization is the first stage of the caries destruction, noting white colors can be very important.7
Significant amount of material deposits tend to give a black signal, which is considered an alert to clean the deposits and reassess the signal. Infected dentin gives a dark red autofluorescence signal. Incipient and evolving lesions magnified in the diagnostic mode tend to have mixed signal colors of red centers surrounded by black grooves and green islands. This is because material deposits shown as black can minimize the red signal of dentin caries.
The treatment mode, labeled mode II on the images, also filters out the surrounding soft tissues of the mouth, rendering them black and white. This mode also amplifies and displays in color the fluorescence signal of the dentin. The only difference in the treatment mode is that the red wavelengths are amplified more and the blue wavelengths are decreased. Carious dentin gives a red fluorescence signal so the amplified red color in the treatment modes assists in the excavation process—a photographic caries detector of sorts.
Tables 1 and 2 summarize the signal colors and their relevance to tissue characteristics.
METHODS AND MATERIALS
Clinicians continue to be confronted with how to identify carious tissue and when to stop the caries excavation process. The goal of these case studies was to evaluate a protocol using LIFEDT with the SOPROLIFE Camera for caries treatment decisions as to when to treat and to what extent the caries removal should be performed. In addition, we compared use of the SOPROLIFE camera in the treatment mode to the use of caries dye indicators with the assumption light evaluation could expedite the excavation process by eliminating the repetitive cycle of dye application and rinsing.
The protocol:
1. Initial observation of suspicious grooves, fissures, and shadows in the daylight, then diagnostic modes.
2. Fluorescence analysis and therapeutic decision with the diagnostic mode.
3. Radiographic evaluation/correlation.
4. Fluorescence assisted lesion removal in treatment mode.
5. Restorative treatment.
CASE REPORTS
The 2 cases presented in this article were chosen because the lesions were considered to be conservative in size and amenable to the direct composite resin restorative technique.
Case 1
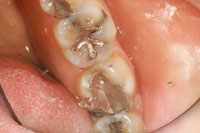
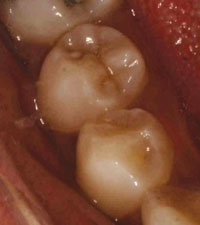
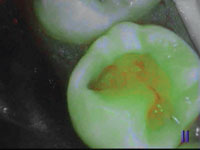
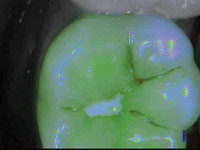
A 23-year-old female was seen in the hygiene clinic with the suspicion of occlusal caries of tooth No. 29. The SOPROLIFE light was set to daylight mode and the 30x to 100x magnification helped locate the areas of the lesion and established a need for treatment (Figure 1).
 |
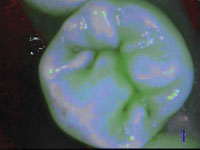 |
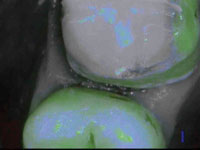
| Figure 1. Case 1: Preoperative magnified image of tooth No. 29 displayed to patient to demonstrate carious lesion. | Figure 2. Image in diagnostic mode. (Note the green and red colors indicating healthy and affected dentin, respectively.) |
 |
 |
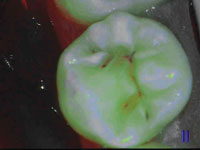
| Figure 3. Image in treatment mode, after initial penetration of enamel. |
Figure 4. Image in treatment mode, after water-assisted air abrasion. |
 |
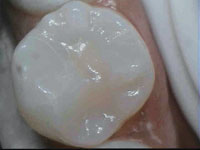 |
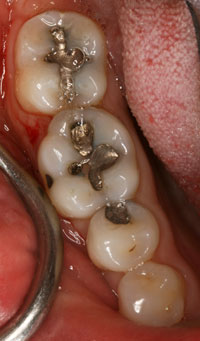
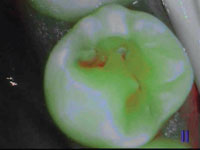
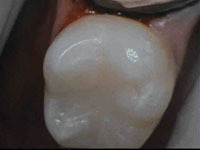
| Figure 5. Caries removal evaluation of final preparation, imaged in treatment mode. | Figure 6. Case 1: Tooth No. 29, the final restoration. |
The patient was placed in a restorative chair with the intent of performing minimalist preparation guided through the use of the SOPROLIFE light’s diagnosis and treatment mode. The camera was switched to the diagnostic mode and the infected dentin was imaged (Figure 2). A conservative tooth preparation was preformed with a fissurotomy bur (Micro STF [SS White Burs]) and water-assisted air abrasion (PrepStart H2O [Danville Engineering]). After initial enamel penetration, the caries excavation was monitored by switching the camera to the treatment mode (Figures 3 and 4).
The final conservative preparation (Figure 5) was selectively etched at the surrounding enamel for 15 seconds with 37% phosphoric acid. An adhesive bonding resin (G Bond [GC America]) was used on the enamel and dentin surfaces, followed by a liner layer of flowable composite resin (Gradia Direct Flo [GC America]) and a highly radiopaque composite resin (Gradia Direct X [GC America]). The final restoration can be seen in Figure 6.
Case 2
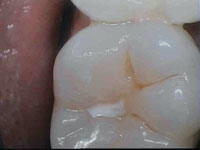
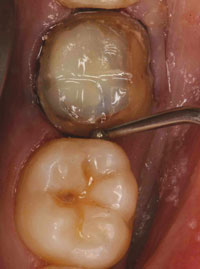
A 27-year-old pregnant female was seen for replacement of failed full coverage crown No. 18. Her caries risk assessment was rated low but the presence of an endodontically treated tooth suggested a “heightened” proactive caries management approach.
 |
 |
| Figure 7. Case 2: No. 19 preoperative image of suspicious occlusal groove. | Figure 8. Preoperative image of suspicious distal white and brown spot lesions. |
 |
 |
| Figure 9. Image in diagnostic mode. | Figure 10. Image of the distal surface was evaluated in diagnostic mode. |
 |
 |
| Figure 11. A conservative preparation was done using a safe-sided piezoelectric diamond tip. | Figure 12. Occlusal caries evaluation in treatment mode. |
 |
 |
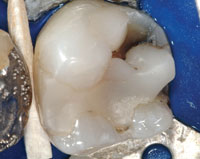
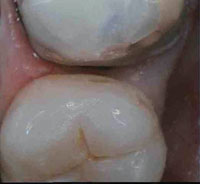
| Figure 13. Final caries removal evaluation in treatment mode. | Figure 14. Case 2: Tooth No. 19, the finished occlusal and proximal restoration. |
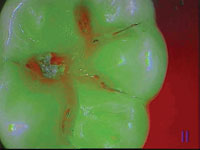
During the preparation process, the SOPROLIFE camera set to daylight mode on a macro setting illuminated suspicious occlusal groove anatomy on tooth No. 19 (Figure 7) as well as a suspicious proximal distal surface of tooth No. 18 (Figure 8). Switching to diagnostic mode fluoresced a red signal indicative of dentinal caries occlusally (Figure 9). The proximal surface’s fluorescence signal was white surrounded by green, indicative of enamel caries (Figure 10). There was an opportunity to conservatively prepare the distal surface without compromising the surrounding enamel or marginal ridge. A piezoelectric cavity preparation device (P5 Newtron [SATELEC, ACTEON North America]) was used with a safe-side diamond tip (Excavus [SATELEC, ACTEON North America]) (Figure 11) to ultrasonically prepare a conservative beveled slot on the distal enamel. The occlusal caries was conservatively removed using a fissurotomy bur, and the remaining caries was removed with a No. 6 round bur (SS White Burs) at low speed. The removal of infected dentin was monitored with the camera’s treatment aid mode (Figure 12); a diffuse red signal (Figure 13) revealed the end of infected dentin and the remaining dentin to be affected.
The prepared and unprepared enamel was selectively etched for 15 seconds with 37% phosphoric acid. An adhesive resin (G Bond) was used on the enamel and dentin surfaces, followed by a liner layer of flowable composite resin (Gradia Direct Flo). Then a highly radiopaque composite resin (Gradia Direct X) was used to finish the restoration. The final restoration can be seen in Figure 14.
DISCUSSION
Caries management cannot be based solely on the diagnostic modalities of examination, radiography, and LIFEDT. Caries risk levels should be assigned based on: diet/fermentable sugar intake, acid attacks, fluoride history, hygiene, and presence of existing lesions, to name just a few factors. In the cases described above, we used the SOPROLIFE camera to convey magnified images of suspected carious lesions to patients under white light in daylight mode. Then, we shifted to blue light images in the diagnostic mode and carried out the early caries detection process while maintaining communication with the patient. In addition, we correlated visual color diagnostic protocols that separated lesions into enamel caries, dentin infected caries, and dentin affected caries. Once the type of lesion was determined, the camera was used in the treatment mode to navigate the caries excavation process. The information provided by this new LIFEDT appeared to be very accurate and similar to other studies of this technology.4,8
CONCLUSION
It is the author’s opinion that LIFEDT technology shows great promise to improve the early diagnosis, education, and communication of dental caries, while expediting conservative caries removal thus preserving healthy tooth structure.
References
- Rosenberg JM. Modern restorative dentistry: anterior application. Inside Dentistry. 2009;5:112-114.
- Tyas MJ, Anusavice KJ, Frencken JE, et al. Minimal intervention dentistry—a review. FDI Commission Project 1-97. Int Dent J. 2000;50:1-12.
- Magne P, Magne M. Use of additive waxup and direct intraoral mock-up for enamel preservation with porcelain laminate veneers. Eur J Esthet Dent. 2006;1:10-19.
- Terrer E, Koubi S, Dionne A, et al. A new concept in restorative dentistry: light-induced fluorescence evaluator for diagnosis and treatment. Part 1: Diagnosis and treatment of initial occlusal caries. J Contemp Dent Pract. 2009;10:E086-E094.
- Banerjee A, Watson TF, Kidd EA. Dentine caries: take it or leave it? Dent Update. 2000;27:272-276.
- Erten H, Uçtasli MB, Akarslan ZZ, et al. Restorative treatment decision making with unaided visual examination, intraoral camera and operating microscope. Oper Dent. 2006;31:55-59.
- Featherstone JD. The continuum of dental caries—evidence for a dynamic disease process. J Dent Res. 2004;83(special issue C):C39-C42.
- Terrer E, Raskin A, Koubi S, et al. A new concept in restorative dentistry: LIFEDT—light-induced fluorescence evaluator for diagnosis and treatment. Part 2: Treatment of dentinal caries. J Contemp Dent Pract. 2010;11:E095-E102.
Dr. Rosenberg maintains a private practice in Philadelphia, Pa, emphasizing restorative and aesthetic dentistry. He is a Fellow of the AGD and holds associations with various restorative, aesthetic, and orthodontic organizations. Dr. Rosenberg has invented several dental devices and holds 8 patents in the dental field including the world’s first noninvasive full-arch periodontal measuring device, Perio Alert. He has published numerous articles in the areas of cosmetic dentistry, implant dentistry, and the use of computer imaging to assist in dental diagnosis and treatment. He can be reached at (215) 592-4747 or drjeff@philadelphiasdentist.com.
Disclosure: Dr. Rosenberg received complimentary use of the SOPROLIFE Camera from ACTEON North America.