INTRODUCTION
Chairside whitening has been a challenge due to time-consuming and inadequate isolation methods. When combined with the bleaching gels that were previously available, as well as the lights for chairside bleaching, most practitioners avoided doing chairside bleaching. They felt treatments were ineffective and uncomfortable for the patients during the lengthy time required by the process. Yet, patients seek immediate results and some do not wish to spend the time necessary to achieve results with at-home bleaching systems. The benefit of chairside bleaching is that average color change per appointment has been reported to be 2.1 to 3.7 units on a 16-scale VITA Classic shade guide (Vident).1
In general, the use of light activation of in-office bleaching agent does not affect the long-term results but increases efficiency in the short term.2 Color relapse has been reported when chairside bleaching has been utilized and this becomes apparent at 2 weeks post chairside treatment.1 To avoid this occurrence and maintain the results achieved chairside, it is recommended that the patient be given custom bleaching trays and home bleaching gel to be used 2 to 3 times weekly. This becomes especially necessary to maintain the results when the patient has activities that can lead to tooth discoloration such as drinking red wine, coffee, tea, and caramel-colored beverages.
One concern among practitioners has been the effect the heat from the chairside lights has on pulpal tissue. Does the increased heat have a detrimental effect on pulpal health? Recent published literature has indicated that thermal changes in the pulp were not detrimental to pulpal health when a chairside light was used as part of the bleaching procedure, in general, and specifically with the Zoom light (Discus Dental).3,4 But, tooth sensitivity is more of an immediate concern due to its acute nature. Tooth sensitivity, when it does occur, has been reported to be mild and transient in nature.2,5 Sensitivity can be greatly minimized by use of topically applied neutral fluoride prior to the initiation of tooth bleaching and continued for a period of time following the chairside bleaching procedure.6 The use of a 5% potassium nitrate-fluoride gel applied in the take-home bleaching tray as needed for tooth sensitivity associated can reduce sensitivity in a majority of patients.7,8 Alternatively, use of potassium nitrate containing desensitizing materials has also shown success in preventing and eliminating sensitivity.9,10 Alternation of take-home bleaching gel and fluoride gel/desensitizing gel can be used in the same tray to help maintain the effects of the chairside bleaching and prevent or minimize potential sensitivity.
An improved chairside bleaching system has been recently introduced (Zoom Advanced Power [Discus Dental]). The system features the Zoom Advanced Power Lamp along with a completely redesigned Zoom Chairside Whitening Kit (Discus Dental) and 25% hydrogen peroxide bleaching gel. The following case report will highlight the details of this improved bleaching technique.
CASE REPORT: CHAIRSIDE BLEACHING TECHNIQUES
 |
 |
|
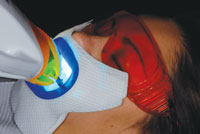
Figure 1. Vitamin E oil was applied to protect the lips prior to initiation of chairside bleaching and placement of the retractor. |
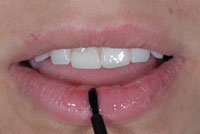
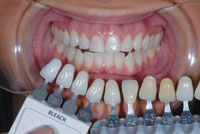
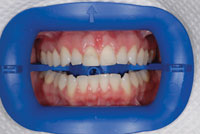
Figure 2. Preoperative shade selection photography was done. |
Chairside bleaching requires the patient to spend approximately an hour in the chair during the process. With this in mind, application of vitamin E oil to the lips prior inserting the retractor will prevent chapping of the lips and make the patient more comfortable during treatment (Figure 1).
Prior to initiation of isolation, a shade was recorded of the current tooth shade. It is recommended that photographic documentation be made to record this initial shade showing the shade tab in the image to account for variation observed with different monitors and printers (Figure 2). In this particular patient’s case, the maxillary central incisors were darker than the adjacent teeth due to existing composite restorations. Porcelain veneers were planned following the completion of the bleaching process.
Isolation
Isolation is vital in the chairside process to prevent tissue irritation due to the use of bleaching gels and light. The new Zoom chairside kits now contain the new IsoPrep (Discus Dental) Retractor, engineered to provide complete protection of the lips and soft tissue while allowing access to the facial side of teeth and gums. Its unique design features an integrated bite block and tongue cup. The patient is able to close on the bite block during the procedure, making it more comfortable. The IsoPrep Retractor was pinched horizontally and inserted intraorally, then released to retract the lips (Figure 3). A tongue cup (a part of the retractor) assists in keeping the tongue from contact with the teeth and bleaching gel. Bite block portions improve patient comfort as the patient can relax during the treatment session occluding on the bite block. A face bib, included in the Zoom kit, was placed over the patient’s face and tucked into the IsoPrep to shield the skin from exposure to the whitening lamp (Figure 4). Then, a cotton roll was placed into the buccal vestibule in the anterior maxilla and mandible. This was followed by cotton rolls placed in the posterior at the molars to protect the buccal mucosa (Figure 5).
 |
 |
|
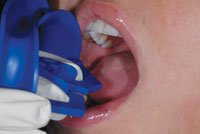
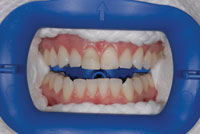
Figure 3. The IsoPrep Retractor (Discus Dental) was inserted intraorally to isolate and protect the lips and external skin around the mouth from the bleaching light. |
Figure 4. Upon insertion of the IsoPrep Retractor, the lips and tongue were retracted and external skin was covered to protect it from the bleaching light. |
 |
 |
|
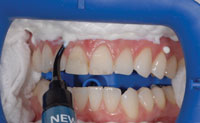
Figure 5. Cotton rolls were placed into the vestibule between the arch and the IsoPrep Retractor to protect the soft tissue during the bleaching process. |
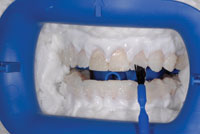
Figure 6. Liquidam (Discus Dental) dental dam was applied via syringe to cover all soft tissue from the gingival margin to the cotton rolls to completely protect the soft tissue from the bleaching gel and the bleaching light. |
 |
 |
|
Figure 7. Following application of the resin liquid dam, the material was light-cured, completing the isolation process. |
Figure 8. Bleaching gel (Zoom Whitening Gel [Discus Dental]) was applied with a brush in a one- to 2-mm thickness over the tooth surfaces to be bleached. |
A light-cured resin (Liquidam [Discus Dental]), applied from a syringe, was used to cover all visible gingival tissue (Figure 6). Complete isolation was achieved, preventing contact of the soft tissue with the bleaching gel and protecting the skin and lips from the bleaching light. It is important to apply the resin from the gingival margin to the cotton rolls, completing the isolation of the soft tissue (Figure 7).
Using the Bleaching Gel and Light
Zoom Whitening Gel (Discus Dental)has been specially formulated to work in combination with the Zoom lamp technology. It is dispensed from a dual-barrel syringe that automixes a 32% hydrogen peroxide gel with a high pH booster gel, producing a 25% hydrogen peroxide gel. The Zoom Whitening gel was applied to the facial tooth surfaces with a brush (Figure 8). It is important that a one- to 2-mm thick layer of the bleaching gel is applied to ensure adequate material to accomplish the bleaching at the first session of the bleaching appointment. It is important that prior to initiating use of the Zoom Advanced Power Lamp that eye protection is placed on the patient to prevent inadvertent retinal damage should the patient look at the light. A Light Guide, another Zoom kit component, was placed on the lamp and aligned with the IsoPrep Retractor to control the patient’s distance from the light (Figure 9).
| External Bleaching (Per Arch) | ||||||||||||||||||||||||||||||
| Tom M. Limoli, Jr The bleaching of vital teeth, in most cases, is considered cosmetic in nature. However, there are benefit plans in the marketplace that cover bleaching and/or bonding for other than purely cosmetic reasons. Reimbursable liabilities include severe tetracycline staining, severe fluorosis, hereditary opalescent dentin and amelogenesis imperfecta. When the patient presents with these clinical conditions, the third-party payer will need radiographs, diagnostic photographs and a narrative report. Remember that some plans specifically exclude reimbursement for the treatment of congenital conditions. In conjunction with the bleaching of vital teeth, code for enamel microabrasion (D9970) per treatment visit when discolored enamel defects are needing to be chemically as well as physically removed prior to the in-office whitening procedure. The authors address the treatment issue of post procedure sensitivity via the delivery of 5% potassium nitrate-fluoride gel in a customized tray. Under no condition should this global adjunct be separately identified for reimbursement consideration in that the sensitivity is a direct result of the completed procedure. Consider the prevention and treatment of post-procedure sensitivity to be part of your global fee for D9972. When bleaching is purely cosmetic in nature, the associated components of the procedure are not reimbursable benefits. To deceptively use code numbers for diagnostic casts, nightguards, stents, or individually fabricated trays is a fraudulent and unprofessional attempt to secure money from the benefit plan that is simply not payable. Expect limited or no reimbursement from the third-party payer. |
||||||||||||||||||||||||||||||
|
The bleaching light was applied for three 15-minute sessions. (An additional fourth session can be performed at the dentist’s discretion.) Following the end of each session, the gel was removed using a surgical suction tip provided with high vacuum suction. It is advised that irrigant not be used to remove the gel as this may loosen the gingival isolation resin, allowing the bleaching gel to get under the barrier and to damage the soft tissue. If any gingival tissue is visible, additional Liquidam is applied and light-cured. Should the patient be experiencing discomfort during the Zoom application, the light may be moved further from the oral cavity to decrease the sensation of heat during the whitening process. The practitioner should keep in mind that when the light is used at a greater distance from the oral cavity, an additional session may be required to achieve the results desired.
Following the last cycle, the whitening gel was removed from the teeth with the surgical suction tip. The isolation (Liquidam, gauze, cotton rolls) were moistened with water and then detached from the soft tissue. Figure 10 shows that the general shade was whiter and brighter in this case. The maxillary central incisors were now ready for treatment with porcelain veneers to replace the current composite fillings (Figure 10).
 |
 |
|
Figure 9. Eye protection was placed on the patient and the bleaching light was placed in close proximity to the teeth and aligned with the retractor, then activated to begin the whitening process. |
Figure 10. Completed case. |
Postoperative Instructions and Care
The patient was instructed on the use of the products found in the Patient Post Care and Maintenance Kit (Discus); Relief ACP (a combination of potassium nitrate and amorphous calcium phosphate), and take-home whitening gel. If the patient has any tooth sensitivity, Relief ACP can be applied to decrease sensitivity and remineralize the teeth. The Relief ACP is placed into the take-home trays for home bleaching and worn for 10 to 30 minutes until sensitivity has stopped. If a tray is not available, the Relief ACP may be applied with a toothbrush and the patient is instructed to not spit for 3 minutes. For best results, the patient should not drink or eat for at least 30 minutes after application.
Patients should also be advised that consuming coffee, tea, red wine; or smoking during the 2 hours following the bleaching process; can lead to staining and darkening of the teeth, until a pellicle reforms on the enamel surface. To maintain and further enhance the Zoom Chairside Whitening results, it is advisable to fabricate take-home trays to be worn with the take-home whitening maintenance gel, either NiteWhite ACP (Discus Dental) or DayWhite ACP (Discus Dental) for 30 minutes weekly.
CONCLUSION
Chairside whitening has become simpler with easier isolation methods and materials as well as improved bleaching gels and improved whitening lights. With proper training and supervision, dental auxiliaries can quickly isolate the teeth and perform chairside bleaching procedures. In the authors’ experience, the improved bleaching materials and technique, as described above, result in less sensitivity and better results.
References
- de Silva Gottardi M, Brackett MG, Haywood VB. Number of in-office light-activated bleaching treatments needed to achieve patient satisfaction. Quintessence Int. 2006;37:115-120.
- Alomari Q, El Daraa E. A randomized clinical trial of in-office dental bleaching with or without light activation. J Contemp Dent Pract. 2010;11:E017-E024.
- Carrasco TG, Carrasco-Guerisoli LD, Fröner IC. In vitro study of the pulp chamber temperature rise during light-activated bleaching. J Appl Oral Sci. 2008;16:355-359.
- Yazici AR, Khanbodaghi A, Kugel G. Effects of an in-office bleaching system (ZOOM) on pulp chamber temperature in vitro. J Contemp Dent Pract. 2007;8:19-26.
- Browning WD, Blalock JS, Frazier KB, et al. Duration and timing of sensitivity related to bleaching. J Esthet Restor Dent. 2007;19:256-264.
- Tay LY, Kose C, Loguercio AD, et al. Assessing the effect of a desensitizing agent used before in-office tooth bleaching. J Am Dent Assoc. 2009;140:1245-1251.
- Haywood VB, Caughman WF, Frazier KB, et al. Tray delivery of potassium nitrate-fluoride to reduce bleaching sensitivity. Quintessence Int. 2001;32:105-109.
- Pamir T, Ozyazici M, Baloğlu E, et al. The efficacy of three desensitizing agents in treatment of dentine hypersensitivity. J Clin Pharm Ther. 2005;30:73-76.
- Orchardson R, Gillam DG. The efficacy of potassium salts as agents for treating dentin hypersensitivity. J Orofac Pain. 2000;14:9-19.
- Jalalian E, Meraji N, Mirzaei M. A comparison of the efficacy of potassium nitrate and Gluma desensitizer in the reduction of hypersensitivity in teeth with full-crown preparations. J Contemp Dent Pract. 2009;10:66-73.
Dr. Bassett practices cosmetic and restorative dentistry in Scottsdale, Ariz. She is one of 200 dentists worldwide to be awarded accreditation with the American Academy of Cosmetic Dentistry; she has Fellowship in the Academy of General Dentistry (AGD); and is past president of the Arizona AGD. She was elected into membership in the American Academy of Fixed Prosthodontics in 2005. Dr. Bassett teaches the aesthetic continuum at the Arizona School of Dentistry and is the founder of Women Teaching Women Cosmetic Learning Facility. She is a recipient of the volunteer dentist of the year for Arizona CASS, a member of the editorial board of several peer-reviewed publications and a published author. She can be reached via e-mail at drmouthy@aol.com.
Disclosure: Dr. Bassett has received sponsopship for lecturing for Discus Dental.
Dr. Kurtzman is in private general practice in Silver Spring, Md, and is a former assistant clinical professor at the University of Maryland, department of endodontics, prosthetics, and operative dentistry. He has earned Fellowships in the Academy of General Dentistry (AGD), American College of Dentists, International Congress of Oral Implantologists (ICOI), Pierre Fauchard Academy and Academy of Dentistry International, as well as a Mastership in the AGD and ICOI and a Diplomate status in the ICOI and American Dental Implant Academy. He has lectured internationally on the topics of restorative dentistry, endodontics, implant surgery, prosthetics, removable and fixed prosthetics, and periodontics and has published more than 180 articles. He is privileged to be on the editorial board of numerous dental publications, a consultant for multiple dental companies, and a former assistant program director for a university-based implant maxi-course. He can be reached via e-mail at dr_kurtzman@maryland-implants.com.
Disclosure: Dr. Kurtzman reports no disclosures.