


WHY DOES 3-D OBTURATION OF ROOT CANAL SYSTEMS MATTER?
It is a commonly accepted fact that sterile canals, if perfectly sealed at their coronal extents, do not need to be filled to achieve endodontic treatment success. In their classic research study, Kakehashi et al1 showed that pulp exposures of teeth in gnotobiotic rats (animals delivered by caesarian section into a sterile environment) did not result in pulp degeneration or periradicular pathosis, while pulps exposed in nonsterile rats did not survive, thus proving that endodontic disease states do not occur without bacterial etiology. No bugs means no disease; so why do we fill canals?
The biologic rationale for 3-D obturation (root canal systems filled to their full apical and lateral extents) is to buttress our biochemical cleaning procedures because root canal systems can present with levels of anatomic complexity that defy definitive treatment. If I fail to achieve sterility in a given root canal system, I may still achieve successful healing of periradicular pathosis if infectious remnants are entombed by the sealer and gutta-percha (Figure 1).
 |
 |
| Figure 1. Maxillary molar with an MB2 canal that bifurcated, mid-root, from the MB1 canal, made a 90° turn, and bifurcated again in its apical 3.0 mm. A canal form such as this is unlikely to be known before or during root canal therapy, presenting more than 7.0 mm of canal space that was unnegotiated, unshaped, and most certainly not sterilized during irrigation procedures. This is a case that only succeeded because the inevitable bacterial remnants were entombed by filling material during 3-D obturation. | Figure 2. Illustration of successive vertical waves of condensation. |
Fifty years ago, Dr. Herbert Schilder described a new obturation method, the Vertical Condensation of Warm Gutta-Percha Technique, that could predictably fill any lateral canal complexity that was cleaned beforehand2 (Figure 2). While Schilder’s technique set the gold standard for the 3-D filling of root canals, it was time-consuming and difficult to master. Fortunately, 3-D obturation has evolved to a point that it now takes less time to do a very thorough job of filling primary and secondary endodontic anatomy than it does to do lateral condensation of cold gutta-percha.
Electronic 3-D Obturation Devices
The difficulties of the Schilder technique were lessened with the advent of the electric gutta-percha syringe, invented by Herskovitz et al3, and the electric heat carrier, invented by Dr. Carl J. Masreleiz4 in the early 1980s. These inventions greatly simplified and shortened the time needed to accomplish the fill.
Dr. Jay Marlin’s Obtura Gutta-Percha Gun3, derived from research done by his graduate student Dr. Fulton Yee5, simplified the most difficult but least important part of Schilder’s technique, the backfill, reducing the time needed to backfill a 4-canal molar to 5 to 10 minutes from the 15 to 20 minutes it took previously. Masreleiz’s Touch ’n Heat electric heat carrier (Kerr Endodontics) dramatically improved the downpack procedure in both speed and consistency. It was able to deliver its heat carrier at full temperature in less than 2 seconds and, because the electric heat carrier did not cool until switched off, it became easier to avoid pulling the gutta-percha cone out during heating and condensation routines.
These 2 devices made the Vertical Condensation of Warm Gutta-Percha Technique more accessible not only to Schilder’s endodontic post-graduate students at Boston University, but also to endodontists and general dentists trained elsewhere. While I was taught the original Schilder technique by Dr. Michael Scianamblo during my undergraduate dental program at the University of the Pacific School of Dentistry (San Francisco), these new electronic devices were a huge aid to both my use of the technique in practice and in training others how to use it.
The Continuous Wave of Condensation Technique
In 1989, after using these tools and this technique for nearly a decade, I conceived a way to radically simplify 3-D obturation, the Continuous Wave (CW) of Obturation Technique, by combining the function of Schilder’s pluggers and Masreilez’s electric heat carrier into a single electric heat plugger (EHP) (Figure 3).6 This new method collapsed Schilder’s Vertical Condensation downpacking procedure from 3 to 5 heating and packing steps requiring 5 minutes per canal, into a downpack that required just 2 procedural steps and less than 15 seconds per canal to complete. While my intention was to simplify Schilder’s technique of Vertical Condensation, the surprise result was a “Centered” Condensation Technique that, despite the huge reduction in time and skills needed, actually provided superior obturation results, moving more gutta-percha into lateral complexities than vertical condensation (Figures 4 to 6).7
 |
 |
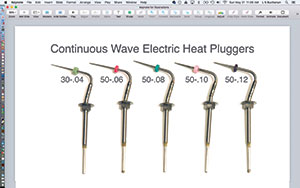
| Figure 3. The full array of Continuous Wave (CW) Obturation Electric Heat Pluggers (EHPs) (Kerr Endodontics). | Figure 4. My first CW Obturation result in a maxillary molar. Note the significant mid-root lateral canal filled off the MB2 canal, the mid-root isthmus filled between MB canals, and the lateral canal filled off the MB1 canal. |
 |
| Figure 5. Illustration of Centered Condensation with its streaming effect. The best analogy for the CW technique is that it is the inverse of analog impressioning: the impression tray becomes the EHP, the heavy-bodied impression material is like thermoplasticized gutta-percha, and the thin-bodied material is analogous to sealer. |
 |
 |
| Figure 6a. Sagittal dissection of mesial root of an extracted mandibular molar showing a 3-D obturation result with the CW of Obturation Technique. Note the gutta-percha and sealer completely filling the isthmus between the MB and ML canals. (Courtesy of Dr. Robert Sharp, Sacramento, Calif.) | Figure 6b. Sagittal dissection of MB root of an extracted maxillary molar showing a similar 3-D obturation result with the CW of Obturation Technique. Note the gutta-percha and sealer completely filling the isthmus between the MB1 and MB2 canals. (Courtesy of Dr. Gary Carr, San Diego, Calif.) |
The Centered Condensation filling methods, such as CW and carrier-based obturator techniques, work by inverting the physics of our 3-part impressioning methods, which use a hard tray, a heavy-bodied material, and a thin-bodied material, all working together to create a perfect impression of our patient’s teeth and jaws in about the same time as the Centered Condensation Obturation method takes to completely fill the most complex root canal system: about 2.5 seconds8,9 (Figure 7). With impressioning, the hard tray pushes the heavy-bodied material, which slips and slides on the thin-bodied material, pushing it into the smallest crevices around the teeth. With Centered Condensation Obturation methods, the EHP or carrier is analogous to the impression tray, the thermoplasticized gutta-percha is the heavy-bodied material, and sealer is the thin-bodied material that lubricates the movement of the gutta-percha and fills the tiniest lateral irregularities—usually with gutta-percha and sealer.
The first version of the CW Obturation Technique was done with the same Touch ’n Heat heat source that was used for Vertical Condensation at the time, the difference being the combined heat carrier and plugger functions in a single EHP. The benefit of heating and condensing gutta-percha simultaneously—instead of the multiple heating and packing steps as in Vertical Condensation—is that in the CW technique, the CW EHP (with a taper similar to the prepared canal) is driven down through the gutta-percha mass in a single wave of condensation until just short of its binding point. The efficacy of CW Obturation is delivered as the internal pressures of the singe wave of condensation exponentially increase due to the vent space inversely closing as larger diameters of the tapered EHP arrive at the orifice. The single CW downpack stroke fills lateral complexities more efficiently than the Schilder technique with its interrupted waves of condensation that create, but also dissipate, the thermodynamic pressure waves with each heating and packing cycle (Figure 8).
CW Electronic Devices
As soon as the successes of the CW technique were seen using the Touch ’n Heat heat source with intermittent heat application to control the rate of downpack, the temperature controlled System B Heat Source (Kerr Endodontics) was designed by Masreleiz. It was then that the CW Obturation Technique came to be the most respected and commonly used obturation method among specialists around the world. Ironically, many of them think they are doing a Vertical Condensation Technique because they do not understand the difference between Vertical and Centered Condensation. However, unless they are heating and packing with an electric heat carrier and multiple hand pluggers in multiple waves of downpacking steps, they are, in fact, using the CW Obturation Technique in a Centered, not a Vertical Condensation, method.
 |
| Figure 7. Maxillary lateral incisor that was obturated with the CW technique, filling all complexities in less than 2 seconds. |
In the years following the world-wide adoption of the CW Obturation Technique, SybronEndo (now Kerr Endodontics) introduced 2 sets of obturation devices while combining the downpack heat source with electric warm gutta-percha extruders: the first one is called the Elements Obturation Unit (EOU) (Kerr Endodontics) and the second a cord-free set called elementsfree (Kerr Endodontics) (Figure 9). The improvements to the downpack device were the 4-second cut-off function to prevent overheating of roots when inappropriate heat application times were used; removable autoclavable shields for the EOU; and, for both the EOU and elementsfree device sets, a spring-loaded receptacle in the ends of downpack handpieces that obviated the need to cinch a collet down to secure the pluggers in the handpiece, making it much more efficient to obturate multicanal teeth. The electric warm gutta-percha extruders were an improvement on gutta-percha gun syringes as they have replaceable gutta-percha cartridges that bring a fresh, pre-bent needle for every case. In addition, Kerr Endodontics has recently introduced a gutta-percha cartridge with hardier needles. This is a needed addition since the sterling silver needles in the previous cartridges would occasionally break if bent more than once.
The elementsfree devices are the first cordless units I have used that work exactly as the corded EOU unit operates, meaning the EHPs reach full temperature within 0.5 seconds (most imitation devices require one to 2 seconds to reach full temperature), and the gutta-percha backfilling devices work effortlessly without the ratcheting problems seen in other cordless units. I now use and teach the elementsfree devices exclusively.
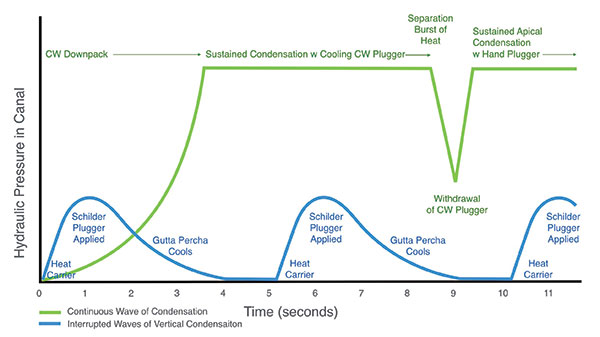 |
| Figure 8. This graph describes the CW Obturation Technique versus interrupted vertical waves of condensation. Higher intracanal pressure is achieved with the CW technique as larger diameters of the EHP approached the orifice level, inversely closing the vent space between it and the canal, while Vertical Condensation pressures on gutta-percha occur only at the level of each separate wave of condensation, while the pressure is dissipated as the gutta-percha cools between cycles. |
CW Pluggers
The CW technique is used with EHPs and hand pluggers. The EHPs are made of dead-soft stainless steel, so they can be bent in order to downpack closer to the desired depth in small canals. They are available in 5 different sizes: .04, .06, .08, .10, and .12 tapers. All but the .04 EHP have tip diameters of 0.5 mm. The .04 EHP tip is intended to downpack through today’s minimally invasive endodontic (MIE) shapes, so it has a smaller diameter of 0.3 mm. After the gutta-percha cone fitting, an appropriate plugger is also fitted into the canal to be obturated.
Since most of the EHP tip diameters are the same, the taper designations will not match exactly to the taper of the shaped canal to be filled (eg, while an .06 EHP will usually fit a 20-.06 canal preparation, it will be too small for most 30-.06 and 40-.06 canal preps). The simple remedy is to start by fitting the taper size EHP that matches the taper of the canal prep, then try the next size up and see if it fits to the same 4.0- to 6.0-mm length from the terminus as the smaller size EHP does. The objective is to use the largest EHP that fits within the desired 4.0- to 6.0-mm depth (from the terminus), because it will more closely bind at the orifice level of the canal, thus creating a maximal wave of condensation pressure during the downpack.
When fitting the EHPs, push each into the canal with a rocking motion as it will cause the plugger to bend to the curvature of the canal and fit deeper in the prep. Once the plugger binds in the canal, shorten the length stop to the same reference point used to fit the master cone. Remove the plugger and compare it to the fit master cone, holding the stop on the plugger next to the pinch mark on the cone made by cotton pliers during cone fitting; compare the tip of the plugger relative to the tip of the cone and you will see how deep the plugger fits in the canal. Do this length check for small canals to be sure you can get the plugger within 4.0 to 6.0 mm of the terminus. Also, do this check procedure in medium and large canals to be certain that the pluggers don’t fit closer than 4.0 mm from length in the canal, as downpacking beyond that depth would soften the master cone at its tip and encourage it to extrude beyond the root canal terminus. When the largest .12 plugger fits closer than 4.0 mm from the length of the fit master cone it is being compared to, simply shorten the stop on the EHP to limit its use short of that depth.
 |
 |
| Figure 9. The elementsfree (Kerr Endodontics) cordless CW Obturation devices on the charging stand. | Figure 10. Buchanan CW size Nos. zero, 1, and 2 hand pluggers with color ring indicators at the NiTi apical plugger ends. Note the NiTi plugger diameters of 0.25 mm, 0.4 mm, and 0.7 mm, respectively, and the stainless steel orifice plugger diameters of 0.75 mm, 0.9 mm, and 1.35 mm, respectively. |
 |
 |
| Figure 11a. Maxillary molar obturated with the CW technique. Note the significant lateral canal off the palatal canal. (Courtesy of Dr. Giuseppe Cantatore, Rome, Italy.) | Figure 11b. Maxillary molar obturated with the CW technique. Note the multiple lateral canals and the long MB2 fin off the MB1 canal. (Courtesy of Dr. Constantinos Laghios, Athens, Greece.) |
The 3 hand pluggers (Figure 10) are size Nos. zero, 1, and 2, and are colored yellow, red, and blue, respectively, at the apical plugger end. The size zero plugger is used when the 30-.04 EHP is selected for use in minimally shaped canals or canals with severe curvatures in their coronal halves. Its NiTi apical plugger end is 0.25 mm in diameter, so it can condense the apical mass without binding after removal of the 30-.04 EHP at the end of the sustained condensation stroke of the downpack. Its stainless steel orifice plugger side is 0.75 mm for ideal condensation of the backfill at the orifice level in MIE shapes smaller than 1.0 mm. The size No. 1 plugger is used for downpacking most of the small canals that are typically prepared to size 20-.06, 30-.06, and 40-.06 shapes (fit with .06 or .08 EHPs). Its NiTi apical plugger end is 0.04 mm in diameter, so it can condense the apical mass of gutta-percha without binding the canal after the EHP is removed at the end of the downpack. Its stainless steel plugger end is 0.9 mm to deliver ideal condensation at the orifice when the canal has been shaped with files having a 1.0-mm maximum flute diameter. The size No. 2 plugger is used for medium and large canals shaped to 30-.08 or larger. Its NiTi apical end is 0.7 mm in diameter and its stainless steel orifice end is 1.35 mm in diameter.
CW Downpack and Backfill Methods Relative to Canal Size
Small canals (in mandibular incisors, multicanal premolars, buccal roots of maxillary molars, and mesial roots of mandibular molars) are, of course, narrower in diameter and have significantly greater cervical curvatures. Medium canals (in palatal roots of maxillary molars and distal roots of mandibular molars) and large canals (in maxillary anteriors, mandibular cuspids, and single canal premolars) have larger diameters and much less curvature. These differences in canal geometry cause differences in downpack results, so I use different CW methods for small and larger canal obturation. Small canals nearly bind the end of the EHP at the apical extent of the downpack, and, because of that, after a separation burst of heat (described a bit later), the EHPs easily release from the condensed apical mass of gutta-percha, leaving it in the apical third of the canal but removing the gutta-percha attached to the sides of the plugger.
Medium and large canals are typically larger than the EHP apical end (0.5 mm regardless of taper size), and as a result, all of the condensed gutta-percha will often remain in that canal. This outcome is most prevalent in single canal premolars as they have mid-root buccal and lingual fins, which mechanically hold the condensed gutta-percha in the canal despite the separation burst of heat delivered at the end of the downpacking sequence. For many years, I struggled to remove this remaining gutta-percha because leaving it in place nearly always resulted in a void when syringes were used to backfill. Finally, after another failure to remove the gutta-percha alongside the EHP in a large canal, I viewed the canal and the remaining gutta-percha with my microscope and realized that I was looking at an impression of the EHP in the condensed gutta-percha. Rather than repeatedly struggling to remove the recalcitrant gutta-percha, it occurred to me that if I cut a gutta-percha cone of the same taper as the EHP to a 0.5-mm tip diameter (using a gutta-percha adjustment gauge), it would fit very closely in that space. I coated and cemented a gutta-percha cone fit in that manner into the remaining space, seared it off at the orifice, condensed it until set, and a new, more effective backfilling technique for medium and large canal CW Obturation was born.
Now I intentionally leave all the gutta-percha in medium and large canals at the end of the downpack, preforming a single-cone backfill. This not only avoids the backfill voids in those roots, but also reduces the time and expense of obturating medium and large canals. Using the CW Obturation Technique in these roots with single-cone backfilling is the only 3-D obturating method that takes less time than carrier-based obturation—a huge bonus for clinicians.
CLOSING COMMENTS
GT Hand and Rotary Files took 6 years to develop. Conversely, within a month of conception, I had the first prototype EHP and it worked well the first time I used it to do a CW downpack. Ironically, in product development, it is not always the failures that must be deconstructed and designed around. With the CW technique, it took more than 2 years to deconstruct that success to fully understand the power of Centered Condensation. Since then, I have been gratified to see the widespread adoption of this technique, making Schilder’s exceptional filling results accessible to endodontists and general practitioners alike (Figure 11). To all those who have adopted this technique, you have my deepest gratitude. However, a humble request: please, do not call it “Vertical Condensation.”
Note: The next in this 2-part article series is entitled “The Continuous Wave of Obturation Technique, Part 2: Techniques and Tricks,” and will be published in the October 2017 issue.
References
- Kakehashi S, Stanley HR, Fitzgerald RJ. The effects of surgical exposures of dental pulps in germ-free and conventional laboratory rats. Oral Surg Oral Med Oral Pathol. 1965;20:340-349.
- Schilder H. Filling root canals in three dimensions. Dent Clin North Am. November 1967:723-744.
- Herskovitz SB, Marlin J, Stiglitz MR, inventors; Solar Energy Technology, Inc, assignee. Electrically heated endodontic syringe for injecting thermoplastic material into a root canal cavity. US patent 4,265,618. May 5, 1981.
- Masreliez CJ, inventor. Medical or dental probe with self-heating tip. US patent 4,527,560. July 9, 1985.
- Yee FS, Marlin J, Krakow AA, et al. Three-dimensional obturation of the root canal using injection-molded, thermoplasticized dental gutta percha. J Endod. 1977;3:168-174.
- Buchanan LS. The continuous wave of obturation technique: ‘centered’ condensation of warm gutta percha in 12 seconds. Dent Today. 1996;15:60-67.
- DuLac KA, Nielsen CJ, Tomazic TJ, et al. Comparison of the obturation of lateral canals by six techniques. J Endod. 1999;25:376-380.
- Goldberg F, Artaza LP, De Silvio A. Effectiveness of different obturation techniques in the filling of simulated lateral canals. J Endod. 2001;27:362-364.
- Gencoglu N, Helvacioglu D, Gundogar M. Effect of six obturation techniques on filling of lateral canals. Journal of Research and Practice in Dentistry. 2014(2014):807624.
Dr. Buchanan is a Diplomate of the American Board of Endodontics, a Fellow of the National and International Colleges of Dentists, and part-time faculty in the graduate endodontic programs of the University of California, Los Angeles, and the University of Southern California. He is the founder of Dental Education Laboratories, a hands-on teaching center in Santa Barbara, where he also maintains a practice limited to conventional/microsurgical endodontic therapy and implant surgery. He can be reached by visiting his company websites delendo.com and endobuchanan.com.
Disclosure: Dr. Buchanan designed, patented, and licenced the CW hand and electric heat pluggers and the elementsfree Obutration System (Kerr Endodontics).
Related Articles
Endodontic Shaping Procedures: The Past, Present, and Near Future
Should General Practitioners Place Implants?
Inflection Points in Dental Imaging


