


Every clinician who has performed endodontics has experienced a variety of emotions ranging from the thrill-of-the-fill to an upset like the procedural accident of breaking an instrument. Fortunately, when a file breaks, it is reassuring to know that CBCT imaging, in conjunction with a microscope, promotes 3-D visualization and fulfills the endodontic adage, “If you can see it, you can remove it.” This article will emphasize the importance of coronal and radicular access; describe ultrasonic and adjunctive removal techniques; and reveal 3 novel emerging methods that improve safety, efficiency, and simplicity when removing intracanal obstructions.
Factors Influencing Broken Instrument Removal
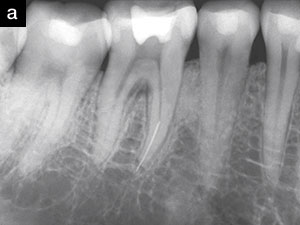
The ability to safely access the file segment and successfully perform broken instrument removal procedures will be influenced by the file segment’s diameter, length, and position and further influenced by the canal’s diameter, length, and curvature. Another critical factor that influences removing file segments is root morphology, including the depth of any given external concavity. In general, if straightline radicular access can be safely established to the head of a broken file, and if one-third of the overall length of this segment can be exposed, then experience demonstrates it can generally be removed (Figure 1).
 |
 |
| Figure 1a. A preoperative film of a mandibular first molar demonstrates a broken instrument in the apical one-third of a thin mesial root. Note the furcal lesion. |
Figure 1b. A post-treatment film demonstrates that the broken file has been removed and the root canal systems have been filled. Note the furcal canal. |
Technology is another important factor that influences broken instrument removal. Yet, the vast majority of these devices require over-enlargement of a canal, which invites iatrogenic events. I am frequently asked, “If removal efforts are unsuccessful, is it ok to fill this system as best as possible?” The answer to this question is dependent on several factors: Is the pulp vital or necrotic? Are there signs and symptoms? What is the restorative treatment plan? Could a surgical approach be successful? Would a referral be prudent? The good news is, today, most broken instruments can be safely removed using advanced technologies, in conjunction with training.
Coronal and Radicular Access
Coronal access is the first step required for the successful removal of a broken instrument. A high-speed surgical length diamond bur may be selected to create a straightline pathway to any given orifice. The emphasis is on flaring the axial wall that approximates the canal holding the broken instrument so as to facilitate removal techniques below the orifice. Fortuitously, any given tapered file that breaks provides an existing glide path that can be readily enlarged, as necessary, to create direct visual access to the head of the obstruction. The techniques for broken instrument removal have been clinically shown in the critically acclaimed DVD series Ruddle on Retreatment.1
 |
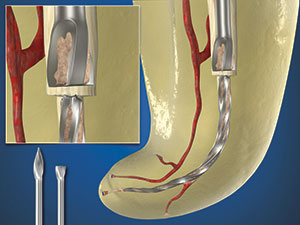 |
| Figure 2. Gates Glidden (GG) drills may be used to create a smoothly tapered funnel, which is largest at the orifice and narrowest at the obstruction. |
Figure 3. This GG drill is modified and rotated counterclockwise (CCW) and |
 |
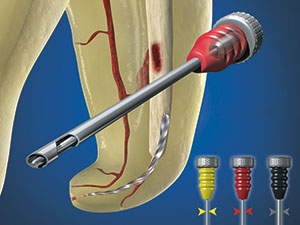
| Figure 4. The ProUltra ENDO 1-5 ultrasonic instruments (Dentsply Sirona Endodontics) have an abrasive coating to improve cutting efficiency, whereas the ProUltra ENDO 6-8 instruments provide longer lengths and smaller diameters when space is more restrictive. |
The guidelines for radicular access are the same as if there was no broken instrument and emphasize creating a smooth, flowing funnel, which is largest at the orifice and narrowest at the obstruction. This can be accomplished with Gates Glidden (GG) drills sizes 1 to 4, which have maximal diameters of 0.5, 0.7, 0.9, and 1.10 mm, respectively. GGs are used in a crown-down manner, at about 300 to 500 rpm, and are confined to the straightaway portions of a canal. The GG-4 is used in a brushing motion to flare an orifice and to relocate the coronal aspect of a canal away from an external root concavity. The GG-3 is used deeper in the body of a canal, whereas a GG-2 can generally be carried more apically to the head of a broken file segment (Figure 2).2
Creating a Staging Platform
Following optimal pre-enlargement procedures, oftentimes the tip of an ultrasonic instrument cannot be placed laterally to the head of the broken file segment to initiate trephining procedures. In these instances, a GG is selected that has a cross-sectional diameter slightly larger than the diameter of the head of the visualized broken file segment. This GG is modified by cutting it perpendicularly to its long axis at its maximal cross-sectional diameter. This GG is then rotated counterclockwise (CCW) and is directed apically until it contacts the coronal-most aspect of the obstruction. This clinical step serves to create a circumferential staging platform to facilitate ultrasonic trephining procedures (Figure 3).3
 |
 |
| Figure 5a. This ultrasonic instrument precisely sands away dentin and progressively exposes the coronal aspect of the broken file. The Stropko Irrigator delivers a controlled stream of air to blow out dentinal dust and maintain vision. | Figure 5b. This graphic demonstrates using a 17% solution of EDTA and a smaller diameter insert tip to jettison a broken file segment out of a canal. |
 |
 |
| Figure 6a. An endodontically failing mesial root of a hemisected first molar. Note a short screw post, a separated file, and amalgam debris. The inset photograph shows a staging platform and trephining around the head of this broken file. | Figure 6b. A long-term recall film demonstrates the restorative effort and periradicular healing. The inset image depicts a filled third mid-mesial system. |
Primary Removal Method
The primary method to remove a broken file segment utilizes the microscope in conjunction with optimally designed ultrasonic instruments, such as the ProUltra Endo insert tips (Dentsply Sirona Endodontics) (Figure 4). The specific ultrasonic instrument selected must have a length that will reach the broken obstruction and a diameter small enough to provide direct vision to the head of the broken file. This insert tip is placed against the head of the file segment, activated, and moved in a CCW direction around the obstruction.4 This ultrasonic work utilizes the Stropko Irrigator (stropko.com) with a 29-ga luer-lock canula (Ultradent Products) to deliver a controlled stream of air, which serves to blow out dentinal dust and maintain continuous vision (Figure 5a).2
The goal of this ultrasonic method is to trephine, sand away dentin, and expose 2 to 3 mm of the coronal-most aspect of the obstruction, or about one-third of its overall length.5 A few drops of a 17% solution of EDTA are delivered into the canal and serve as a potent removal adjunct when placing an energized tip against the head of a broken file segment (Figure 5b). Clinically, after creating a staging platform and exposing the head of a broken file segment, gently wedging the energized tip between the tapered file and the tapered canal wall oftentimes causes the broken instrument to loosen, unwind, and jettison out of the canal (Figure 6). Yet, ultrasonic procedures may prove unsuccessful, and in these instances, a secondary removal method will be required.
 |
| Figure 7. Each FRS device (Dentsply Sirona) comprises a microtube and an internal screw wedge for mechanically engaging and removing an intracanal obstruction. |
 |
 |
| Figure 8a. When ultrasonic efforts prove ineffective, the beveled end of this microtube is designed to “scoop up” the head of the broken file. |
Figure 8b. This graphic shows the importance of rotating the microtube 180° to facilitate wedging and displacing the head of the file out the side window. |
 |
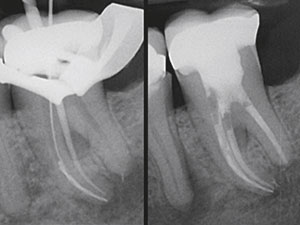
| Figure 9. Left: A pre-op radiograph of a canine demonstrates a broken file segment deep within the apical one-third. Middle: A working film shows that the FRS has successfully engaged and is elevating the broken file segment out of this canal. Right: A postoperative film demonstrates a densely filled system that exhibits 3 apical portals of exit. |
Secondary Removal Methods
When the ultrasonic method is unsuccessful, then secondary removal methods are available. However, the vast majority of these traditional devices and removal methods are scaled far too large to safely use within root-appropriate canal shapes. Even though better scaled technologies have emerged, they still require developing radicular access, creating a staging platform, and utilizing trephining procedures to expose the head of a file. Although innovative, a recently heralded, yet fragile, loop device has not eliminated the difficulties of the original “Lasso and Anchor” technique first described 35 years ago.6 As such, a removal method will be described that provides anatomically scaled, durable, and innovatively designed microtubes for removal.
The File Removal System
The File Removal System (FRS) (Dentsply Sirona Endodontics) provides 3 variously sized microtubes and interchangeable screw wedges to mechanically grasp and remove intracanal obstructions, such as a silver point, a carrier-based obturator, or a broken file segment.4 The microtubes are readily identified by handles that are black, red, and yellow, corresponding to outside diameters of 1.0 mm, 0.80 mm, and 0.60 mm, respectively (Figure 7). Once the head of a broken file has been circumferentially exposed 2 to 3 mm, regardless if its more apical portion lies partially around the canal curvature, a specific sized microtube is selected.
The pre-selected microtube is inserted into the canal with the long part of its beveled end oriented to the outer wall of the canal to “scoop up” and guide the head of the broken file into the internal lumen of the microtube (Figure 8a). Once seated, the microtube is then rotated 180° so that the head of the broken file lies in approximation to the tube’s side window. Generally, the corresponding color-coded screw wedge is selected and slid internally through the length of the microtube, and its handle is turned CCW to increasingly tighten, wedge, and mechanically displace the head of the obstruction through the microtube’s window (Figure 8b). When clinically engaged, the tube and screw wedge assembly is rotated CCW to back a broken file out of the canal (Figure 9).
 |
 |
| Figure 10a. Left: A radiograph of an extracted maxillary first bicuspid demonstrates that the yellow FRS microtube has captured the head of this broken file segment. Right: The SDR light-curing composite is placed in the distal end of the previously selected and pre-fit microtube. | Figure 10b. This image shows the microtube seated. Note the single optical fiber that enables light to polymerize the composite when the SmartLite (Dentsply Sirona Restorative) is activated. |
 |
| Figure 11. Left: This radiograph demonstrates a mechanically driven size 10 file crawling around and bypassing a broken file segment. Right: A recall film demonstrates progressive apical bone fill. Note the expanding endodontic lesion associated with the distal root of the first molar. (Image courtesy of Dr. Ghassan Yared, Toronto.) |
 |
 |
| Figure 12a. Left: A graphic illustrates a broken file segment buried deep within the canal of a mandibular bicuspid. Right: A 3-D animation image reveals the head of an exposed broken file segment. Note the debris packed between the file and canal walls. | Figure 12b. Laser-activated irrigation produces enormous sheer-wall forces, which serve to loosen and eliminate packed debris and jettison the file segment. |
Future Removal Methods
At the 2016 American Association of Endodontists (AAE) annual meeting in San Francisco, I described 3 novel technologies and methods that hold enormous promise to remove broken file segments. All of these methods have been extensively tested and validated and represent significant advancements in simplicity, efficiency, and safety as compared to all other removal methods.
Tube and Glue: Traditionally, a microtube has been bonded onto a coronally exposed obstruction with unreliable adhesives. Yet, a light-cured composite, such as SureFil SDR Flow (Dentsply Sirona Restorative), produces significantly higher pull-out test values compared to a chemically cured composite or cyanoacrylate.7 This novel method utilizes an FRS microtube, the SDR light-cured composite, a fiber-optic wand, and the SmartLite (Dentsply Sirona Restorative). A microtube is pre-fit over a coronally exposed obstruction, radiographically confirmed, then removed. The SDR composite is placed within the distal end of the microtube, and then this tube is carried into the canal and extended apically until its distal end scoops up the head of the broken file (Figure 10a).
To polymerize the SDR light-curing composite, a single fiber-optic fiber is selected and slid through the lumen of the seated microtube until its distal end contacts the composite. Variously sized End Glow fiber-optic cables are available in diameters that range from 0.25 to 0.75 mm. Once this cable has been trimmed flush with the coronal-most head of the microtube, the SmartLite is placed over the microtube and activated for 1.5 minutes (Figure 10b). This light-curing activity polymerizes the composite and produces a “bulldog” grip between the head of the broken file and the microtube. The assembly is rotated CCW to back the broken file segment out of the canal. Importantly, any surplus SDR material outside the tube will not polymerize.
Endurance Limit Concept: The Endurance Limit (EndL) is, by definition, the level of stress or strain a material can withstand when subjected to a minimum of 1 million cycles without failure. This concept has been used to develop a mechanical method to initially negotiate virtually any canal, and, with astonishing success, this method can also be used to bypass, loosen, or remove virtually all broken file segments.8,9 This not-yet-to-market method utilizes a unique motor (Aseptico) to produce ultra-short, unequal bidirectional angles; a thermal-hardened stainless steel file (VDW) to afford a high resistance to breaking; and the EndL concept to calculate the optimal, unequal, and ultra-short bidirectional CW/CCW angles.10
This technique is noninvasive and straightforward compared to all other removal devices, kits, and systems. Unlike other methods, direct visualization to a broken file segment is not required, especially in the instance when the broken segment lies completely around canal curvature. In a bath of 17% EDTA, a heat-hardened size 10 file is inserted into the canal that holds the broken file segment. Because of the ultra-short, unequal, bidirectional angles of movement, this mechanically driven size 10 file will find the flute spaces and literally “crawl” around and bypass the broken file segment (Figure 11). This activity serves to loosen and initiate unwinding and, oftentimes, will pull the broken segment out of the canal.
Er:YAG Laser: The Er:YAG laser represents cutting-edge technology for laser-activated irrigation (LAI) and 3-D disinfection. Specifically, this laser can eliminate pulp tissue remnants; bacterial biofilms, when present; and, fortuitously, many intracanal obstructions, such as a broken instrument (Figure 12a). An example of Er:YAG LAI technology is PIPS, an acronym for “photon-induced photoacoustic streaming.”11 Unlike other forms of LAI, PIPS utilizes a uniquely tapered and stripped tip that is confined to the pulp chamber only. PIPS generates shockwaves at subablative levels and actively pumps fluid three-dimensionally into both minimally or fully prepared canals and their related root canal systems.
The exposed portion of the PIPS tip is placed stationary and centered within a fluid-filled pulp chamber containing 17% EDTA and activated. The resultant burst of energy produces enormous shear-wall forces similar to that of a pressure washer used to clean paint from stone, brick, or concrete. Strategically, this energized reagent can be used to safely break up dentinal debris packed between a broken file segment and the dentinal walls and uncover the broken file segment (Figure 12b). The removal method is encouraged by using 3 to 4 irrigation cycles at 30 seconds each, alternating between NaOCl and EDTA. In this manner, the canal can oftentimes be recovered, giving the clinician the opportunity to three-dimensionally disinfect and fill this root canal system.
CLOSING COMMENTS
The best antidote for a broken file is prevention. Yet, when this procedural accident occurs, it is reassuring to know that removal procedures can generally be executed to solve this problem. A few years ago, I had the opportunity to visit the Marine Corps Naval Air Station in Miramar, Calif—the original home of the TOPGUN school. I received an up-close tour of F-18 fighter jets, and, as sunset approached, heard and watched exhilarating takeoffs. Later, I joined 3 young pilots for dinner in the Officer’s Club and asked what is meant by their legendary mantra, flawless execution. They stated that, although flawless execution is impossible, it means being accountable by having “the knowledge, training, and skill to solve problems as they occur.”
References
1. Baumgartner C. Advanced endodontics: Ruddle on retreatment. J Endod. 2002;28:413.
2. Ruddle CJ. Nonsurgical endodontic retreatment. In: Cohen S, Burns RC, eds. Pathways of the Pulp. 8th ed. St. Louis, MO: Mosby; 2002:875-929.
3. Ruddle CJ. Microendodontic nonsurgical retreatment. In: Kim S, ed. Dental Clinics of North America: Microscopes in Endodontics. Philadelphia, PA: W.B. Saunders; 1997:429-454.
4. Ruddle CJ. Nonsurgical retreatment. J Endod. 2004;30:827-845.
5. Ruddle CJ. Microendodontics: eliminating intracanal obstructions. Dent Today. 1996;15:44-49.
6. Roig-Greene JL. The retrieval of foreign objects from root canals: a simple aid. J Endod. 1983;9:394-397.
7. Wefelmeier M, Eveslage M, Bürklein S, et al. Removing fractured endodontic instruments with a modified tube technique using a light-curing composite. J Endod. 2015;41:733-736.
8. Machtou P, Ruddle CJ, Yared G. Initial negotiation of difficult canals. March 4, 2016. Style Italiano. https://styleitaliano.org/initial-negotiation-of-difficult-canals. Accessed June 2, 2018.
9. Ruddle CJ. Focus on: endodontics. Dent Today. 2016;35:18.
10. Yared G. Canal preparation with nickel-titanium or stainless steel instruments without the risk of instrument fracture: preliminary observations. Restor Dent Endod. 2015;40:85-90.
11. Olivi G, De Moor R, DiVito E, eds. Lasers in Endodontics: Scientific Background and Clinical Applications. Cham, Switzerland: Springer International Publishing; 2016.
Dr. Ruddle is founder and director of Advanced Endodontics, an international educational source, in Santa Barbara, Calif. He is an assistant professor of graduate endodontics at Loma Linda University and the University of California, Los Angeles; an associate clinical professor at University of California, San Francisco; and an adjunct assistant professor of endodontics at the University of the Pacific School of Dentistry. As an inventor, Dr. Ruddle has designed and developed several instruments and devices that are widely used internationally. He is well known for providing endodontic education through his lectures, clinical articles, training manuals, videos, and DVDs. Additionally, he maintains a private practice in Santa Barbara, Calif. He can be reached at (800) 753-3636 or by visiting the website endoruddle.com.
Disclosure: Dr. Ruddle has a financial interest in Dentsply Sirona Endodontics’ File Removal System Kit and ProULTRA Endo insert tips.
Related Articles
Focus On: Endodontic Emergencies
Single File-Shaping Technique: Achieving a Gold Medal Result
System-Based Endodontics: Does Your Gutta-Percha Master Cone Fit?


