


INTRODUCTION
As an early adopter of digital technology in my general dentistry practice, I have spent the last 15 years helping clinicians and laboratory teams learn about digital restorative dentistry and, more importantly, how to implement it in the dental practice. The vast majority of dentists I have encountered believed that the adoption process was both difficult and complicated—the primary reason being that, for quite some time, there were too many barriers to doing so. There were a limited number of options when it came to purchasing equipment, which was expensive and complicated to use, and the training was often limited. However, over the past few years, these barriers have been lifted or significantly reduced, allowing more general dentists to adopt this technology. Making use of this technology in our everyday restorative cases has been invaluable, and, with the appropriate planning, it is possible to achieve very predictable and accurate results.
This article, by highlighting a restorative case as an example, will illustrate how the process can be easily incorporated into routine restorative dentistry.
Planning and Consulting Phase
In order to achieve predictable success in restorative dentistry, emphasis needs to be placed on proper diagnosis and case planning. In the traditional method, one must take diagnostic impressions and pour up the models just to be able to review the casts and to begin the treatment planning process. However, in the digital workflow, an intraoral scan can be taken and immediately evaluated on a computer by the dentist—a process that unfolds in full view of the patient. The highly interactive nature of this visit results in patients better understanding their treatment needs, thus leading to higher case acceptance.
 |
 |
| Figure 1. Preoperative photo of teeth Nos. 8 and 9, with lingual accesses restored with composite resin. | Figure 2. Pre-op photo of tooth No. 8 fractured through a lingual access composite restoration. |
 |
| Figure 3. Pre-op smile. |
Preparation, Retraction, and Scanning
A typical workflow in conventional restorative dentistry begins with the preparation of the tooth, followed by tissue retraction and a vinyl polysiloxane (VPS) impression, which can be a messy and uncomfortable procedure from the patient’s perspective. In addition, the need to repeat the impression, if inaccuracies are noted, can be inconvenient for the patient and costly to the dentist. This impression is then physically sent to the laboratory, which can take time and, through all the handling and required steps to make models, can become distorted.
In the digital workflow, we have modified the technique so that after the tooth is prepared and retracted, it is easily scanned and then critically evaluated on a computer monitor. This view can be magnified, affording the operator an unprecedented view of the preparation, one that was previously limited to the laboratory technician studying the die under a microscope. Adjustments or refinements can be made to the preparation(s), and any area(s) that require modification or improvements can be easily rescanned, thus enabling the dentist to obtain a precise impression in a very efficient manner.
 |
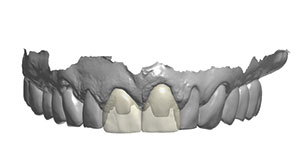 |
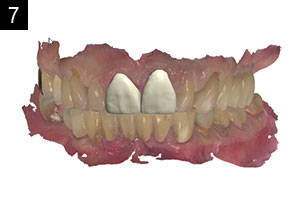
| Figure 4. Scans (TRIOS Intraoral Scanner [3Shape]) of the preparations (teeth Nos. 8 and 9), opposing arch, and occlusion. | Figure 5. Design of the lithium disilicate (IPS e.max [Ivoclar Vivadent]) crowns for teeth Nos. 8 and 9. |
 |
 |
| Figures 6 and 7. Design of the lithium disilicate crowns for teeth Nos. 8 and 9, in occlusion. |
Laboratory Team Interaction
The digital restorative workflow has significantly narrowed the workspace between the laboratory team and the dentist, allowing the simultaneous view of digital models and restorative designs from separate locations. The collaborative process ensures a higher level of precision while planning cases. All involved parties can review, discuss, and approve the function and morphology of the restoration(s) before any fabrication steps are begun. If needed, provisional restorations can be economically fabricated, tried in, and then precisely duplicated to create the definitive restoration.
 |
 |
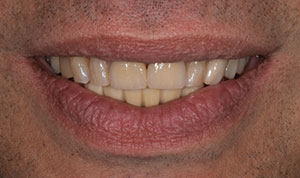
| Figure 8. Design of the lithium disilicate crowns for teeth Nos. 8 and 9, occlusal view. | Figure 9. Postoperative smile. |
 |
 |
| Figure 10. Post-op smile, showing the lip-line. | Figure 11. Pre-op and post-op comparison. |
CASE REPORT
Diagnosis and Treatment Planning
A healthy 64-year-old male presented with a horizontal crown fracture through his right central incisor. Several years ago, tooth No. 8 and tooth No. 9 had been endodontically treated. Both the lingual accesses in teeth Nos. 8 and 9 had been restored with composite resin (Figure 1). The crown of tooth No. 8 demonstrated significant mobility due to a horizontal fracture through the lingual access opening (Figure 2). Both central incisors were discolored, and a noticeable midline diastema was noted.
The treatment options were reviewed with the patient, as well as the associated risks and benefits of the presented options. Based upon the level of fracture and the patient’s aesthetic concerns with his maxillary central incisors (Figure 3), the decision was made to restore both teeth Nos. 8 and 9 with full-coverage crowns.
Prior to initiating treatment, the TRIOS Intraoral Scanner (3Shape) was used to capture preoperative digital study models to evaluate the existing occlusion. In addition, this scan was sent to the laboratory team for a digital wax-up and fabrication of a splinted PMMA temporary that would eventually be used to close the existing diastema between teeth Nos. 8 and 9. Next, using composite, an intraoral mock-up was completed to close the diastema between teeth Nos. 8 and 9. Then a VPS impression material (AFFINITY [CLINICIAN’S CHOICE Dental Products] was taken to provide a matrix for the fabrication of the provisionals.
Clinical Protocol
Under local anesthesia, the existing lingual access restoration of tooth No. 8 was removed. Then, using the RelyX Fiber Post System (3M), a post space was made in the previously treated canal. Prior to cementing the post, the DEXIS Digital Sensor (KaVo) was used to take a radiograph. This was completed to confirm an adequate post space length and an appropriate amount of remaining gutta-percha in the apical one-third of the canal. The post space and chamber were prepared for cementation, and the fiber post was seated with a resin cement (RelyX Ultimate Adhesive Resin Cement [3M]) and light-cured. Subsequently, a core build-up was completed using a fiber-reinforced material (Build-It FR [Pentron]) and then light cured (Bluephase [Ivoclar Vivadent]). Teeth Nos. 8 and 9 were then prepped for lithium disilicate (IPS e.max [Ivoclar Vivadent]) crowns. IPS e.max was chosen for this case due to its excellent aesthetics and for its high strength, which was appropriate for the patient’s occlusion. Splinted temporary crowns were fabricated using the VPS matrix taken preoperatively and a bis-acryl provisional material (Luxatemp Ultra [DMG America]). The provisional crowns were adjusted, polished, and temporarily cemented (Integrity TempGrip Cement [Dentsply Sirona]).
Due to the fact that the gingival zeniths of teeth Nos. 8 and 9 did not coincide, the decision as to whether or not an aesthetic gingivectomy should be done was discussed. When the patient initially presented, tooth No. 9 had approximately 4.0 mm of gingival recession facially. However, due to the patient’s medium-low lip-line, the discrepancy was not an aesthetic concern. Yet, the probing depths on the facial of tooth No. 8 were 1.0 mm; thus, to not impinge on the biologic width and to allow for a restoration that supports a healthy periodontium, the decision was made to slightly crown lengthen tooth No. 8.
The patient returned, and, under local anesthesia, crown lengthening on the facial of tooth No. 8 was performed by a periodontist to achieve a minimum of 3.0-mm probing depths. Following the procedure, a laboratory-processed PMMA temporary, which was fabricated from the TRIOS scan and digital wax-up at the initial visit, was relined and cemented to help maintain the new gingival position of tooth No. 8.
Four weeks later, the patient returned to refine the preparations and for the final impression of teeth Nos. 8 and 9. Under local anesthesia, the preparations were refined using a fine diamond flat-ended shoulder bur (#8848 [Brasseler USA]) and margin refinement bur (#8839 [Brasseler USA]). Adequate occlusion reduction was confirmed. A single retraction cord was used followed by the placement of Traxodent Hemodent Paste (Premier Dental Products) and a Comprecap (Roeko) around both preparations. In lieu of using a physical impression technique, which can be uncomfortable and messy for the patient as well as costly and wasteful for the dentist, a digital final impression was taken (TRIOS Intraoral Scanner). The opposing arch and occlusion were also scanned, all within the span of a few minutes (Figure 4). While taking into account the TRIOS shade-measurement tool, a custom shade was taken and photographed to achieve the ideal aesthetic. The retraction cords were removed, and the temporaries were recemented. Then, through a seamless and simple interface, the scans were sent to the laboratory team (BioDental Sciences, New York City), and the receipt of the digital files was confirmed within seconds. Throughout the design process, collaboration with the laboratory team was maintained (Figures 5 to 8).
The patient returned 2 weeks later for the final cementation of the IPS e.max restorations on teeth Nos. 8 and 9. Under local anesthesia, the temporary crowns were removed and the preparations were debrided. The restorations were tried in and assessed for contacts, internal fit, margins, occlusion, and aesthetics. After minimal adjustments, the crowns were polished (IPS e.max Chairside Adjustment and Polishing Kit [Brasseler USA]). A try-in paste (Variolink Esthetic Try-In Paste [Ivoclar Vivadent]) was used to assess the translucency and shade before selecting the appropriate cement. The restorations were cleaned using a universal cleaning gel (Ivoclean [Ivoclar Vivadent]) and then rinsed thoroughly with water. Next, the intaglio surfaces of the lithium disilicate restorations were etched using a 9.6% hydrofluoric acid-etch, then rinsed thoroughly and dried. A universal primer (Monobond Plus [Ivoclar Vivadent]) was then applied to the intaglio surfaces of both crowns and dried. The tooth preparations were isolated and dried, and a universal adhesive (Adhese Universal in a VivaPen [Ivoclar Vivadent]) was then applied (as directed) and light cured. The crowns were cemented (Variolink Esthetic DC Cement [Ivoclar Vivadent]) and light cured for 2 seconds from the facial and lingual directions. The excess cement was then easily cleaned up, and then the crowns were fully light cured. The occlusion was reconfirmed.
The patient was pleased with the final result (Figures 9 to 11).
CLOSING COMMENTS
This article has described how the digital restorative workflow was incorporated into both the diagnostic and treatment phases of a restorative case, resulting in a successful outcome. This clinical case has also served to demonstrate the ease, usability, and accuracy of the digital workflow for restoring maxillary central incisors. Fewer materials, less shipping, and less chair time are necessary in the digital workflow compared to the traditional workflow.
Clinicians should use this technology as a tool that can help meet patient care objectives more efficiently and predictably. More importantly, we need to look at any technology that is used in dentistry not as the solution but rather as a modality that helps implement sound, evidence-based principles in our practices.
Dr. Kaye graduated from the Columbia University School of Dental Medicine, where he received awards in endodontics, prosthodontics, and geriatric dentistry. He has practiced comprehensive dentistry since 1993 and has built successful multi-specialty group practices in and around New York. He is a graduate of the Dawson Academy of Comprehensive Dentistry and has published and lectured on ceramics, occlusion, and the adoption of digital dentistry. He consults with dentists, dental schools, and manufacturers on all aspects of digital dentistry. He can be reached at drgarykaye@nycdd.org.
Disclosure: Dr. Kaye is co-owner of BioDental Sciences.
Dr. Goldstein received his DDS degree from the New York University College of Dentistry and completed his residency program at the Manhattan Veterans Affairs Medical Center, where he currently teaches. He has been trained in the different techniques and software of several intraoral scanners and is passionate about the adoption and implementation of digital dentistry for the general dentist. He can be reached at drgoldstein@kayedentistry.com.
Disclosure: Dr. Goldstein reports no disclosures.
Related Articles
Restorative Digital Dentistry Part 1: The Journey to New Paradigms
Restorative Digital Dentistry Part 2: Choosing the Right Digital Dental Strategy
Restorative Digital Dentistry Part 3: Integration of Technology Into the Clinical Practice


