


INTRODUCTION
Treating complex cases for a patient with limited resources can be challenging. This is especially true when trying to find intermediate restorative material options that are affordable and long lasting enough to stabilize necessary changes in aesthetics and the occlusion. Understanding the latest state-of-the-art options can make it possible to propose a complex yet affordable treatment plan to which the patient can say yes—specifically a treatment plan with a timeline that includes an intermediate solution that can later be converted to a permanent solution, thus accommodating the patient’s financial constraints.
Historically, clinicians have had limited material choices for the fabrication of a chairside restoration option that would be durable enough to last for months, or even years, before a financially challenged patient could afford a final restoration. Recently, a semi-permanent material for indications such as this was introduced to the market (LuxaCrown [DMG America]). Through in vitro comparative studies at the University of North Carolina, LuxaCrown has been shown to last up to 5 years in the mouth, similar to indirect composites, offering an option in material choices for both clinician and patient. The following case report will describe the clinical use of this innovative new material in a patient who required an interim restorative solution.
CASE REPORT
Diagnosis and Treatment Planning
A 78-year-old gentleman presented with a desire to improve the aesthetics and function of his failing upper anterior bridge spanning teeth Nos. 6 to 11. There were retainers on teeth Nos. 6, 7, and 11 that had root canals done and were now found to be structurally compromised. His posterior teeth had significant wear and were located end-to-end or in crossbite. His anterior teeth were also in crossbite (Figures 1 to 3). He was concerned with the slight mobility in his anterior bridge and the significant wear. While he was experiencing no TMJ or muscle pain, it was clear that a complex treatment plan would be required. However, because of the patient’s financial challenges, this treatment would have to be done in phases over time.
It was decided that the ideal treatment would include lower anterior orthodontic intrusion to correct lower anterior dental alveolar extrusion. Opening of the vertical dimension of occlusion (VDO) would be required to create restorative space. This would be accomplished via a full-mouth reconstruction. This treatment would be done over time with a combination of tooth-borne and implant-retained restorations.
 |
 |
| Figure 1. Preoperative anterior view of the patient’s teeth. | Figure 2. Pre-op maxillary model, occlusal view. |
 |
 |
| Figure 3. Pre-op mandibular model, occlusal view. | Figure 4. Wax-up demonstrating correction of occlusal planes. |
 |
| Figure 5. Posterior semi-permanent crown (LuxaCrown [DMG America]) restorations. |
A diagnostic wax-up, opening the VDO to establish adequate restorative space while also decreasing the angle of disocclusion, was done according to the overall treatment goals. The wax-up was also designed to account for the lower anterior orthodontic intrusion that would necessitate lower incisal restorations to re-establish the incisal edge. The posterior occlusal surfaces of the wax-up were created using white presentation wax (Life-Like Presentation Wax [Whip Mix]) in a silicone mold consisting of 2 upper and lower mated sets of posterior occlusal forms using a Rapid Waxer (Dentsply Neytech). The cooled posterior wax teeth were then adjusted for precise placement on the study models to create the ideal desired outcome. The decision was made to follow this as a blueprint for the intermediate restorations and, eventually, for the final restorations to be done at a later time when the patient would be ready to proceed (Figure 4).
Overlay Fabrication and Clinical Protocol
With the success in creating the posterior forms necessary to manage the change in the VDO, the same waxing system would be used to create duplicate tooth forms for the desired anterior changes with composite resin (Silicone Moulds, Anterior [Smile Line]) (Figure 5). The completed composite anterior teeth were then bonded onto the existing teeth, creating the same outcome created as that from the wax-up.
The posterior tooth shells (onlays) were fabricated using the semi-permanent crown and bridge material (LuxaCrown) in the Rapid Waxer. A thin layer of LuxaCrown was placed into the form until cured. Each tooth shell was carefully removed and trimmed to passively fit on top of the existing tooth or crown. It is critically important to trim the shell so that the margin is not overextended; if the margin is too long, the shell will extend too far, thus preventing it from being properly positioned. If the margin is too short, it will result in an open margin that can be easily filled with a flowable composite (such as LuxaFlow Ultra [DMG America]). One by one, each posterior tooth was prepared, beveled, and etched; then adhesive was applied and light cured (Figure 6). Next, a bulk-fill composite (Ecosite Bulk Fill [DMG America]) was then carefully placed inside each posterior tooth shell.
The shells were bonded onto the posterior teeth, starting with the first premolar on one side, then progressing to the lower first premolar on the other side. This sequence was continued to complete the entire lower arch, simulating the occlusal outcome created previously in the diagnostic wax-up. Prior to light curing the composite, each shell was positioned on the tooth as previously described. The consistency of the bulk-fill composite allowed each shell to be moved slightly to ensure the placement was ideal prior to the curing step. After proper positioning, excess composite was removed and light cured (Demi Plus [Kerr Dental]). The marginal discrepancies were then filled with flowable resin composite (LuxaFlow Ultra [DMG America]). Contouring and polishing were completed using a flame-shaped carbide bur (Figure 7). This alternating placement allowed for careful construction of the lower occlusal plane in order to match what was accomplished on the wax-up. Because it is not possible to bond onto the existing gold crowns, a small round bur was used to create retentive holes in the occlusal surfaces (Figure 8). Flowable composite was injected into the retentive holes, cured, and then blended into the packable composite that was inside the posterior tooth shells that had been placed on the crowns.
 |
 |
| Figure 6. Etching-prepared tooth before placement. | Figure 7. First premolar with the LuxaCrown shell (overlay) in place. |
 |
 |
| Figure 8. Retentive holes in gold crowns, into which flowable composite would be cured. | Figure 9. Corrected lower occlusal plane. |
 |
 |
| Figure 10. Corrected upper occlusal plane. | Figure 11. Lower anterior teeth undergo orthodontic intrusion with the upper provisional in place. |
 |
 |
| Figure 12. Lower model post-intrusion and after overlay placement. | Figure 13. LuxaCrown splinted teeth overlay (Nos. 22 to 26), shown with a bulk-fill composite (Ecosite Bulk Fill [DMG America]) placed inside, prior to placement. |
 |
 |
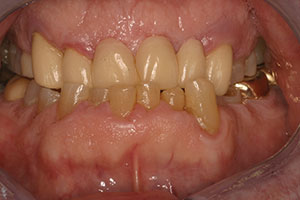
| Figure 14. Splinted overlay placed on the lower anterior teeth. | Figure 15. Post-op image showing the completed semi-permanent upper and lower anterior LuxaCrown crowns that will be replaced with permanent restorations, once the patient is ready and financially able to complete his treatment. |
After the lower arch was properly shaped (Figure 9) in accordance with the diagnostic wax-up, the upper arch was shaped in the same fashion (Figure 10). The upper first premolars were bonded in place first to establish the new altered vertical dimension. This process was continued to complete the upper arch form. Because the lower arch wax-up had been successfully created using the Ney tooth shapes, it was clear that the same approach would be appropriate in shaping the upper arch. Contours and occlusion were adjusted as needed. To prevent inadvertent bonding of the interproximal surfaces, stainless steel matrix bands (Tofflemire [Water Pik]) were utilized. While the first premolar was bonded in place, matrix bands were placed around the canine and second premolar teeth. This protected interproximal surfaces of those adjacent teeth from bonding to the first premolar. Matrix bands were moved accordingly; in other words, when it was time to bond the occlusal surface on the second premolar, the matrix bands were moved to surround the first premolar and first molar. These matrix bands were moved as necessary to ensure interproximal separation.
With the posterior occlusion now set to the desired VDO the lower anterior intrusion was initiated by an orthodontist. Intrusion was completed in approximately 8 months once the free gingival margins of the anterior teeth were at the appropriate levels. During the process of intrusion, provisional restorations of teeth Nos. 6 to 11 were completed (Figure 10). A stint of the wax-up was created for teeth Nos. 6 to 11. After refining upper anterior preparations, LuxaCrown semi-permanent crown and bridge material was injected into the stint and around each preparation. The stint was then placed in the mouth, and the self-curing material was allowed to set, upon which the stint and bridge were removed from the mouth. (A small amount of the material was expressed onto the counter to use as a reference for curing.) Excess marginal material was then trimmed, and the intermediate bridge was contoured and polished.
After lower anterior intrusion was completed (Figure 11), the lower incisal edges needed to be re-established with 2.0 to 3.0 mm of length added. It was decided to extract one incisor and restore the space with 3 lower incisors instead of 4. Utilizing the same technique used for the posterior segments, a stint was made from addition silicone putty (Sil-Tech Putty [Ivoclar Vivadent]) on a wax-up of the desired incisal outcome. LuxaCrown semi-permanent crown and bridge material was then placed inside the stint to make a shell (overlay) of the lower incisors (Figure 12). As before, this shell was hollow on the inside. The shell was trimmed so that it passively fit on top of the existing teeth in the desired position. It is important to remember that if the margin extends too far, the shell cannot be passively positioned. Appropriate tooth preparation and bonding were accomplished. Once again, a bulk-fill composite was placed inside the shell (Figure 13), and after this overlay was carefully positioned, excess composite was removed, and the splinted overlay was light cured in place (Figure 14).
The marginal discrepancies were filled with flowable composite (LuxaFlow Ultra) and light cured. Finally, the contouring and polishing steps were completed (Figure 15).
After completion of the described protocol above, the patient was stabilized with the intermediate overlays and the desired change in the VDO and an improvement in both the occlusion and aesthetics. He expressed his pleasure with the appearance, comfort, and function of his semi-permanent restorations and stated that he was looking forward to transitioning to permanent restorations over the next few years.
CLOSING COMMENTS
One unique aspect of the treatment plan described above is the use of the Rapid Waxer to create not only the wax buildup, but also the posterior tooth shells/overlays. To the best of the author’s knowledge, this is an approach that has not previously been done using LuxaCrown.
The real benefit of this technique is that it allows changes to the VDO with semi-permanent restorations that can be converted to permanent restorations on a tooth-by-tooth basis. This gives the flexibility to convert to permanent restorations in a time frame that best accommodates a patient’s financial situation. Prior to the availability of a semi-permanent crown and bridge material, this technique, designed to phase a patient’s treatment, was not possible with the level of long-term predictability that this recently introduced material allows.
Dr. Fling is a dentist, educator, and author. He maintains a private practice with an emphasis on aesthetic and restorative dentistry and serves as an associate professor and director in the Department of Advanced Restorative Dentistry at the Oklahoma University College of Dentistry. He delivers advanced dental education to dental teams and technicians around the world. He has been listed in Dentistry Today’s Leaders in CE since 2005. A Pankey Scholar, he serves at the L.D. Pankey Institute as an Essentials Director and a member of the Board of Advisors. He can be reached at drfling@drmichaelfling.com.
Disclosure: Dr. Fling receives lecture support from DMG America.
Related Articles
The Effects of Increasing Vertical Dimension of Occlusion
Bio-Rejuvenation Dentistry: Utilizing Nanohybrid Flowable Composite Techniques


