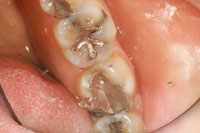
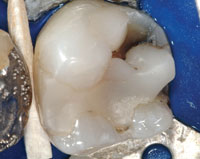
These days, in the age of aesthetic and adhesive dentistry, respecting and preserving remaining healthy tooth structure for future use is the name of the game. Patients are now living longer, wanting and expecting to keep their teeth for a lifetime.
CHOOSING BETWEEN DIRECT AND INDIRECT COMPOSITES
It’s my experience that it can be a difficult task to provide multiple large interproximal direct posterior composites with a high level of quality and consistency in the oral environment. This is especially so when replacing amalgams. Why? Because they take a lot of chair time. Amalgams require bulk. That’s why we were taught the block type preparation to provide the necessary bulk for strength. Furthermore, because amalgams are not a bonded restoration, we were taught to create undercuts and “extension for prevention.”
Over time, as the amalgam contracts and expands with cold and hot temperature changes, cracks form in the glass-like structure of the teeth. Most of the time, these large preps are hard to restore with direct composite. There are isolation and contamination issues, and it is just plain hard to replicate nature in the mouth in a timely, cost-effective and predictable manner—every case, every time. Furthermore, curing in layers makes for a long appointment. It is uncomfortable for patients to keep their mouths open for the prolonged amount of time necessary to accomplish the procedures required. Often, large direct posterior composite resins yield unsatisfactory results in terms of aesthetics and especially long-term function, due to shrinkage, curing and contamination issues.
However, when I fabricate these out of the mouth and in the laboratory, I find that multiple posterior restorations are easier, stronger, and more anatomically correct. Because they are processed at the same time, the whole process can be even more time efficient than using a CAD/CAM system. This indirect technique also reduces the chances for tooth movement, altered contacts or occlusion, which can result during the provisional phase. Furthermore, not having to deal with provisionals reduces tissue irritation and completely eliminates those untimely emergencies when temporaries break or come off. Those costly, nonproductive, and uncomfortable second appointments can also be avoided, keeping the patient happier. In addition, without concerns about retention of temporaries, preparation design can be even more conservative.
CASE REPORT
Diagnosis and Treatment Plan
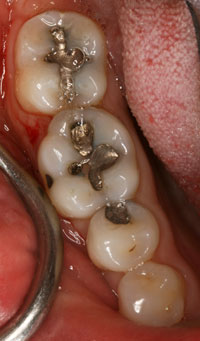
In this case, this patient wanted to replace his multiple failing amalgams in both the lower and upper right quadrants (Figures 1 and 2) in the same appointment. It was determined that the upper right teeth could be restored directly, while the lower ones would be done indirectly. To save time, the mandibular quadrant would be prepared first and then, while the onlays are being made in the laboratory, the maxillary right quadrant could be prepared and filled. This way, there would be no waiting time for the patient for a second appointment. He would be receiving the maximum amount of care in the least amount of time.
Clinical Steps: Mandibular Indirect Composites
We started with the lower left by isolating teeth Nos. 29, 30, and 31 with a rubber dam. For quadrant dentistry, I like to use the split-dam technique. Use of a rubber dam is essential to reduce the amount of amalgam ingested by the patient. In addition, rubber dam offers superior isolation, improved visibility for the clinician, with better dentistry for the patient.
 |
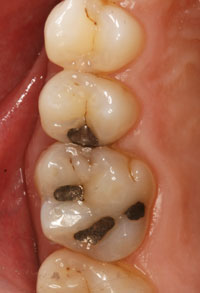 |
| Figure 1. Failing amalgams with caries associated along fracture lines in lower quadrant. | Figure 2. Failing amalgams in upper quadrant. |
 |
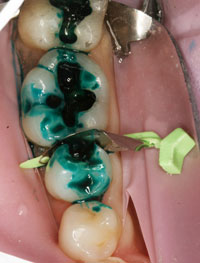 |
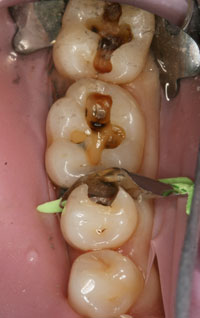
| Figure 3. Amalgam removal with FenderMate (Directa Dental) to prewedge and protect adjacent interproximal wall. | Figure 4. Caries detector. |
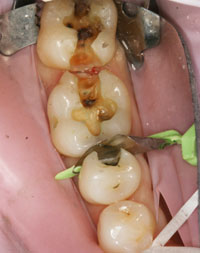 |
| Figure 5. Caries removed. |
I first considered using FenderWedge (Directa Dental) to separate and protect the adjacent tooth. However, in this specific case, I found that FenderMate (Directa Dental) was a better choice to prewedge Nos. 29 and 30 (Figure 3). These products protect the adjacent tooth during preparation, air abrasion, etching, bonding, and refining. In addition, they provide for tighter interproximal contacts in the final restorations.
To remove amalgam, I prefer to use a coarse hourglass-shaped diamond bur No. 813. Diamond burs are less likely to produce the fracture and craze lines that are normally associated with carbide burs. Once the amalgam was removed, SUPERDENT Caries Detection Dye was painted on the prepared surfaces (Figure 4). Cracks associated with the longtime expansion and contraction of the old amalgams had contributed to the interproximal decay found between teeth Nos. 30 and 31. With the amalgam and decay removed, a build-up or “insulation layer” was placed (Figure 5). First, a disinfectant (Hemaseal & Cide [Advantage Dental Products]) was applied. Then, 2 coats of self-etch bonding agent (OptiBond All-In-One Unidose [Kerr]) were applied, air-thinned, and light-cured; providing reduced postoperative sensitivity and high dentin bond strength. Next, a flowable composite (Premise Flowable [Kerr]) was applied to the internal walls and floor, creating an even floor and filling in undercuts (originally created during caries removal and for amalgam retention). After the tooth was insulated, the preparation was refined with a flat-ended cylindrical short-shanked fine-grit diamond (NTI No. 846). Next, 2 accurate hydrocolloid alginate impressions (Identic Alginate [DUX Dental]) were taken. They take only 90 seconds to set, so they are ideal for same day inlay/onlays. As one assistant mixes the alginate, I squirt a little surfactant (PrepWet Plus [DUX Dental]) onto the teeth to wet the preps prior to expressing hydrocolloid material. The second assistant loads the syringe with the warm Identic Syringable Hydrocolloid Cartiloids (DUX Dental) and hands it to me. I squirt the “plug” away from the prep and then continue into the teeth. Then, the first assistant gives me the tray loaded with the Identic Alginate, and I insert it with gentle pressure and hold it steady for 90 seconds.
In the Laboratory
 |
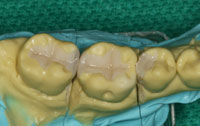 |
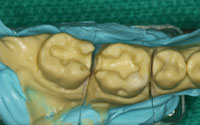
| Figure 6. MACH-SLO/Blue Mousse (Parkell) model work. | Figure 7. Polymer ceramic inlays on model. |
 |
 |
|
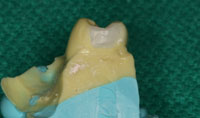
Figure 8. Interproximal of inlay. |
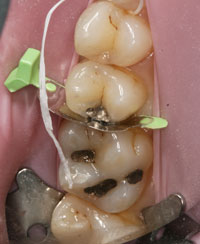
Figure 9. FenderMate to prewedge and protect adjacent interproximal wall. |
 |
 |
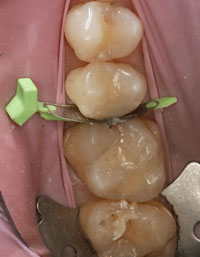
| Figure 10. Composite placed and light-cured. | Figure 11. Final direct composite restorations. |
Meanwhile, back in the lab, the impressions were poured with MACH-SLO Blue House (Parkell) and based with bite registration material on a C-Bite articulator (C-Bite [Dental Products]) (Figure 6). Wax was used to block out any undercuts on the dies (Ultra Waxer [Kerr]). The onlays were built in composite layers with a dentin base shade (Premise Indirect Facial Dentin [Kerr]), followed by an incisal shade (Premise Indirect Incisal [Kerr]). Once the onlays were cured (light, heat, and pressure) in the belleGlass (Kerr) curing unit, they were fitted, adjusted, and polished on the silicone models (Figure 7). When employing an indirect technique, all margins and contacts can be easily and accurately verified outside the mouth, saving valuable chair time and clinical frustration (Figure 8).
Clinical Steps for Maxillary Direct Composites: Saving Time
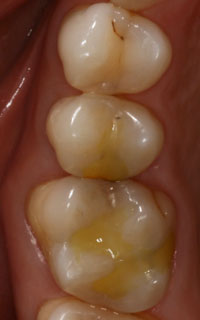
During the time the lower right onlays were being fabricated in the lab, we started on the upper right by placing another FenderMate (Directa Dental) to prewedge teeth Nos. 3 and 4 (Figure 9). Since these fillings were considerably smaller in size, they were done directly using similar steps to prepare and bond these teeth using Premise Nanohybrid (Kerr) as the final restorative. Once the teeth were built up with composite (Figure 10), the FenderMate (Directa Dental) was removed, leaving ideal interproximal margins and contacts. The occlusion was adjusted accordingly and the teeth were polished (Figure 11). By the time the amalgams were replaced, the lower onlays were ready to seat. Now that’s being efficient with chair time!
Seating the Onlays
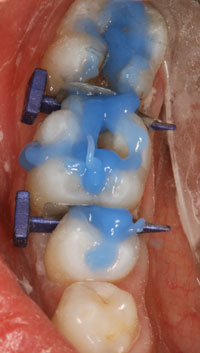
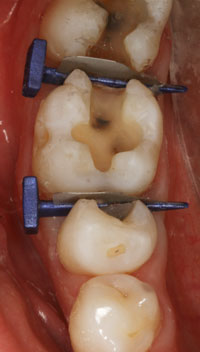
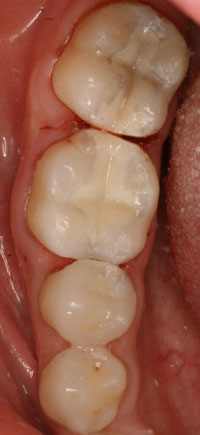
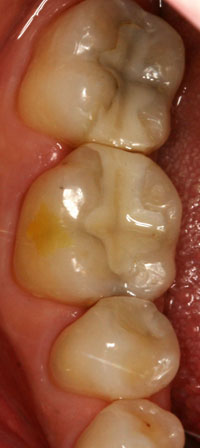
When seating the onlays, the Isolite was applied for isolation during the cementation of the onlay. Before the cementation steps were begun, Expasyl (Kerr) gingival retraction paste was packed into the sulcus gently. It was left in place for 2 minutes to create a clear dry margin between the tissue and tooth. Expasyl contains 15% aluminum chloride which provides hemostasis and also reduces tissue seepage, thus preventing contamination in the sulcus. Then, to assist in seating the onlay, FenderWedges were inserted beneath the interproximal floor, slightly separating and isolating the adjacent teeth. Next, the Expasyl was thoroughly rinsed off with air-water spray. The enamel and composite core was gently microetched with aluminum oxide and the Etch Master (Groman Dental). Then, the enamel and composite core was etched for 15 to 30 seconds (Figure 12). A single component fifth-generation adhesive (PDQ2 [AXIS]) was applied and air-thinned until there was no more movement. The enamel should be glossy (Figure 13). Flowable composite (Premise Flowable [Kerr]) was dispensed into the prepped tooth and the inlay was then inserted into the tooth. The FenderWedges were removed and the onlays further seated using a titanium-coated No. 21 Acorn (American Eagle Instruments) with gentle pressure. Complete seating was facilitated using a contra-angle packer/condenser. An explorer was used to remove any excess flowable composite before light curing. The restoration was then cured from all angles; starting at the interproximal gingival floors where leakage is most likely to occur. Occlusal flash and excess flowable composite is “buffed” with a NTI No. 7,106 short flame-shaped carbide bur. The interproximal margins were adjusted with NTI OA3 bullet or needle No. TDF-4F carbides. Sometimes, I like to use the Bard Parker No. 12 scalpel to remove cured interproximal cement. The pre-wedging step created a temporary open contact that allowed for better finishing before closing (Figure 14).
 |
 |
| Figure 12. Etch is placed, FenderWedges (Directa Dental) are used to pre-wedge and protect adjacent interproximal walls. |
Figure 13. Primed enamel and composite base. |
 |
 |
|
Figure 14. Inlays bonded, immediate open contact. |
Figure 15. Next day, contact closed. |
Once the proper occlusion was established, a diamond-impregnated point and/or cup (PDQ2 [AXIS]) was used to polish the restoration. Polishing was further enhanced by using a polishing paste (Diasheen [AXIS]).
In just 3 hours, 3 large interproximal onlays (Figure 15) and 2 direct composite fillings (one involving an interproximal contact), in 2 different quadrants, were prepped, placed and polished.
CLOSING COMMENTS
Adhesive dentistry offers a more conservative restorative approach. Why take away healthy tooth structure? Why not attempt to save the good and just replace the bad? Direct composites and a laboratory composite resin system are valuable and worthwhile options to preserve tooth structure and long-term dental health. After all, preserving a patient’s natural tooth, whenever possible, is always in their best interest.
Direct composites are an essential part of our armamentarium. But indirect composite restorations have a lot of advantages. There is simply no comparison between the strength of these materials made outside of the mouth versus those cured in the mouth. And of course, it is much easier to build, control, and finish/polish the occlusal, interproximal, and facial/lingual morphology in the laboratory.
Patients truly appreciate the numerous benefits of both direct and indirect composites, especially not having to be in cumbersome temporaries and being able to avoid the inconvenient second appointment associated with crowns. Perhaps the greatest advantage for the patient is being able to conserve the maximum amount of healthy structure, while saving time and money at the same time!
Dr. Berland is a Fellow of the American Academy of Cosmetic Dentistry (AACD), the co-creator of the Lorin Library Smile Style Guide, and the developer of the Web site denturewearers.com. He also is the founder of Berland Dental Arts, a multidoctor specialty practice celebrating 25 years in the Dallas Arts District that pioneered the concept of spa dentistry. He currently serves as the editor of the Cosmetic Dental Tribune. Dr. Berland is also the creator of “Biomimetic Same Day Inlay/Onlays,” and “The Latest and Greatest in Cosmetic Dentistry—A Full Mouth Rehab in 2 Visits,” both awarded 8 AGD credits. His unique approach to dentistry has been featured on television and publications such as 20/20, Time, Town & Country, Reader’s Digest, GQ, US News & World Report, Woman’s World, Details, Dallas Morning News, Good Morning Texas, and D magazine. In 2008, The AACD honored Dr. Berland with the 2008 Outstanding Contributions to the Art and Science of Cosmetic Dentistry Award. He can be reached at drberland@dallasdentalspa.com.
Disclosure: Dr. Berland reports no conflicts of interest.


