
INTRODUCTION
Until recently, CAD/CAM technology was the latest advancement in dental technology. Now, 3D printing is quickly becoming the next step in the digital revolution. The dental industry has quickly adopted 3D printing both chairside and in dental labs. Dentists, dental assistants, and technicians can accurately and efficiently produce study models, smile design models, implant surgical guides, occlusal guards, clear aligners, dentures, custom trays, provisional restorations, and permanent restorations. Dentists implement 3D printing technologies in-house because of their efficient turnaround time and accessibility. According to Dental Tribune, between 2023 and 2035, 3D printing in dentistry is expected to grow an average of 12.6% per year during the next 12 years.1
Three-dimensional printing is an additive manufacturing process in which a model, restoration, or dental appliance is fabricated by laying down successive layers of material until the finished product is formed. Three-dimensional printing allows dentists to create dental appliances and restorations for patients quicker and more accurately and cost-efficiently than traditional, manual methods.2
In my practice, we started using our 3D printer for models, occlusal guards, and surgical stents. These are the main clinical indications for 3D printing.3 Now, we fabricate many restorations that we would have formerly sent to the lab. Shifting production of All-on-X prototypes, ceramic crowns, provisional crowns, and bridges to our 3D printer has made our workflow much more efficient and saved us thousands in lab fees. Achieving fit and aesthetics with an in-office-printed restoration comparable to or even superior than a lab-made restoration is paramount.
This article will provide a step-by-step demonstration of a combination anterior veneer and implant case that utilized 3D printing for smile design, provisional fabrication, implant planning, and placement.
This workflow can help clinicians simplify complex cases, get better outcomes, and provide treatment in fewer appointments.
CASE REPORT
This case details the restorations for a 20-year-old young man with multiple congenitally missing permanent teeth.
He was first seen in our office at the age of 16 years old. He had just completed orthodontic treatment and was seeking a solution to his multiple missing permanent teeth. Frequently, after undergoing orthodontic treatment, these young adult patients are ready to replace their congenitally missing teeth and will seek multiple opinions around restoration. It is advisable to have these discussions and consultations prior to the orthodontic treatment to best set up the alignment of the existing teeth for the definitive plan. In this case, however, and like many others, the orthodontic treatment was done without the restorative plan in place.
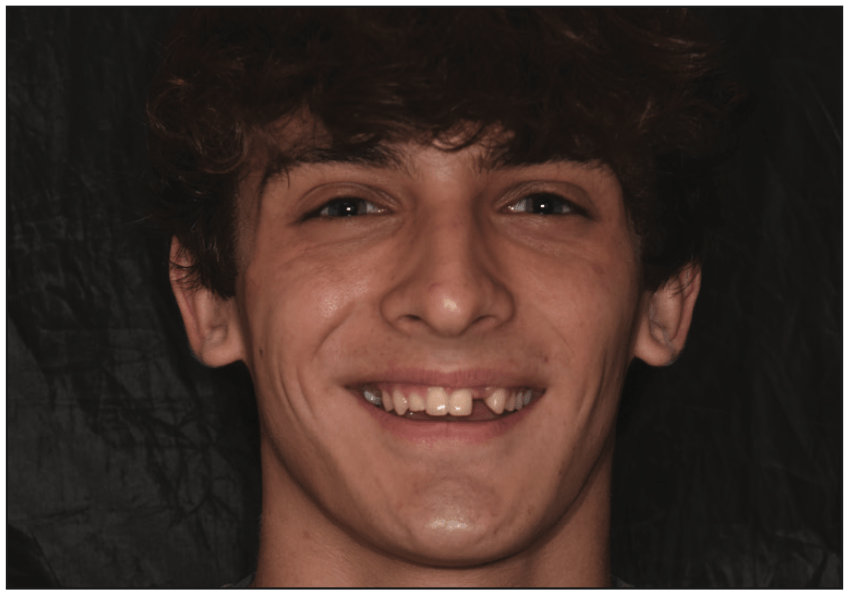
Figures 1 and 2 show the 16-year-old patient at the completion of his orthodontic treatment. He had a retained upper right second primary molar and was missing his upper left lateral incisor. He was also missing his lower right and left lateral incisors. His lower right and left canines had been orthodontically placed in the position of the right and left lower lateral incisors. The lower canines had been altered to have flattened cusps to give the appearance of incisors.

At this time, and considering the patient’s age, the treatment plan included using ceramo-resin onlays to build the upper right second primary molar into occlusion. This would function as both a space maintainer and fill in the aesthetic void. The upper left lateral would be replaced with a single-winged, bonded zirconia bridge. When the patient is a bit older, the bonded zirconia bridge could be removed, and the upper lateral could be replaced with an implant. The upper right primary second molar would remain as long as possible with the bonded onlay and would eventually be replaced with an implant. Ideally, the lower canines would be distalized, and the lower right and left lateral incisors would be replaced with implants. This treatment plan was presented to the patient and his parents, but they did not follow through with this treatment in our office.
The patient returned after a 4-year absence. The upper right primary second molar was still in place and in sub-occlusion. The upper left lateral incisor had been replaced with a Maryland bridge. The lower canines were replaced with Maryland bridges. As you can see, there was some shifting of the upper right central incisor from the earlier photos (Figures 3 and 4). The patient and his parents were dissatisfied with the appearance of his smile. Therefore, the smile received a comprehensive evaluation (Figures 5 and 6).


The midline and incisors were canted with the midline shifting right. The height of the contour was uneven, as was the gingiva. Proportionally, the centrals were not even, the right lateral was small, and the left lateral on the Maryland bridge was too wide. After considering the smile evaluation, the following treatment was planned:
- Removal of the Maryland bridge replacing the left lateral incisor.
- Implant placement in the position of the left lateral maxillary incisor.
- Ceramic veneers would be placed on the right lateral maxillary incisor and the right central maxillary incisor.
- The left central maxillary incisor had been prepped lingually for a Maryland bridge, which necessitated full coverage for the left central.
- The primary second right molar would receive a bonded onlay to bring it into occlusion.
- The lower Maryland bridges would remain in place at the present time but would be replaced with implants in the future.
The patient had a limited time frame available for the restoration and implant placement as he was home on break from college with about 5 months to complete the treatment.
An intraoral scan and a CBCT scan were acquired. The smile was designed digitally, focusing on improving the aesthetics and correcting the issues above. In order to simplify the procedures and expedite the appointments, in-office 3D printing was utilized. Treatment began with removing the Maryland bridge, and the upper right lateral, upper right central, and upper left central were prepared for ceramics. The gingival tissue was sculpted with a diode laser. A provisional with full coverage on the upper left central incisor with a cantilever pontic for the upper left lateral incisor was designed and printed using V-Print c&b temp (VOCO). Full coverage was necessary on the upper left central incisor because the lingual had been prepared for the previous Maryland bridge. Veneer provisionals for the upper right central and lateral were also designed and printed (Figures 7 and 8).


Utilizing the CBCT scan and intraoral scan, a surgical guide using V-Print SG 3D printing resin (VOCO) was designed, and the STL file was produced. The surgical guide was printed and rinsed. The guide sleeve was placed, and then the splint was cured. After the splint was autoclaved, it was used for fully guided surgical placement of the implant (Figures 9 to 11).


A short, tissue-level provisional abutment was placed into the implant. The provisional with full coverage on the upper left central incisor and the cantilever pontic was placed. The tissue side of the pontic fit intimately onto the tissue-level abutment. Not only is this hygienic, but it encourages the papilla to develop around the pontic, and it does not relay occlusal stress on the implant. The provisionals were in place for 16 weeks to allow for healing of the implant. The printed provisionals are durable, have exact margins, and keep their finish through long-term usage and are an ideal solution for this clinical situation (Figure 12).


The final layered IPS e.max restorations (Ivoclar) were fabricated and placed (Figures 13 and 14).
CONCLUSION
Smile design principles and planning, coupled with 3D printing, resulted in a very aesthetic outcome for this patient. The long-term, printed provisional was not only aesthetic but also durable and allowed for the desired tissue adaptation for the future implant-supported crown on the left lateral incisor. Utilizing 3D printing to fabricate the surgical guide allowed the patient to be scheduled expeditiously for surgery and to ultimately complete his smile restoration in the time he had available.
Three-dimensional printing in dentistry is not only established but also a very promising direction for clinicians. It allows clinicians to leverage existing technology and techniques to provide new solutions to their current procedures. New materials and technologies will be developed to further ensure high accuracy and low cost. With advancements, new biocompatible materials will be introduced, giving excellent aesthetic results.4 Disrupting the traditional approaches to procedures gives clinicians opportunities to reduce costs and improve the care they provide to their patients.
REFERENCES
1. Hall Hoppe A. Dental 3D-printing market to reach almost US$8 billion over the next few years. Dental Tribune. April 8, 2022. Available at: https://www.dental-tribune.com/news/dental-3d-printing-market-to-reach-almost-us8-billion-over-the-next-few-years/
2. Javaid M, Haleem A. Current status and applications of additive manufacturing in dentistry: A literature-based review. J Oral Biol Craniofac Res. 2019;9(3):179–85. doi:10.1016/j.jobcr.2019.04.004
3. Oberoi G, Nitsch S, Edelmayer M, et al. 3D Printing – Encompassing the facets of dentistry. Front Bioeng Biotechnol. 2018;6:172. doi:10.3389/fbioe.2018.00172
4. Moshkova A. 3D Print opportunities in dentistry: history, present, future. Int J Adv Sci Res. 2020;290(4s):2667–81.
ABOUT THE AUTHOR
Dr. McMahon is a graduate of the University of Pittsburgh (Pitt) School of Dental Medicine. She maintains a private practice focused on cosmetic dentistry in Pittsburgh. Dr. McMahon is accredited by the American Academy of Cosmetic Dentistry and is an invited Fellow of the prestigious American Society for Dental Aesthetics. She is a past clinical instructor in prosthodontics and operative dentistry at Pitt. Dr. McMahon frequently lectures across the United States on minimally invasive dentistry and conservative cosmetic dentistry for teenagers and young adults and has been annually voted by her peers as a top dentist in Pittsburgh for more than 20 years. She can be reached at drsusan@wowinsmile.com.
Disclosure: Dr. McMahon received an honorarium from VOCO to write this article.


