My first experience with beauty pageants was performing a smile makeover for a patient before she competed in the Mrs. North Carolina America Pageant in 2009. I was in the front row when she won “Best Smile” and then won the pageant itself. The joy I received was worth much more than the money I made performing the procedures. When the directors of the Mrs. North Carolina and South Carolina America pageants asked if I would become a sponsor for the 2 pageants, I was elated. Since then, I have had the honor of providing smile enhancements for the winners of both of these pageants. Some want simply whitening, while others desire some tooth alignment or composite bonding. A number of them wish for ceramic smile makeovers.
About Our Patient
Phaedra Pistone is Mrs. North Carolina America 2019. She has survived 2 bouts of breast cancer, one after she won the crown. This remarkable woman not only survived, but she thrived. A native of North Carolina, she currently resides in Mooresville with her husband, Tom, and her 3 fur babies, Harley, Crü, and Pesci, and is the owner of Classic Bride & Formals in Cornelius, NC. She is an honors graduate of High Point University in North Carolina and holds a BA in business administration with a double concentration in finance and management. Also, she is a graduate of the J.Y. Monk Real Estate School in Charlotte, NC, and holds a North Carolina Real Estate license.
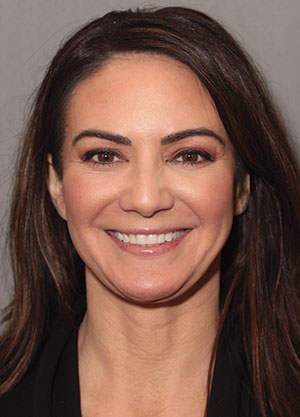 |
| Figure 1. Full-face preoperative image. |
This inspiring woman is an active volunteer with her personal platform H.O.P.E. – Breast Cancer Awareness (Care & Cure), along with Shirley’s Angels Organization, the National Breast Cancer Foundation, the American Cancer Society, the Make-A-Wish Foundation, the Hope House Foundation, and Brides Across America. She has turned her pain into her purpose by empowering, encouraging, and educating women about the importance of early detection with mammograms because that is what saved her life. Phaedra says she was so honored to be Mrs. North Carolina America 2019 and to have had the opportunity to share her message of breast cancer awareness at the 2019 Mrs. America Pageant in Las Vegas where she finished in the top 6 out of 52 participants.
The Consultation
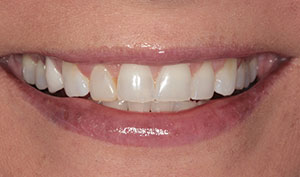
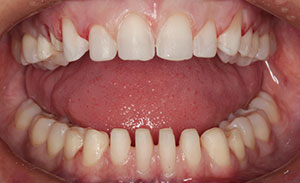
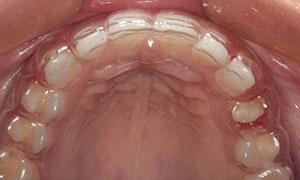
When Phaedra came to my office for a smile evaluation, I did a complete hard- and soft-tissue examination and took radiographs and a full set of extraoral and intraoral photographs. Preoperative photos were taken (Figures 1 to 3) at this initial appointment. While she had some tissue recession on the facial area of the mandibular incisors (Figure 3), she still had a band of attached tissue there. Her dental health was excellent with minimal interproximal caries in her maxillary premolar area and no periodontal disease. She had suffered from incisal wear of her anterior teeth, and it was concluded that the stress from her cancer and treatment likely contributed to her wear. She had one existing crown on her maxillary right first premolar, but no other restorations had been done.
 |
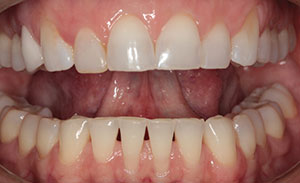 |
| Figure 2. Phaedra’s smile, before treatment. | Figure 3. Retracted pre-op facial view. |
 |
 |
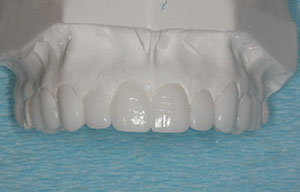
| Figure 4. Wax-up for the maxillary 6 anterior and bicuspid teeth. | Figure 5. Lab putty stint for provisional fabrication. |
 |
 |
| Figure 6. Stone duplicate of wax-up. | Figure 7. Vacuum-formed stint for the prep guide. |
Her desires were to repair any decay; achieve a whiter, wider smile; and restore her worn edges. We discussed her treatment possibilities, and this included taking care of only the active caries and doing nothing to improve her aesthetics. After all, she won the pageant with the smile she had. After consultation, she decided to have the minor caries treated and to also have porcelain veneers done to optimize her smile. Due to her overall good oral health, it was determined that she would be a good candidate for the elective dentistry that she desired.
Pre-op Appointment
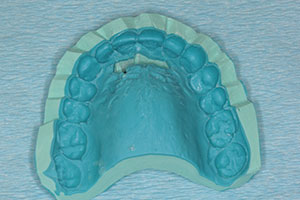
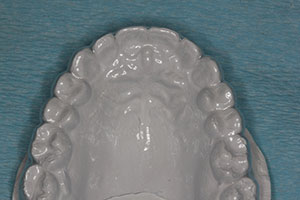
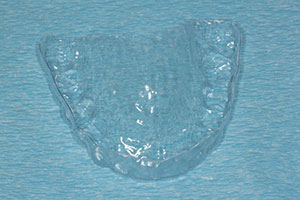
Upper and lower full-arch pre-op impressions were taken using an alginate substitute impression material (Silginat [Kettenbach LP]). A facebow record (Denar [Whip Mix]) and a centric relation bite registration was taken (Futar [Kettenbach LP]). The impressions and records were sent to the dental laboratory team with a request to mount the models and to complete a wax-up for the maxillary teeth from second premolar to second premolar (Figure 4) and the mandibular teeth from first premolar to first premolar. The lab team was asked to make a maxillary putty impression (Figure 5) over the completed wax-up to be used to fabricate the provisional restorations. The lab team was also asked to duplicate the wax-up models in stone (Figure 6) and to fabricate a vacuum-formed stent (Figure 7) to serve as a preparations guide.
Preparation Appointment
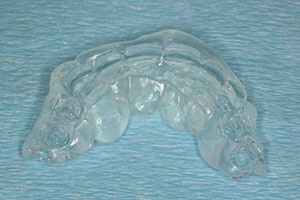
At the preparation appointment, the mandibular 8 anterior teeth were prepared for porcelain veneers, and a bite registration was taken (Futar Clear Fast [Kettenbach LP]). The maxillary 6 anterior teeth and 4 bicuspids were then prepared. The maxillary 6 anterior teeth (canine to canine) were prepared for 360° laminates. The crown was removed from the left first premolar, and the preparation was refined. The other 3 premolars were prepared for onlay veneers covering the mesial, distal-occlusal, and facial areas. A proximal carious lesion was found in the mesial of the right first molar, so a small inlay preparation was completed. A second bite registration was taken using Futar Clear Fast (Figure 8). The purpose of the 2 occlusal registrations is to be able to “jump” the prepared lower to the mounted pre-op model and then to jump the prepared upper model to the previously mounted lower model. By doing this, both the unprepared and prepared models are mounted identically on the articulator.
The prepared teeth can be seen from the facial retracted view in Figure 9. In Figure 10, you can see the preparation guide in place over the ma
xillary prepared teeth. Final vinyl polysiloxane impressions were taken using a light-body material (Panasil initial contact X-Light [Kettenbach LP]) over the preps and at the margins, with Panasil Putty Soft (Kettenbach LP) for the tray material. Next, provisional restorations were fabricated by injecting a temporary crown and bridge resin (Visalys [Kettenbach LP]) into the lab stents and then seating them intraorally to place. The temporary material was allowed to completely cure before the stent was removed. Excess resin was removed from the margins with a small carbide finishing bur (Brasseler USA), and the surface was smoothed and polished with an Enhance Finishing Cup (Dentsply Sirona). The provisional restorations are shown from the retracted facial view in Figure 11.
 |
 |
| Figure 8. CR bite registration. | Figure 9. Retracted facial view of the prepared teeth. |
 |
 |
| Figure 10. Maxillary preparation guide in place. | Figure 11. Provisional restorations in place. |
 |
 |
| Figure 12. Maxillary restorations on the working model. | Figure 13. Mandibular restorations on the working model. |
Laboratory Fabrication of the All-Ceramic Veneers
Full understanding of the case in the laboratory does start with the diagnostic wax-up for the vision, design, and function of the case. Once the case has been prepped and sent to the lab team (Frontier Dental Laboratories, El Dorado Hills, Calif.), it is merely a continuation of the process set in motion from the initial consultation with the patient. While the lab team processes the model work, analysis of the form and function of the provisional restorations is completed and all information is communicated to the lab with provisional models, photos and sometimes Facetime video conferencing with the lab team, clinician and patient. Provisional models are analyzed by the lab team to ensure all preparations are adequate to produce the desired results. Using a diagnostic wax-up serves as a road map for a successful case. Also, there is an increase of success and continuity when the maxillary and mandibular restorations can be completed at the same time.
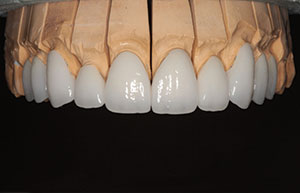
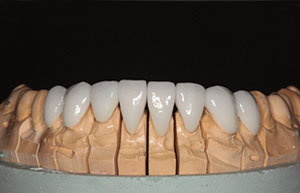
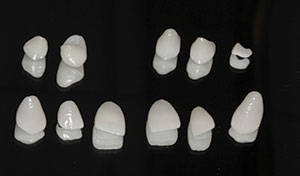
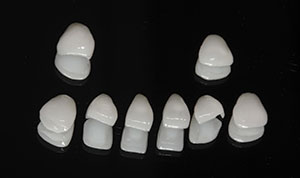
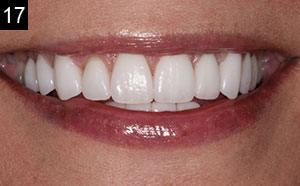
The lab team was asked to fabricate IPS e.max (Ivoclar Vivadent) restorations. This clinically proven lithium disilicate material was chosen for its inherent strength and exceptional aesthetics. The patient desired an OM1 shade (VITA North America). The talented ceramist was able to achieve the desired shade with a beautifully natural appearance. Even though the final shade was OM1, it was important to make sure that we achieved a naturally bright shade, rather than opaque (fake) bright. HTBL1 (High Translucency) was the e.max ingot of choice due to its high-value and yet natural look. All of the lithium disilicate restorations were carefully layered and contoured to ensure optimum results (Figures 12 to 15).
Delivery Appointment
When Phaedra returned for placement of her restorations, everyone was excited. She had loved her provisional restorations and was looking forward to the lighter color of the final restorations. The provisionals were removed, and the IPS e.max restorations were tried in using a drop of water in each as a try-in medium. The fit and aesthetics were excellent. Phaedra loved the new look, so we proceeded to place them.
 |
 |
| Figure 14. Maxillary restorations photographed on a mirror surface. | Figure 15. Mandibular restorations photographed on a mirror surface. |
 |
| Figure 16. Retracted facial view of the restorations in place. |
 |
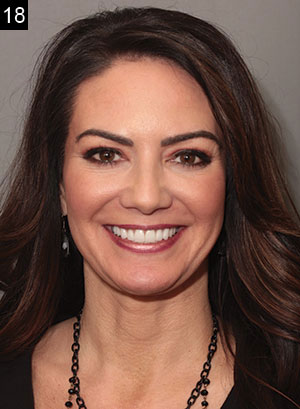 |
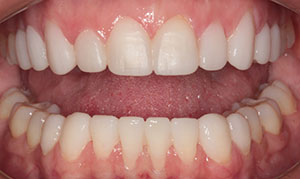
| Figures 17 and 18. Phaedra’s new smile. |
The prepared teeth were thoroughly cleaned and dried using an air/water syringe. The mandibular veneers were placed first; the prepared surfaces (Etch-37wBAC [BISCO Dental Products]) were etched for 10 seconds. The teeth were then thoroughly rinsed and lightly air dried with an air/water syringe. The prepared teeth were rewetted with a 2% chlorhexidine digluconate aqueous solution (Cavity Cleanser [BISCO Dental Products]) and left slightly moist. Next, a seventh-generation bonding agent (All-Bond Universal [BISCO Dental Products]) was liberally applied to the prepared tooth surfaces and lightly air-dried. The bonding agent was light cured for 10 seconds (S.P.E.C. 3 curing light [Coltene]). Silane Primer (BISCO Dental Products) was applied to the internal etched surfaces of the veneers and air dried. A dual-cure resin cement (Duo-Link Universal [BISCO Dental Products]) was applied to the internal surfaces, and each restoration was set to place. The luting composite was allowed to come to a gel state, and then excess cement was teased away from the margins with an explorer. The luting composite was allowed to continue to cure. Then a curing light (S.P.E.C. 3 [COLTENE])was used to finish the cure, and the excess cured resin was removed using a small carbide finishing bur (Brasseler USA) in a high-speed handpiece. Excess interproximal resin was removed with a small dental saw (Ceri-Saw [DenMat]).
The maxillary 360° laminates were then placed in the same manner, followed by the premolar crown, onlay/veneers, and inlay. Minor occlusal adjustments were made using fine diamonds, a 30-fluted carbide finishing bur, and porcelain polishing points (Dialite [Brasseler USA]).
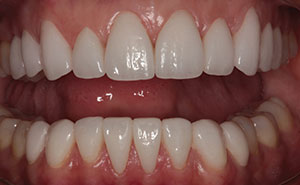
The patient was extremely pleased with the aesthetic outcome (Figures 16 to 18).
CLOSING COMMENTS
By using ceramic laminates, a crown, onlay/veneers, and a ceramic inlay, we were able to improve what was already an attractive smile for a very special woman who gives way more to others in life than she receives. It is my hope that our work supports her in her quest for the continued promotion of breast cancer awareness.
Acknowledgment:
I would like to thank Brent West and the fine ceramists at Frontier Dental Laboratories, El Dorado Hills, Calif, for the world-class ceramics they fabricated for Phaedra.
Dr. Nash maintains a private practice in Huntersville, NC, where he focuses on aesthetic and cosmetic dental treatment. An accredited Fellow in the American Academy of Cosmetic Dentistry and a Diplomate for the American Board of Dental Aesthetics, he lectures internationally on subjects in aesthetic dentistry and has authored chapters in 2 dental textbooks. He is co-founder of the Nash Institute for Dental Learning in Huntersville and is a consultant for numerous dental product manufacturers. He can be reached at (704) 895-7660, via email at rosswnashdds@aol.com, or via the website thenashinstitute.com.
Disclosure: Dr. Nash reports no disclosures.
Related Articles
Porcelain Veneers in a Single Appointment
Minimally Invasive Preps for Thin Porcelain Veneers


