
What’s the biggest problem with tooth whitening? If you answered anything other than “Sensitivity!” you haven’t been paying attention. What’s the second biggest problem? Compliance! The question is, “Why?” I suggest there are 2 reasons: the first is obviously sensitivity; the second is the patient’s inability to appreciate that anything significant is being accomplished. In this article I will address both of these challenges and make many suggestions as to how we have successfully dealt with and/or prevented these issues in my office.
SOLVING THE CHALLENGES: COMPLIANCE
Let’s start with patient compliance. If patients could see the results happening right in front of their eyes, they would be more pleased and would certainly be more compliant. That’s only human nature. We are all more likely to follow someone’s suggestion if we see proof that it is working.
Take-Home Bleaching
Most dental offices are still doing tooth whitening treating both arches at the same time. Unless there is an extreme time deadline, I never do that. We also do a few other things differently, and we are about to examine each of them.
First, make what you are doing important. Take pre-op photos, and plan on midway and post-op photos. Take a pre-op shade. Establish realistic expectations. Then quote a longer treatment time frame. In my office we say, “The average treatment time is about 2 to 3 weeks for the upper teeth, and another 2 to 3 weeks for the lowers, but it’s possible yours could take a little longer.” Set your fee so you don’t have to increase it if you need a little extra time or some extra materials. Then you can promise to “stick with it” even if this patient is a resistant case, and you are a hero if it takes less time to get the desired results.
 |
 |
|
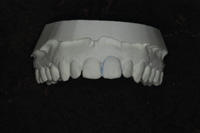
Figure 1. Upper model. |
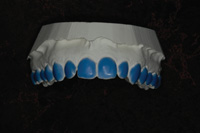
Figure 2. Block out added. |
 |
 |
|
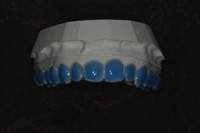
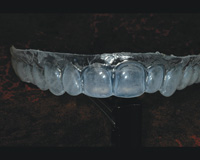
Figure 3. Tray on model. |
Figure 4. Reservoir tray showing gingival extension. Trays like these hold the bleaching gel intimately against the entire buccal surface of the teeth, but because the margin of the tray is extended on to the gingiva, there is no leakage at the gingival margin. |
We also use reservoirs. Certainly, I have heard the same statements that you have—reservoirs are un-necessary—but that just doesn’t apply to this technique. (If you have a scalloped edge, those statements are correct: reservoirs don’t matter because the gel is going to escape no matter what you do since the tray can not be adapted well enough to the teeth.) However, since we have sealed the gingival margin of the tray against the gingival tissue, making reservoirs to hold the whitening gel against the teeth makes perfect sense. We place a thin layer of light-cured blockout material on the buccal surfaces of the teeth to be bleached. Then, we vacuum form a tray over the model and use a heat knife to cut the flat margin against the gingiva (no blockout there). Next, we smooth the cut tray edge by slightly heating it with a flame and then pressing it with a sliding finger against the stone model. The result is a pocket that holds the bleaching gel completely against the buccal surface of the teeth and disperses the gel right up to (yet stopping at) the gingival margin. In this way, the whitening gel is kept exactly where it needs to be during the entire treatment time. In the rare instance when the patient has sensitive gingival tissue, the tray is cut back in those areas into the more common scalloped shape (Figures 1 to 4).
(Here is a challenge to try on yourself: take an impression of your own mouth and make a bleaching tray. Construct one side as described above with block out, reservoirs, and the tray edge a few millimeters up on the gingiva; and then fabricate the other side in the “normal” [no reservoir, scalloped edge near the gingival crest] way. Put some whitening gel in the tray, insert it into your mouth, and look in the mirror. Watch the gel ooze out of the scalloped side. If you need further convincing regarding this design’s advantages, go ahead and use it personally for a couple of weeks. You will have to go back and help the scalloped side catch up to the “better-bleached” side done with the tray design fabricated using this method. You will be absolutely convinced of the effectiveness of this method.)
Bleaching Protocol
We then deliver only the upper tray, giving instructions, and asking the patient to return in one week for a check of how they are doing. If they have any problems in the meantime, they are to call and return to the office immediately. Within a week, the patient can see a difference between their upper and lower teeth. As each day progresses, they can see an even greater contrast. If both arches are done at the same time, the daily difference is too subtle for most patients to discern, so they may perceive there is no improvement and gradually quit. So, you can understand how you have ultimately caused their noncompliance in this way.
 |
|
Figure 5. Midbleaching documentation photo. Upper teeth have been completed; the lower teeth are yet to be done. |
After t
he one-week check, we then (usually) have the patient return 2 weeks later. The ever-increasing contrast between the arches in our patients is very obvious to them. Since they can see a difference, they have the incentive to keep bleaching as instructed so they can move on to the lower tray (which we withhold until we and the patient feel they have bleached to the desired level) as soon as possible. At this point, the patient will be a great ambassador for your office. They typically show everyone how their teeth are becoming brighter and more attractive and explain how you have helped them accomplish this goal. We then take a midtreatment photo with the upper teeth white and the lower teeth unbleached (Figure 5). The lower tray is then delivered. The patient is brought back once again for one week to monitor the progress of the lower teeth, and then typically a final check, 2 weeks later. At this final appointment, post-op photos are taken. The patient is reminded that touch-ups are inexpensive and are expected at about 6 month to one year intervals. (“Why not plan on it at each ‘cleaning’ appointment?”) With this method, you will get compliance, and your patients will get whiter teeth for life.
SOLVING THE CHALLENGES: SENSITIVITY
A significant number of patients develop temperature sensitivity during the whitening process. First, reassure them that it is transient. It always goes away within a couple of days of discontinuing the bleaching. Some patients develop such intense sensitivity that they would rather stop the process than to put up with the discomfort.
Chemical Treatments
There are many methods for dealing with sensitivity. One of the first methods was the use of fluoride applications, either in the trays or in prescription-level fluoride toothpastes. Potassium nitrate is an excellent desensitizer and is of enormous help. More recently, amorphous calcium phosphate has also proven to be quite an effective additive. All of these chemicals help to reduce bleaching-related sensitivity. They have also been incorporated in many of the currently available whitening products.
Preventing Sensitivity
How about preventing the sensitivity in the first place? In my opinion, dehydration is the primary cause of whitening sensitivity. Picture your last visit to the hygienist. They are trying to be extra careful and to remove even those tiny little specks of calculus just subgingival on the lingual surfaces of your mandibular anterior teeth. Then they blow some air on the area to better visualize the calculus, and then blow a little more. The teeth are dried out and they give you a “zing”—which you interpret as sensitivity to cold. When we bleach, the evaporation of the nascent oxygen produced from the peroxide dehydrates the teeth. That is why the teeth always look a little chalky right after bleaching—they are dehydrated.
To solve the dehydration problem, we use a prewhitener (Power Swabs [Power Swabs Corporation; also distributed under Power Start]) that performs 3 functions. First, Power Swabs include solvents that help clean the teeth (like prewash stain removers help in cleaning grass stains off trousers). It doesn’t take a rocket scientist to realize that clean teeth should get whiter faster than dirty teeth. Second, since there is less debris on the enamel, the bleaching can penetrate deeper—again resulting in faster and greater whitening. Third (and most important), the swabs contain a surfactant (wetting agent). The surfactant al-lows the bleaching gel to dissipate all over the teeth keeping them hydrated, and since the teeth are not allowed to dehydrate (keep bleaching times short) the teeth do not get sensitive. Thus, the simple use of this prewhitener produces results that are whiter and faster while eliminating a main cause of sensitivity.
 |
 |
|
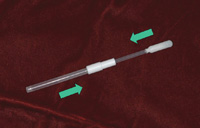
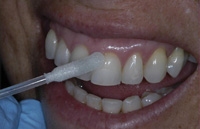
Figure 6. The applicator. |
Figure 7. Applying a prewhitener with a soaked swab (Power Swabs [Power Swabs Corporation]). |
So, let’s go back to compliance for a moment. If you can show the patient that their teeth are getting whiter, they can see it every day, their time of application is reduced, and they have no sensitivity, why wouldn’t they do what you ask to help them improve their appearance?
POWER BLEACHING
The good news is that the prewhitener also works extremely well with power bleaching. Whether or not you use a light source, power bleaching involves a dental professional applying a stronger whitening agent for a shorter period of time than when using trays. To shorten the time even more while improving the results, just swirl the soaked Power Swab all over the surfaces to be bleached for 30 seconds immediately prior to each application. I typically cut my time for application of the whitening agent down to 3 sets at 10 minutes each. It is amazing, but when the final coat is rinsed off with cold water, the patients do not wince because the prewhitener prevented any sensitivity.
I typically follow power bleaching with a week of take home tray treatment, still using the prewhitener before every application. For maximum compliance, you can use the one-tray-at-a-time method, but I only do in-office power bleaching for those who are in a hurry—so they usually get both trays at once.
In rare instances, a few patients still get a little sensitivity with 30 minute tray applications of peroxide whiteners at home. If this happens, I reduce the time to 15, or even 10 minutes, and have the patient take one day off. This does extend the total time to get the whitening results we desire, but at least we can bleach these patients who would otherwise be unwilling to complete the process.
 |
 |
|
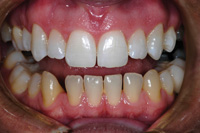
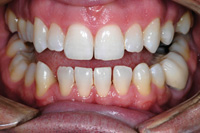
Figure 8. Before whitening. |
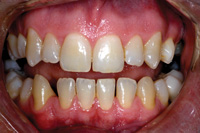
Figu re 9. After whitening. |
Dr. Zase practices general dentistry with an emphasis on cosmetics, at the Colchester Dental Group in Colchester, Conn. He is an accredited member and past president (2006-2007) of the American Academy of Cosmetic Dentistry. He is also a master of the Academy of General Dentistry. He can be reached at (860) 537-2351 or martyzase@aol.com.
Disclosure: Dr. Zase is the professional advisor for Power Swabs Corp, the manufacturer of the Power Swabs, powerstart.com.


