
Combining Whitening and Aesthetic Restorative Procedures
Many of today’s dental patients are asking about brightening their smiles when undergoing restorative treatment. Since restorative materials do not change color, it is recommended to perform tooth whitening procedures prior to restorative procedures for these types of patients. Tooth whitening and direct composite materials can be utilized to make minor aesthetic corrections, oftentimes with dramatic results. This article will feature some of these techniques in a case report that combined conservative aesthetic treatment to makeover a patient’s smile after completing orthodontic therapy.
Minor Orthodontic Correction and Tooth Whitening
Tooth whitening (or “bleaching”) is still one of the most conservative options to brighten a person’s smile. Both chairside and at-home methods have been shown to be effective. The final result, which can vary from patient to patient, is partially determined by the concentration of the whitening solution vs time in contact with the tooth surface and the natural preoperative shade being brightened. Usually, yellowish-colored teeth respond to whitening solutions better than bluish-gray or tetracycline-stained teeth. Chairside whitening systems can be of higher concentration because their application can be controlled by the dentist and the soft tissues are protected. At-home systems using prefabricated trays can be effective as well, but lesser concentrations are used since patient use cannot be monitored.
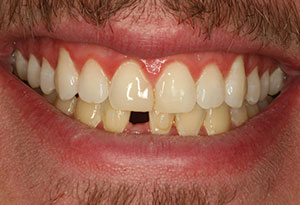
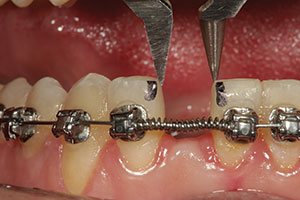
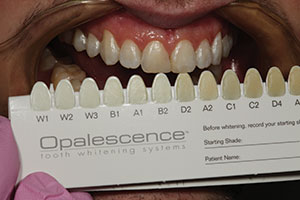
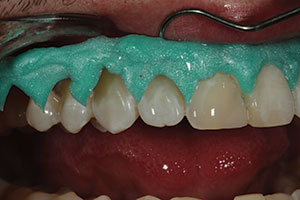
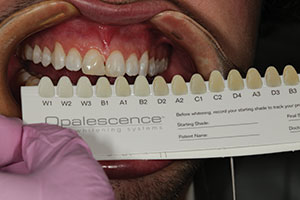
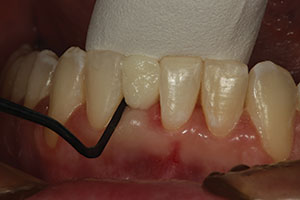
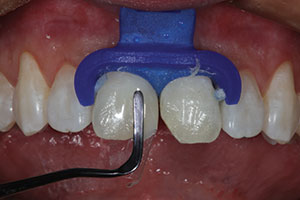
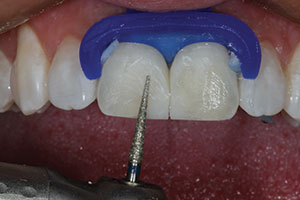
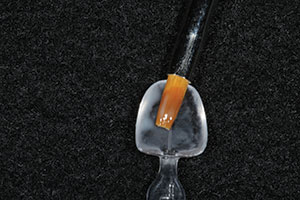
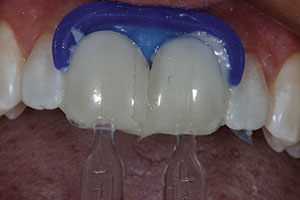
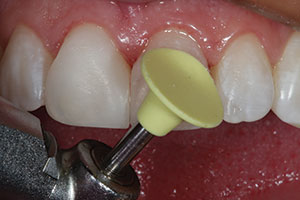
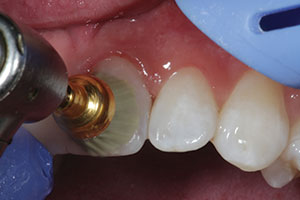
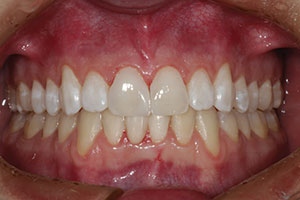
The 19-year-old patient in Figure 1 had just completed orthodontic treatment and was referred for restorative replacement of tooth No. 25. Upon clinical examination, the edentulous space was found to be smaller in the mesiodistal direction than the adjacent mandibular central incisor tooth No. 24. Also, the patient had an existing composite diastema closure with less-than-ideal emergence profile contours. The patient also desired brightening the color of his teeth since restorative work would be required. Therefore, minor orthodontic correction and chairside whitening (Opalescence Boost [Ultradent Products]) were chosen as initial therapies to maximize the final result and to minimize the time before the restorative phase could be completed. A study model was used to plan where the interproximal tooth reduction would be done to make additional space for the tooth replacement (Figure 2). It was determined that by taking 0.5 mm off the proximal surfaces of each remaining mandibular incisor and orthodontically moving them toward the mesial surfaces of their respective canines, the edentulous space for the tooth No. 25 replacement would be more symmetrical to the width of tooth No. 24 (Figures 3 and 4). Once the space was widened, the next procedure would be tooth whitening. Opalescence Boost was chosen so that an immediate result could be achieved to see how the teeth would respond to the whitening solution. A pre-op shade was taken (Figure 5). Note the variation in tooth color that was naturally occurring with this patient. In this case, the treatment goals were to first whiten the teeth and then to match the composite shades to the whitened dentition. To protect the soft tissue, a light-cured liquid dam (OpalDam [Ultradent Products]) was applied to the facial gingiva on the maxillary and mandibular arches. The Opalescence Boost was then mixed per the manufacturer’s instructions and placed on the labial surfaces of the teeth (Figure 6). After three 20-minute sessions, the teeth were rinsed, and the OpalDam material was removed (Figure 7). The patient was given a take-home whitening kit (Opalescence Go [Ultradent Products]) to be used for 2 weeks after the take-home procedure to maximize the effect of the tooth whitening process (Figure 8). After 2 additional weeks to allow for any “rebound effects,” a post-whitening shade was taken (Figure 9), and the restorative process could then proceed.
 |
 |
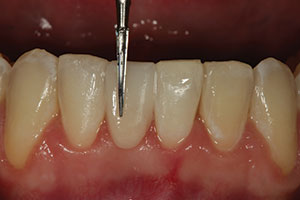
| Figure 1. A preoperative smile view of a 19-year-old patient after completion of orthodontic therapy. He was missing tooth No. 25 and desired a fixed replacement until an implant could be potentially placed. | Figure 2. Interproximal reduction (IPR) of the mandibular incisors was planned so that minor corrective orthodontics could be completed to widen the edentulous space to make the mesiodistal width of the space equal to the width of tooth No. 24. A fine needle composite finishing bur and IPR abrasive instruments (ContacEZ) were used for this process. |
 |
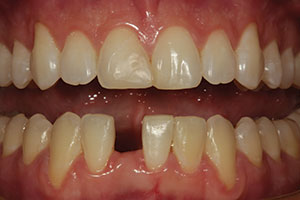 |
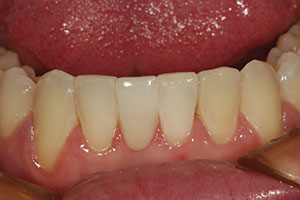
| Figure 3. The mandibular arch was placed in fixed appliances to move the incisors toward the mesial aspects of the mandibular cuspids after IPR was performed. (Orthodontic services were provided for the patient by Dr. Keith Sellers, Charlotte, NC.) | Figure 4. After the completion of minor orthodontics, the edentulous space was the same width as the adjacent central incisor tooth No. 24. |
 |
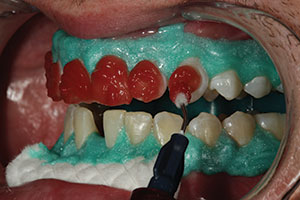 |
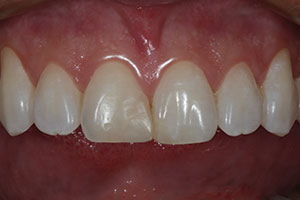
| Figure 5. A pre-op shade was taken prior to tooth whitening using the Opalescence shade guide (Ultradent Products). | Figure 6. After isolation with cheek retractors, cotton rolls, and a liquid dam (OpalDam [Ultradent Products]), 40% hydrogen peroxide whitening solution (Opalescence Boost [Ultradent Products]) was applied to the labial surfaces of the teeth. |
Glass Fiber Direct Composite Bridges
For many clinicians, a missing tooth for a young patient means replacement with a lab-fabricated fixed bridge (Maryland bridge) or a “flipper partial denture” until an implant can be placed. The fixed option can be a very expensive solution, whereas a removable appliance will certainly cause potentially irreversible damage to the gingival tissues and bone, requiring additional grafting when implant placement is finally done. Using current composite technology and glass fiber reinforcement, such as everStickC&B (GC America), there is now a good long-term treatment option for a single missing tooth that can be much more economical than lab-fabricated alternatives and still provide an excellent service to the patient.
A one-visit direct composite solution may be preferred because the age of a patient may limit the capability to go through a more extensive, long-term treatment option such as grafting and implants. With this 19-year-old patient, a glass fiber-reinforced fixed bridge was the perfect solution to replace the missing tooth and to act as a fixed orthodontic retainer. Since this was the anterior region, it was decided to prepare slots into the lingual surfaces of the abutment teeth to place the fiber intracoronally. Once the fiber was in place, splinting the 2 abutment t
eeth together and the lateral incisors and canines, it was covered with flowable composite (PermaFlo [Ultradent Products]) (Figure 10) and trimmed with finishing burs. A composite pontic (Mosaic Universal Composite [Ultradent Products]) was then created using a freehand technique, contoured, and polished (Figures 11 and 12). Figure 13 shows a facial view of the completed restoration.
 |
 |
| Figure 7. After three 20-minute sessions, the teeth were rinsed with water, and the protective dam was removed. | Figure 8. The patient received a 10% hydrogen peroxide take-home whitening kit (Opalescence Go [Ultradent Products]) to follow up the chairside session and maximize the whitening effect. |
 |
 |
| Figure 9. Two weeks after home whitening was discontinued, a postoperative shade was taken prior to commencement of the restorative process. | Figure 10. A glass fiber reinforcement material (everStickC&B [GC America]) was bonded to the lingual surfaces of teeth Nos. 22 to 27. This material was placed to serve as a fixed lingual orthodontic retainer as well as a foundation to directly place a composite tooth into the tooth No. 25 space. |
 |
 |
| Figure 11. Using an opaque white shade of composite (Mosaic [Ultradent Products]), the “dentin” portion of the pontic was formed in the tooth No. 25 space covering the facial and lingual sides of the glass fiber material. | Figure 12. After the A1 enamel layer of composite (Mosaic) was placed, sculpted, and cured, an 8-fluted composite finishing bur (#FS9 [Komet USA]) was used for final anatomic shaping. |
Diastema Closure With Direct Composite
The final phase of restorative treatment for this patient was to improve both the proximal contours and the color of the diastema closure that had been previously done (Figure 14). The old composite material was removed from the tooth surfaces, and a 2.0- to 3.0-mm bevel was placed using a coarse diamond (#5858.014 [Komet USA]) to slightly roughen the enamel to increase micromechanical retention of the Class IV portions of the pre-existing preparations to the tooth surface. Extending the bevels to the facial proximal (reflective) line angles would help the composite blend aesthetically into the tooth. The operative plan included the use of Mosaic Universal Composite for this case to close the space. This highly aesthetic composite was chosen due to its ability to hold its shape during manipulation and also because it does not stick to the placement instrument. Isolation was achieved using retractors and a rubber dam (MiniDam [DMG America]). Then a prophy polisher was used to remove the biofilm from the teeth (Figure 15). The teeth were etched with 37% phosphoric acid for 15 seconds, then rinsed thoroughly with water and air-dried. An adhesive bonding resin (Peak Universal [Ultradent Products]) was then applied to the tooth surface, scrubbed in, air-thinned, and light cured. Figure 16 shows a Bioclear matrix that was being held in place to bisect the space between the teeth to create the new midline. Notice the physiologic profile created by the exit of the matrix from the rubber dam. While holding the matrix firmly against the lingual surface of the tooth, heated flowable composite (PermaFlo) was expressed from the lingual proximal forward, filling the matrix back to front. A plastic filling instrument (Goldstein Flexithin Mini 4 [Hu-Friedy]) was used to hold the labial portion of the matrix firmly against the facial surface of the tooth while light curing the increment. Once cured, this formed the “hip” of the restoration; this is the portion of the composite that begins against the tooth subgingivally and extends to the inferior portion of the contact zone. Note the convex physiologic contours that were created by the Bioclear matrix; these areas of the restoration are considered to be complete and should not be touched, if possible, with any finishing burs or discs. They will never be as perfect as they are immediately upon removal of the matrix material.
 |
 |
| Figure 13. A facial view of the completed glass fiber composite bridge replacing missing tooth No. 25. It was very difficult to tell that this was a composite replacement due to the aesthetic quality of the final result. | Figure 14. A labial pre-op view of the old composite diastema closure prior to removal. |
 |
 |
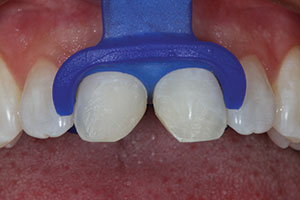
| Figure 15. A labial view after removal of the old composite material and roughening of the existing prepared surface. (The tooth structure was removed at the Class IV mesial areas when the old restorations were placed.) | Figure 16. A Bioclear matrix (Bioclear) shown in place with flowable composite (PermaFlo [Ultradent Products]) forming the gingival proximal emergence profile portion of the restoration on tooth No. 8. |
 |
 |
| Figure 17. Once the proximal portions of the 2 restorations were completed, the labial surfaces were slightly flattened using a pointed coarse diamond instrument (#5858.014 [Komet USA]) to better fit the Uveneer (Ultradent Products) templates to the tooth surfaces. | Figure 18. Once the appropriate size Uveneer template was chosen, a small coat of flowable composite (PermaFlo) was placed on the inner surface using a sable brush. This was done to help prevent the possibility of small voids when loading the matrix with the composite material. |
 |
 |
| Figure 19. The Uveneer templates for teeth Nos. 8 and 9 were loaded with composite material (Mosaic) and positioned on the labial surfaces of the teeth. After removing the excess around the periphery of the templates, the material was light cured. | Figure 20. After curing, any necessary contouring was done with an 8-fluted composite finishing bur. Then a rubber composite disc (Jiffy Disc [Ultradent Products]) was used to further polish and refine the surface of the restoration. |
 |
 |
| Figure 21. A composite polishing brush (Jiffy Brush [Ultradent Products]) was used to impart a final luster to the restorations. | Figure 22. A retracted facial view of the completed tooth whitening and direct composite bridge replacing tooth No. 25 and the redone diastema closure between teeth Nos. 8 and 9. |
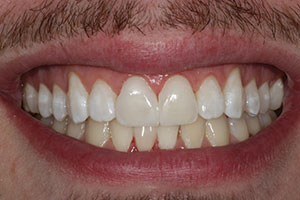 |
| Figure 23. A smile view of the final result—a dramatic change compared to the pre-op appearance in Figure 1. |
Then we turned our attention to the labial surface, which would be reconstructed utilizing a Uveneer (Ultradent Products) template. The first step was to flatten the labial surface a bit using a coarse diamond bur (#5858.014) (Figure 17). Next, the appropriate size of Uveneer template that best matched the mesiodistal width of the maxillary central incisors to be restored was chosen. Next, a small amount of the chosen shade of flowable composite (PermaFlo) was placed inside the Uveneer template and spread over the entire inner surface with a sable brush (Figure 18). This was done to help prevent voids between the composite and the inner surface of the template when loaded. Next, the chosen shade of composite was loaded into the template to fill it to its borders. Once both the right and left central incisor templates were filled, they were positioned and pushed onto the labial surfaces of their respective teeth, and any peripheral excess was removed (Figure 19). The tabs on the templates are used to correctly line up the axial inclinations to the direction of the teeth. Any small amounts of excess around the periphery of the matrix can be removed using a composite placement instrument prior to light curing. Once the composite was light cured (VALO Grand [Ultradent Products]), the templates were removed from the surface of the teeth. Any small areas of excess that remained after curing were removed with a composite carbide finishing bur (#FS9 [Komet USA]), followed by polishing with a rubber abrasive composite finishing disc (Jiffy Disc [Ultradent Products]). Interproximal polishing was done, as needed, using a fine abrasive strip (Jiffy Diamond Strips [Ultradent Products]). Final polishing was completed using rubber abrasive discs (Jiffy Discs) and a polishing brush (Jiffy Brush [Ultradent Products]) (Figures 20 and 21).
Note the excellent physiologic contours and the response of the interproximal gingival tissues between the maxillary central incisors provided by the use of the Bioclear interproximal matrix. Also note the improved tooth shade and the beautiful reflective line angles and facial anatomic form that were easily created using the Uveneer template for the placement of the facial portion of the composite. These anatomic matrix systems helped to simplify the process of composite placement while creating a beautifully aesthetic diastema closure and a direct fiber composite bridge (Figures 22 and 23).
In Summary
The clinical case presented herein demonstrates the use of a multidisciplinary approach to conservatively correct an aesthetic problem in a young adult after orthodontic therapy. Tooth whitening is a preliminary treatment option for patients of almost any age, particularly when there are restorative considerations. A missing mandibular incisor presents a difficult implant placement for even the most seasoned practitioner due to the limited buccolingual dimension of bone, and it was not indicated for this patient because of his age at the time of this treatment. Direct composite for both the remake of the diastema closure and as a combination lower orthodontic fixed retainer with the missing tooth affixed to the fiber presents an excellent option due to the fact that these are easily maintained and repairable, if necessary, while simultaneously keeping costs down until a more long-term solution can be considered.
Dr. Lowe received his DDS degree from the Loyola University School of Dentistry in 1982. He previously taught at the Loyola University School of Dentistry while building a private practice in Chicago. Dr. Lowe currently maintains a full-time practice in Charlotte, NC. He can be reached at boblowedds@aol.com.
Disclosure: Dr. Lowe receives an honorarium from Ultradent.
Related Articles
Posterior Composite Restorations: Increasing Predictability
Direct Composite Diastema Closure
Diode Lasers in Restorative Dentistry: An Absolute Necessity for Optimal Care


