CASE REPORT
Diagnosis and Treatment Planning
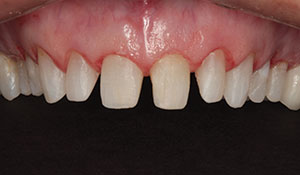
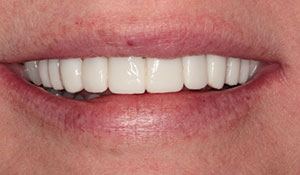
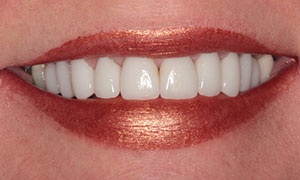
A patient presented with the desire to enhance her smile with porcelain restorations (Figures 1 and 2). She wished to brighten and widen her smile. There were pre-existing direct composite veneers on her maxillary central incisors and some Class V restorations on several premolars. There were also some Class II composites that had been placed in her premolar teeth. Her overall dental health was good, with no active caries or periodontal disease.
The patient decided to have the maxillary teeth treated now with the goal to have restorations on the mandibular teeth done at a later date. After discussing the options, she chose ceramic restorations for her maxillary 10 teeth. Her color choice was OM2 (VITA 3D shade guide), and after discussing the possible aesthetic details that could be built into the restorations, she stated that she desired no incisal translucency and minimal surface texture.
Preoperative Appointment
At the next appointment, to establish records and for communication with the dental laboratory team, a full series of photos was taken using a Canon D60 camera with a 100-mm macro lens. Preliminary maxillary and mandibular impressions were taken using a medium-viscosity A-silicone impression material (Silginat [Kettenbach LP]). This material combines the benefits of A-silicones with those of alginates, pairing low tear resistance with high dimensional stability. A face-bow record (Denar [Whip Mix]) was also taken. On the face-bow jig that would be sent to the lab team to use in mounting the hard model of the maxillary teeth on the semi-adjustable Denar articulator, a hard-setting, non-slumping A-silicone (Futar Fast [Kettenbach LP]) was used to quickly record the patient’s incisal edges and occlusal surfaces. A centric occlusal registration was made using hard-setting A-silicone bite registration material (Futar [Kettenbach LP]) for use in mounting the lower model on the articulator.
The impressions, occlusal registrations, and face-bow jig were sent to the dental laboratory, and the lab poured and mounted the preoperative models. Two pours were made, and 2 sets of models were mounted. On the second set of models, the lab team waxed up the maxillary arch, creating new contours on the 10 most anterior teeth (teeth Nos. 4 to 13). The wax-up goals included creating similar contours to the natural teeth, but in a wider arch form to achieve more fullness while decreasing the negative curve of the maxillary incisal edges.
The wax-up was duplicated in stone, and then a vacuum-formed clear plastic shim was made over the model to use as a prep guide. The lab team also made a stint over the wax-up using Lab Putty (Kettenbach LP) for the chairside fabrication of the provisional restorations after the preparations were complete.
Clinical Protocol
Teeth Nos. 6 to 11 were prepared for 360° laminates. The premolar teeth were prepared for onlay with facial veneer restorations to replace the composite restorations. This prep design was done to allow the fabrication of restorations that would widen the buccal corridor. All margins were prepared at or above the height of the tissue. The prepared teeth can be seen from the retracted facial view in Figure 3.
 |
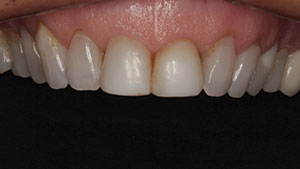 |
| Figure 1. The preoperative smile. | Figure 2. The preoperative, retracted view of the maxillary teeth. |
 |
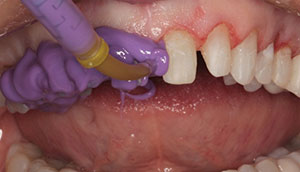 |
| Figure 3. Teeth Nos. 6 to 11, after preparation. | Figure 4. Light body impression material (Panasil initial contact Light [Kettenbach LP]) was injected around the margins. |
 |
 |
| Figure 5. A photo taken after completing injection of the light body impression material. | Figure 6. The tray material (Panasil Putty Soft [Kettenbach LP]) was mixed by the chairside assistant. |
 |
 |
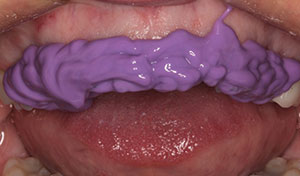
| Figure 7. The tray material (Panasil Putty Soft) was then inserted into the impression tray. | Figure 8. The final impression. |
 |
 |
| Figure 9. The bite registration (Futar Fast [Kettenbach LP]) in place. | Figure 10. The opposing side of the bite registration. |
 |
 |
| Figure 11. The patient’s smile, with provisional restorations in place. | Figure 12. Lithium disilicate (IPS e.max Press [Ivoclar Vivadent]) aesthetic restorations, shown on a mirror surface. |
 |
 |
| Figure 13. The retracted view, with high-strength all-ceramic restorations in place. |
Figure 14. The patient’s new smile. |
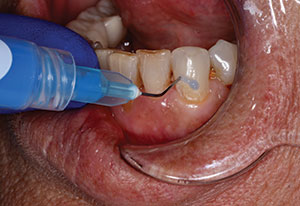
Because of the patient’s excellent periodontal health, no retraction cord or paste was needed. A putty-wash impression technique was done in this case using Panasil Putty Soft (Kettenbach LP) and a light-bodied impression material. According to the manufacturer, Panasil Putty Soft is “a kneadable, addition-curing, elastomeric impression material based on vinyl polysiloxane (VPS) with low final hardness.” In addition to its intraoral setting time of only 2 minutes, this highly efficient impression material provides maximal precision and optimal convenience. Panasil initial contact Light (Kettenbach LP) is a light-body impression material used in conjunction with the tray material.
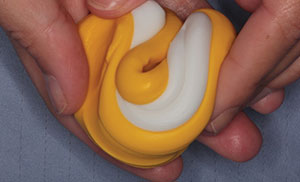
First, the light-body material, which readily flows in the sulci, was injected around the margins and all the prepared tooth surfaces (Figures 4 and 5). In this technique, while the clinician injects the light-body material, the chairside assistant mixes the putty tray material (Figure 6) and places it in the impression tray (with tray adhesive having been previously placed and properly dried) (Figure 7). The assistant then hands it to the clinician to place it in the mouth. The putty consistency of the heavy body actually causes pressure on the light body, further pressing it into the sulcus.
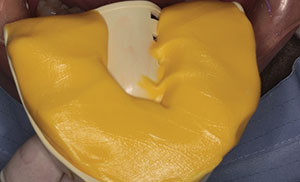
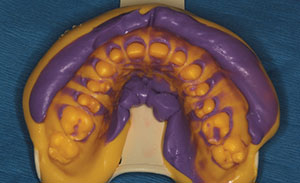
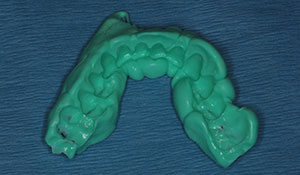
After complete setting, the tray was removed. The final impression can be seen in Figure 8. Note the precise capture of the prepared teeth and margins. An occlusal registration was made using Futar bite registration material (Figure 9). The untrimmed registration can be seen immediately after removal in Figure 10.
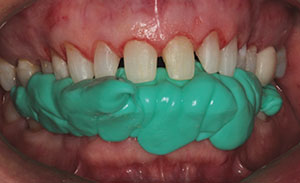
Next, provisional restorations were fabricated using Visalys (Kettenbach LP). Visalys is a temporary crown and bridge material based on a multi-functional acrylic composite with outstanding mechanical properties. The material was injected into the stint (made previously over the duplicate model of the diagnostic wax-up) and placed on the prepared teeth. When the material was set, the shim was removed, excess provisional material was cleaned up, and the margins were refined using a small carbide finishing bur. The provisional restorations made from a copy of the wax-up gave the patient a prototype and preview of the final result. The completed provisionals can be seen in Figure 11.
Dental Laboratory Protocol
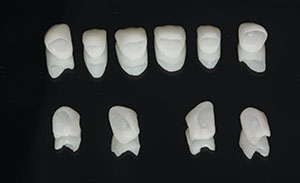
At the dental laboratory, the impression was poured and dies were trimmed. The prepared model was mounted onto the articulator using the new occlusal registration. Ten high-strength and aesthetic lithium disilicate (IPS e.max Press [Ivoclar Vivadent]) restorations were fabricated using the lost-wax and molten ceramic (pressed) technique. The surfaces were cut back and micro-layered to create the desired aesthetics. The intaglio surfaces of the restorations were etched using a phosphoric acid etching gel. The final restorations were photographed on a mirror surface (Figure 12), and then the case was prepared for delivery to the dental office.
Delivery of the Final Restorations
At the placement appointment, the provisional restorations were removed and the lithium disilicate restorations were tried-in using a drop of water as a try-in medium. After the verifying fit and aesthetics of the restorations were approved by the patient, each restoration was removed and thoroughly cleaned with water and then dried with oil and water-free air. Next, BIS-SILANE (BISCO Dental Products) was applied to the internal etched surfaces of the restorations and dried. Etchant gel (UNI-ETCH [BISCO Dental Products]) was applied to the enamel surfaces for 10 seconds and then thoroughly rinsed with water. The teeth were lightly air-dried, and a universal bonding agent (ALL-BOND UNIVERSAL [BISCO Dental Products]) was liberally applied to the prepared tooth surfaces and thinned with air. The bonding agent was light cured for 10 seconds using an LED curing light (S.P.E.C. 3 [COLTENE]). A dual-cure resin cement (DUO-LINK [BISCO Dental Products]) was applied to the internal surfaces of the restorations, and then the restorations were seated. At the gel state, the excess luting composite was teased away from the margins using a scaler. Dental floss was eased between the restorations to remove any further excess cement in the interproximal areas. After cleanup, the LED curing light was used to completely set the material so finishing could begin. Occlusal adjustments were done using fine finishing diamonds and porcelain polishing points (Brasseler USA).
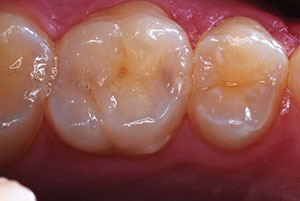
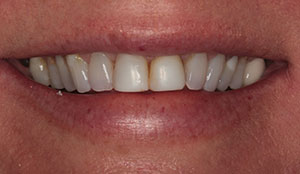
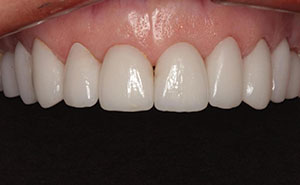
The restorations can be seen in place from the retracted facial view in Figure 13. The patient’s new smile can be seen in Figure 14. She was happy with the result and plans to continue treatment in the future.
CLOSING COMMENTS
While a good number of dental professionals have made the switch from physical to digital impression techniques, this article has demonstrated that clinicians can still provide patients with the smiles that they desire using high-quality, modern impression materials and proven clinical techniques.
Acknowledgment:
Dr. Nash would like to thank Boris Zukovski, master ceramist, Masters of Dental Aesthetics, Inc. (West Hills, Calif) for the excellent lab work for this case.
Dr. Nash maintains a private general practice in Huntersville, NC, where he focuses on cosmetic, aesthetic, and full-mouth rehabilitative treatments. He presents workshops and lectures nationally and internationally on these types of procedures and has authored chapters in 2 clinical textbooks. Dr. Nash is the cofounder of the Nash Institute for Dental Learning in Huntersville. He is a member and an accredited Fellow in the American Academy of Cosmetic Dentistry. He can be reached at rosswnashdds@aol.com.
Disclosure: Dr. Nash reports no disclosures.
Related Articles
Porcelain Veneers in a Single Appointment
Smile Enhancement Using Multiple Modalities
Direct Composite Resin Veneers