
While the 2009 baseball season is under way as you read this, it is Super Bowl weekend as I begin to write this article. With football on my mind, I can’t help but compare the circumstances of a quarterback coming to the line and not liking what he’s seeing, to those of us looking at our schedule on Monday morning and feeling a touch of anxiety. We don’t see blitzing linebackers but we do notice more blank spaces in our schedules than we’ve ever had before. The economy is trying to blitz us. As the cagey quarterback will need to call an “audible” to change the play at the line of scrimmage when he recognizes danger, so will the equally clever dentist need to call an audible, altering the type of treatment that is presented to his diminishing patient load; making more out of less. This is where digital photography plays a major role. As is customary in this annual Dentistry Today digital photography update, I’ll first bring you up to speed on the latest dental ready camera outfits as well as a few other digital photo jewels. Then, I’ll offer the audible that I just alluded to above. Let’s dive in!
NEW AND IMPROVED BUT CONFUSING
Selecting a Single Lens Reflex (SLR) system used to be relatively easy. The available dental-ready kits were few and far between. At present, vendors such as PhotoMed International offer no less than 7 SLR models in kit form. These kits are either Canon- or Nikon-based, and they bare many similarities to one another. The excellent comparison chart (Table) provided by Photomed sheds some light on the complexities of camera selection. The good news is that each and every one of the cameras listed will provide excellent dental photos, as long as they are properly paired with a good macro lens and flash unit and then tuned up by the vendor, thereby optimizing them for dental photography. Ultimately, your choice may simply come down to what your budget will allow. As you study the chart you’ll notice differences in the megapixel count, with the Canon 50D topping out at 15.1 megapixels, as well as in LCD screen resolution and size. I prefer my LCD’s BIG; the higher the resolution, the easier it is to determine image quality.
On occasion, I’ve found myself using the 3 inch LCDs for instant patient demonstrations without even bothering to upload to a PC. The Canon 50D and Nikon D90, with screen resolutions of 920,000 pixels are a joy to behold; like viewing a mini HDTV. I won’t mince words. If you can afford to purchase a system based upon either of these models, you will be delighted. You might also note from the chart that the D90 features video capability, a first in the SLR department. (Take note that all but the Nikon 60D feature “Live View.”) This feature allows one to use the LCD as a means of composing and focusing the image much like you would with a point and shoot digital camera. Ironically, this feature is of little practicality for dental photography as it works best with static subjects. It needn’t be a determining factor when selecting a camera intended solely for dental purposes.
As mentioned above, each of the camera bodies listed in PhotoMed’s chart (Table) is capable of wonderful images. To be quite frank, you will be hard pressed to discern image quality differences between a 10 megapixel camera and a 15 megapixel camera. What you will notice is how the camera feels in your hands, as well as how bright and crisp the playback screen looks when you seek to examine your image results. The only good way to get the “feel” of the camera is to visit a photo equipment vendor during a dental meeting, or by going to your local consumer electronics store and handle a few of the camera bodies mentioned here. (Just don’t buy one there. You’ll pay too much and the camera will not be “dentally-enabled” at the store.)
| Table 1. Comparing the Canon and Nikon SLR Digital Cameras | ||||||||||||||||||||||||||||||||||||||||||||||||||||||||||||||||||||||||||||||||||||||||||||||||||||||||||||||||
a Manual focus only (sigma 105 mm macro lens on Nikon D60) |
Should you decide to use the camera’s autofocus mechanism as a means of focusing (as opposed to manually focusing); you’ll also notice that this approach works best when using a Canon lens with a Canon body and a Nikon lens with a Nikon body. And while I know that manual focusing is the classic approach, particularly for the members of the American Academy of Cosmetic Dentistry out there, I confess to taking advantage of the speed of auto-focusing for much of my less critical show-and-tell imagery. It’s fast and reasonably effective.
That being said, here are Marty’s picks for this year’s crop of dental ready outfits.
 |
 |
|
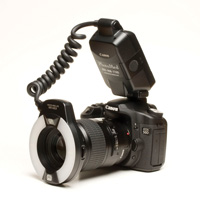
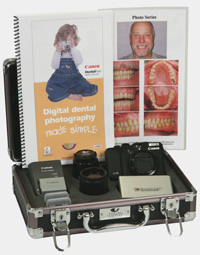
Figure 1. PhotoMed Canon 50D SLR outfit with 100-mm Canon macro lens and ring flash. |
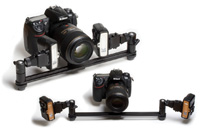
Figure 2. PhotoMed Nikon D90 SLR outfit. |
 |
 |
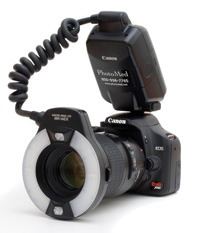
| Figure 3. Canon Digital Rebel XSi digital SLR outfit. |
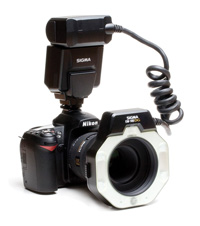
Figure 4. Lester Dine’s SLR Nikon D60 outfit with combo-mini flash. |
One econosystem deserves special mention. That would be Lester Dine’s D60 Kit (Figure 4). What distinguishes it from those kits offered by other dental vendors is a proprietary combination “mini-flash” unit that combines a ring and a point flash. The ring flash works best for intraoral shots while the point source flash is best suited for portraiture. The diminutive Nikon D60 body combined with the petite flash unit and Sigma’s 105 mm lens, makes for a “smallest in class” system with respect to dental ready SLR outfits. As of this writing, it weighs in at $1,795 in kit form (dinecorp.com). Another “doo-dad” that many dentists seem to take a shine to is Lester Dine’s practice of placing a “sticker” on the Sigma lens barrel that diagrammatically guides the photographer on magnification and F-stop settings. While I’ve found this to be helpful, it isn’t foolproof. It typically requires some tweaking to get just the right framing and exposure. As a side note, a similarly equipped Rebel XSi (just $100 more) is a smidge larger and offers a 3 inch playback screen with Live View—should you find a recreational use for this feature.
THE VENERABLE POINT-AND-SHOOTS
They’re everywhere! Indeed they are, but most are far from dental ready. By now, we all know that point-and-shoot cameras do not offer
us a reliable view-finder, but instead have a back mounted LCD screen to compose and focus our images. The lenses are not interchangeable, and flash units are fixed and can be in one of several places on the camera body depending upon the body’s design. That being said, I can recommend 3 point-and-shoot systems that I have personally used and found to be suitable for dental photography. I suppose the primary advantage to such cameras is their duality. They are easily taken home for recreational purposes and by in large they have a comfortable, familiar feel to them. However, make no mistake, ultra-close-up photography (images of one or 2 teeth in the posterior regions of the mouth) are a challenge when using a point-and-shoot solution.
The recommended systems are (in no particular order):
 |
 |
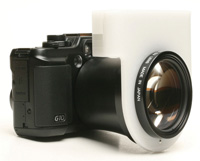
| Figure 5. Canon Powershot G10 with PhotoMed macro attachment. |
Figure 6. Dental Learning Center’s DentalFoto kit. |
PhotoMed’s Canon G10 system, with their proprietary macro/diffuser attachment. This point-and-shoot is the real deal; a high-quality instrument, with a gorgeous 3 inch playback screen, a 5X optical zoom, and 14.7 megapixels; is as close to an SLR as one can get with respect to versatility. Coupled with the PhotoMed attachment, an ingenious device, this system is dental worthy! Image illumination with the Photomed attachment is remarkably even and balanced (Figure 5).
Dental Learning Centers (DLC) DentalFoto camera kit is currently based upon the same Canon Powershot G10 mentioned above. In like manner, DLC has developed their own proprietary close up adapter that easily attaches to the G10, making it dental-ready and easy to use. Taken one step further, DLC can expand their kit with a VELscope adapter that enables easy VELscope photography with the G10. DLC has established “pre-sets” for conventional dental photography and VELscope photography and stored them in the G10’s built in memory enabling easy switching between modes. The system is easy to use and well conceived. For more information, you can go to the Web Site dlcenters.com (Figure 6).
The DINE DIGITAL SOLUTION, currently based on an 8 megapixel Pentax point-and-shoot, does not look like a dental camera. The least expensive of all dental-ready outfits ($895 including a software suite for image management as well as a compact photo printer), DINE has modified and configured this tiny Pentax camera for dentistry and packages it in kit form. The kit is available for less if the software and printer are not ordered as part of the package. I’ve used this little camera and can report that it handles routine everyday dental photos. While not my first choice for high-end dental photography, it might be thought of as an excellent alternative to having intraoral video cameras in your hygiene rooms, as you’ll read about later in this article. Show and tell becomes a simple matter so long as the printer is included in the kit. The other niche filled here is for those on an ultra-tight budget who want to get the digital ball rolling, so to speak.
 |
 |
|
Figure 7. PhotoMed’s R1 Dual Point flash bracket for creative lighting. |
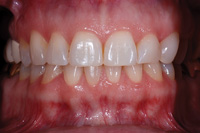
Figure 8. Image taken with a Nikon D80 and PhotoMed’s R1 Dual Flash Bracket. |
|
|
Figure 9. Same dentition taken with Canon 40D and Canon MR Ex14 ring flash. |
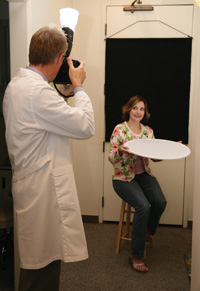 |
| Figure 10. PhotoMed Quick and Easy Portrait kit in use. |
 |
| Figure 11. Portrait Professional 8.0. |
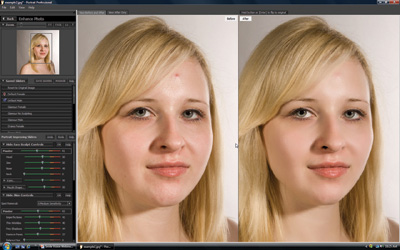
One other important item, mentioned in a previous issue, is PhotoMed’s Quick and Easy Portrait Package. If you are looking for a way to produce better portraits, there simply isn’t an easier approach than this clever package of light diffusion tools when combined with the appropriate flash unit. Again, I suggest you check PhotoMed’s Web site for more info on this kit (Figure 10). For even better results, consider trying Anthrogyr’s Portrait Professional Pro 8.0. This ingenious software package (priced under $100) is available as a trial download. It will further enhance your lighting efforts and smooth skin and facial blemishes, giving your portraits a truly profess
ional look (portraitprofessional.com) (Figure 11).
 |
 |
 |
