


INTRODUCTION
The successful treatment of patients requiring one or more full-arch, implant-retained prostheses is predicated on comprehensive and collaborative treatment planning. Beginning with the end in mind is essential, and clinical success depends upon a properly developed diagnosis derived from an evaluation of detailed and accurate clinical information.1,2 Digital radiography, intraoral impression scanners, and cone beam computed tomography (CBCT)—among other technologies—are invaluable for rendering an accurate diagnosis.3 Not surprisingly, digitally based technologies for diagnosis, records acquisition, treatment planning, clinical protocol execution, and restoration design and fabrication have transformed the way dentists approach implant-retained overdenture cases in recent years. In fact, these technologies have better equipped clinicians to begin with the end in mind, visualize functional and long-lasting treatment outcomes, and plan and/or perform requisite clinical procedures that are restoratively and/or prosthetically driven.
Simultaneously, digital processes (eg, virtual wax-ups, digital treatment planning, CAM milling, 3-D laboratory printing) are empowering dentists and their collaborating colleagues with simpler, more efficient, and more predictable workflows.4,5 Accuracy and precision are also enhanced, since the data that can be reviewed in digital records enables the evaluation of bone quality (width, depth) for planning a precise implant location where sufficient, high-quality bone is present,6,7 angulation, and the identification of necessary implant characteristics (size, length, and diameter), all before any surgical or clinical procedures are performed.5
 |
 |
| Figure 1. Preoperative close-up view of the patient, presenting with multiple missing and hopeless teeth. |
Figure 2. CBCT (CS 9300 [Carestream Dental]) and intraoral digital scans (CS 3600 [Carestream Dental]) were integrated, and implant placement and restorative planning were done virtually (Implant Concierge). |
However, digital technologies are essentially only tools to streamline the traditional processes and procedures that dentists undertake when developing a treatment plan for implant patients. They help to ensure that—collectively and collaboratively—they can be as thorough and detailed as possible and deliver predictable and aesthetic outcomes. Clinicians must still be knowledgeable about and understand patient conditions, biologic and functional risks, and the prognosis of any/all proposed treatment options. That said, with the advent of various dental technologies, it is now possible to “think traditional but process digital.”
This is especially the case when treatment planning, designing, and delivering implant-retained, full-arch overdentures. With digital records and processes, the implant-placement planning and overdenture design processes can be completed more accurately, in less chair time, and in fewer appointments. CAD/CAM design and manufacturing can be incorporated to produce precision surgical guides for accurate implant placement, as well as streamline the design and fabrication of temporary, try-in, and definitive prostheses.
For example, digital dentures (Pala Digital Dentures [Kulzer]) created using CAD/CAM and 3-D printing eliminate the inconveniences (multiple and long appointments), difficulties (a porous composition prone to staining and odor, an unaesthetic tooth shape or arrangement), and discrepancies (poor fit, improper occlusal schemes) associated with traditional denture procedures.8,9 Data required to design and produce a patient’s overdentures are obtained digitally in a single appointment, stored electronically, and are available for future use (for a spare or replacement denture).10
CASE REPORT
A male patient presented to his restorative dentist, Gary Radz, DDS, in Denver, with the primary goal of restoring function and aesthetics to his smile (Figure 1). The patient, a former Olympic snowboarder, was suffering from multiple hopeless and missing teeth, as identified during thorough clinical, radiographic, and CBCT examinations. The missing teeth in the lower anterior had been provisionally restored using a removable aesthetic appliance (Snap-On Smile [Den-Mat]).
 |
| Figure 3. A tooth-borne pilot guide with depth control was used for the implant/drill position and depth (Implant Concierge). |
 |
 |
| Figure 4. An intraoral view of the maxillary arch following placement of the denture attachment housings and block out spacers. Healing caps were placed over abutments to facilitate bone grafting and suturing. The attachments were snapped on, and, to achieve parallelism, the attachments were correctly angled by rotating them with fingers to achieve an ideal path of draw. |
 |
| Figure 5. Smile view of the maxillary full-arch fixed provisional and the mandibular arch with a Snap-On Smile (DenMat). |
 |
 |
| Figure 6. After immediate extraction and guided implant placement similar to the maxillary arch, fixed LOCATOR F-Tx attachments (Zest Dental Solutions) were placed, and a fixed immediate provisional was seated in the mouth. |
 |
| Figure 7. A postoperative panoramic radiograph of upper and lower provisionals in place, confirming ideal implant placement and angulation. |
Digital photographs (EyeSpecial C-II [Shofu Dental]), intraoral scans (CS 3600, [Carestream Dental]), and CBCT scans (CS 96000 [Carestream Dental]) were taken, in addition to analog impressions, a face-bow, and a centric bite registration that were digitally scanned. The obvious extent of the patient’s dental issues necessitated consultation with a periodontist, and evaluation of the panoramic 2-D and 3-D CBCT scans confirmed greater-than-normal bone loss that would ultimately contribute to further tooth loss. Comprehensive treatment planning, in consultation with the patient, was undertaken. A variety of treatment options, and the prognosis of each, were discussed. Although it was a difficult decision considering his relatively young age, the patient decided upon the extraction of all of his remaining teeth and rehabilitation with full-arch, implant-supported prostheses for both arches.
Digital Treatment Planning
This case was fully treatment planned digitally. The intraoral scans, photographs, and CBCT scans were merged into treatment planning software (coDiagnostiX Planning Software [Dental Wings]) to develop a virtual wax-up to demonstrate how the patient’s smile could be restored. Based on time factors, the patient’s maxillary teeth would be extracted first, then grafts would be placed, and then implants would be immediately loaded to support a temporary prosthesis.
Additionally, implant treatment planning software was also used to determine where the implants should be positioned and at what angles, as well as how many would be needed and their widths and lengths (Figure 2). Analysis of the CBCT scans also helped to confirm that an alveoplasty would not be necessary, thereby enabling the use of a tooth-borne surgical implant placement guide (Implant Concierge). This demonstrated the precise implant position and depth of the pilot guide to ensure the exact implant positions and depths, and the patient’s remaining teeth would be strategically kept in place during implant surgery to support the guide, then extracted. Six implants (Performance [Little Implant Company]) would be placed in each arch, and the maxillary arch would be treated first.
The patient would be provided with an immediately loaded temporary polymethyl methacrylate (PMMA) acrylic digital denture, and then extraction of the remaining mandibular teeth and immediate implant placement in that arch would be performed a few weeks later. The patient would then be provided with a digitally designed and fabricated interim full-mouth denture prosthesis and, subsequently, fixed detachable LOCATOR abutments (LOCATOR F-Tx [Zest Dental Solutions]) and digital denture prostheses. The spherical attachment system selected for this case was chosen based on its cost effectiveness compared to other options;11 ability to accommodate divergences in cases for which angled implants are required, yet still ensure a good path of draw;12,13 and efficient chairside overdenture processing.11,14
Clinical Execution
During the maxillary surgical appointment, the pilot guide was pinned into place; the 6 coated, root-form implants were placed (Figure 3); and the maxillary teeth were extracted. Then the fixed LOCATOR attachments were torqued into each implant using an abutment driver (LOCATOR F-Tx Abutment Drivers [Zest Dental Solutions]), and healing caps were placed. The temporary PMMA digital denture was tried in, and once the fit was confirmed and the temporary denture was removed, an allograft bone graft material (BaseBone) was placed in the areas of teeth Nos. 9, 10, and 11. Primary closure was achieved by suturing the tissue with micro sutures.
 |
 |
| Figure 8. Upper- and lower-arch occlusal views of F-Tx abutments with provisionals removed. |
 |
 |
| Figure 9. The abutment-level impression. After healing, the fixed provisionals and healing caps were removed, and impression copings (LOCATOR F-Tx) were placed for taking abutment-level impressions (Honigum [DMG America]). |
 |
 |
| Figure 10. Master cast models of the mandibular and maxillary arches were made based on the fixture-level impression. |
The healing caps were removed, and denture attachment housings and block out spacers were then placed onto the abutments and correctly angled, which was easily accomplished by rotating them with fingers due to the spherical attachment geometry that enables the denture attachment housing to pivot in any direction (Figure 4).15,16 To pick up the black processing retention balls, a dual/light-cured acrylic material (Chairside Attachment Processing Material [Zest Dental Solutions]) was syringed into the underside of the temporary overdenture base and onto the attachment housing.
The temporary overdenture was seated in the patient’s mouth and onto the abutments, and the patient closed into light occlusion to allow the acrylic material to set. By disengaging the black processing balls housed in the picked-up denture attachments, the overdenture was then removed. The black processing balls were removed using a hand driver, after which a dedicated retention ball hex driver was used to replace them with protective polishing caps. Any voids present around the denture housings were then filled with acrylic material and light cured.
A chairside polishing bur (Chairside Denture Prep and Polish Kit [Zest Dental Solutions]) was used to remove any excess acrylic material and to impart a smooth finish to the underside of the overdenture. The polishing caps were removed, and high-retention green ball attachments were placed into the overdenture using the dedicated retention ball hex driver. The temporary overdenture was then seated onto the maxillary implants in the patient’s mouth by engaging the LOCATOR F-Tx attachments with the LOCATOR abutments (Figure 5). The follow-up appointment for mandibular tooth extraction and implant placement was scheduled for a few weeks later, and the patient was dismissed.
When the patient returned for mandibular implant placement, the same digitally planned protocol was repeated, and the same armamentarium was incorporated, including fixed LOCATOR F-Tx attachments. However, because the 2 distal implants were shorter and some molar sites had lesser-quality bone, the provisional prosthesis was not loaded in these areas. Therefore, healing caps were placed, and the remaining 4 implants were used to fabricate a temporary fixed PMMA overdenture (Figure 6). A postplacement radiograph was taken of the provisionals in place (Figure 7).
 |
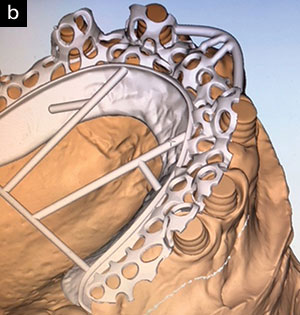 |
| Figure 11. View of the underside of the prototype prostheses with the retention attachment housings and framework in place. Based on the coping impressions, digital processes were undertaken to complete a virtual wax rim and verification jig and then fabricate prototype digital denture prostheses. |
Definitive Digital Denture Design and Fabrication
Once the patient had healed, the temporary overdentures were removed (Figure 8), and abutment-level impressions (Honigum [DMG America]) were taken with impression copings (LOCATOR F-Tx) in place (Figure 9). Master cast models were made and digitally scanned for use in designing and fabricating digital, 3-D printed implant-retained overdentures (Pala Digital Dentures) for both arches (Figure 10). Because all of the other information necessary for designing the patient’s overdentures had already been obtained digitally (scanned during preoperative appointments or following seating of the temporary overdentures), these digital files would allow the laboratory technicians to use CAD software to render virtual wax-ups of both the maxillary and mandibular overdentures; set and move the proposed denture teeth according to that rendering and the ideal teeth arch shape, shade, and measurements; and position the framework within the overdenture bases. Upon completion of the digital design, the files and digital overdenture models were loaded into a 3-D printer (cara Print 4.0 [Kulzer]) for fabricating 3-D printed (ie, additive manufacturing process) overdenture try-in prototypes (ie, wax-ups) for each arch. Denture base frameworks were also digitally manufactured that would be processed chairside to accommodate the LOCATOR F-Tx attachments (Figure 11).
 |
 |
| Figure 12. Photos of the complete digital upper and lower PMMA prototype try-in prostheses. |
 |
 |
| Figure 13. After scanning the prototype try-in overdenture prostheses in the mouth, the laboratory used that digital information for designing and fabricating the definitive digital overdentures. |
Not only would the digitally produced prototypes provide the patient with a more realistic perspective of how his final implant-retained overdentures would look, feel, and function in his mouth, but they would also facilitate a more precise, efficient, and convenient try-in appointment. Additionally, this digital process inherently required fewer record-taking appointments and fabrication steps compared to traditional analog denture processes. Simultaneously, they formed the basis for a permanent digital record of the prostheses that could be retained indefinitely for future use (eg, for manufacturing a duplicate or replacement denture).
Provisional Denture Try-in
When the patient returned for the prototype overdentures try-in appointment, the temporary overdentures were removed using a seating and removal tool (F-Tx Seating and Removal Tool) that generates the required force to engage and disengage the retention balls from the F-Tx abutments. Then the undersides of the 3-D printed prototype overdentures were processed chairside with acrylic to accommodate the titanium framework and LOCATOR F-Tx attachments using the same protocol performed for the temporary overdenture prostheses.
 |
 |
| Figure 14. Photos of the milled epoxy resin matrix and multi-directional, interlacing glass fiber reinforcement framework, separate and seated together. |
 |
 |
| Figure 15. Images of new denture attachment housings in place on the abutments and aligned by hand for path of draw. |
 |
 |
| Figure 16. Photos of the denture attachment housings blocked out with white rings and the milled framework tried in and picked up intraorally. |
 |
 |
| Figure 17. The milled framework was bonded into the underside of the overdenture. |
The digitally designed and 3-D printed implant-retained overdenture prototypes were seated into the patient’s mouth for evaluation of functional (ie, retention, fit, midline, occlusion, vertical dimension, phonetics, chewing) and aesthetic (ie, smile line, lip support, setup) aspects (Figure 12). Upon receipt of patient approval, the prototype try-in overdenture prostheses were digitally scanned intraorally, and that digital information would be used by the laboratory when finalizing the design and fabrication of the definitive 3-D printed overdentures, as well as the milled framework.
Final Digital Denture Fabrication and Delivery
To complete the definitive digital overdentures, the laboratory finalized the model and implemented any necessary adjustments (Figure 13), including where the framework should be positioned to support each overdenture. It was decided that for the definitive overdentures, a metal-free composite system comprised an epoxy resin matrix and a multi-directional, interlacing glass fiber reinforcement (Trilor [Bioloren]) would be used. Introduced for dental indications more than 20 years ago, the selected framework material would be precision milled for each overdenture. For each overdenture base and denture tooth, a proprietary injection process was then used to convert the 3-D printed try-in prototypes into the definitive prostheses using a 3-D additive process (cara Print 4.0) and print cast light-initiated polymer resin (Dima, Pala Digital Dentures [Kulzer]) (Figure 14).
 |
| Figure 18. The completed case. The patient was extremely pleased with the outcome. |
At the final delivery appointment, the prototype overdentures were removed as previously described. New denture attachment housings were placed on the abutments and aligned by hand for path of draw (Figure 15). The milled glass fiber reinforced frameworks were tried in first and removed, and block out rings were placed, after which they were bonded chairside into the underside of each overdenture and processed for the LOCATOR F-Tx attachment housings (Figure 16). The framework was then bonded into the prosthesis (Figure 17), and the black processing balls were replaced with appropriate retention balls: in this case, 4 green (high retention) and 2 blue (low retention).
The final fixed retrievable prostheses were then seated using the seating and removal tool, and all aspects of the overdentures were evaluated by the dentist and patient (Figure 18). The patient was given hygiene instructions for proper maintenance, and a follow-up postoperative evaluation appointment was scheduled. One advantage of LOCATOR F-Tx having no screws or cement is that it makes it easier to remove and reseat during maintenance visits.
CLOSING COMMENTS
With the technologies available today for diagnosis, treatment planning, and prosthesis design and fabrication, it’s now possible for dentists to provide full-arch, implant-retained overdentures by “thinking traditionally, but processing digitally.” As demonstrated herein, every aspect of a patient’s condition and treatment plan can be recorded and executed digitally—prior to performing any clinical or surgical procedures—and with greater accuracy, efficiency, and patient convenience. The inherent characteristics of digital data and processes facilitate enhanced communication and collaboration among treatment team members, ultimately enabling everyone involved to provide the best possible contribution to the definitive prosthetic outcome.
Acknowledgments:
The authors gratefully acknowledge John Orfanidis, CDT, CTO, of Evolve Dentistry and Evolution Dental Science in Buffalo, for fabricating the digital dentures and framework, and Craig Nelson, CDT, senior technical consultant at Kulzer US.
References
- Tischler M. Treatment planning implant dentistry: an overview for the general dentist. Gen Dent. 2010;58:368-376.
- Angelopoulos C, Aghaloo T. Imaging technology in implant diagnosis. Dent Clin North Am. 2011;55:141-158.
- Cucchiara R, Franchini F, Lamma A, et al. Enhancing implant surgery planning via computerized image processing. Int J Comput Dent. 2001;4:9-24.
- Junnila T. Growing your practice in a down economy. Northwest Dent. 2010;89:49-51.
- Levin RP. How dentistry weathers a slow economy. J Am Dent Assoc. 2007;138:391-392.
- Goenka P, Marwah N, Dutta S. A multidisciplinary approach to the management of a subgingivally fractured tooth: a clinical report. J Prosthodont. 2011;20:218-223.
- Mendoza A, Solano E, Segura-Egea JJ. Treatment and orthodontic movement of a root-fractured maxillary central incisor with an immature apex: 10-year follow-up. Int Endod J. 2010;43:1162-1170.
- Li W, Yuan F, Lv P, et al. Evaluation of the quantitative accuracy of 3D reconstruction of edentulous jaw models with jaw relation based on reference point system alignment. PLoS One. 2015;10:e0117320.
- Infante L, Yilmaz B, McGlumphy E, et al. Fabricating complete dentures with CAD/CAM technology. J Prosthet Dent. 2014;111:351-355.
- Bidra AS, Taylor TD, Agar JR. Computer-aided technology for fabricating complete dentures: systematic review of historical background, current status, and future perspectives. J Prosthet Dent. 2013;109:361-366.
- Priest G. Efficient placement of implant overdenture attachments. Dent Today. 2011;30:58-62.
- Ferrare N, Leite AF, Caracas HC, et al. Cone-beam computed tomography and microtomography for alveolar bone measurements. Surg Radiol Anat. 2013;35:495-502.
- Van Assche N, van Steenberghe D, Guerrero ME, et al. Accuracy of implant placement based on pre-surgical planning of three-dimensional cone-beam images: a pilot study. J Clin Periodontol. 2007;34:816-821.
- Strong SM. The spare implant overdenture: retrofitting an existing denture to Locator attachments. Gen Dent. 2011;59:20-22.
- Wilson TG Jr. The positive relationship between excess cement and peri-implant disease: a prospective clinical endoscopic study. J Periodontol. 2009;80:1388-1392.
- Linkevicius T, Puisys A, Vindasiute E, et al. Does residual cement around implant-supported restorations cause peri-implant disease? A retrospective case analysis. Clin Oral Implants Res. 2013;24:1179-1184.
Dr. Little received his dental training at the University of Texas Health Sicence Center at San Antonio School of Dentistry and now maintains a multidiscipline, state-of-the-art practice in San Antonio to provide patients with dramatic restorative treatment results. An accomplished national and international speaker, professor, and author, he is also a respected clinical researcher, focusing on implants, laser surgery, and dental materials, as well as a consultant on emerging restorative techniques and materials. Dr. Little’s leadership and experience in team motivation and vision are recognized worldwide. He can be reached via email at dlittledds@professionalsindentistry.com.
Disclosure: Dr. Little is clinical director of Little Implant Company.
Dr. Radz maintains a private practice in Denver. He is a founding member of Catapult Education and the director of industry relations with SmileSource. He can be reached via email at radzdds@aol.com.
Disclosure: Dr. Radz reports no disclosures.
Related Articles
Using an Integrated Digital Approach to Treatment Planning
Phased Implant-Supported Full-Mouth Dentures
Digital Dentures: Achieving Precision and Aesthetics


