INTRODUCTION
So often, patients present with fractured teeth due to large restorations that have undermined the tooth structure. There can also be cases involving trauma where the coronal portion of the tooth has fractured. In addition, pre-existing endo teeth that have not been restored adequately can fracture significantly due to weakened tooth structure. On these occasions, we are left with a clinical situation in which there is inadequate residual tooth structure to place a definitive crown. What shall we do? Extract the root and place a dental implant, or construct a fixed bridge? Both of those options are more invasive, more time consuming, and more prone to long-term maintenance issues. We cannot replace osseous support and the beautiful soft-tissue architecture as the crown emerges from the sulcus. However, there is a better method—one that is more predictable and with good long-term prognosis, that also provides the optimal physiologic and aesthetic outcome. Preserve the root, build up a foundation, and place a definitive restoration.
This clinical case report will outline materials and clinical steps to do just that. Furthermore, the latest use of adhesive cements, glass fiber-reinforced posts, core materials, and all-ceramic crowns needed to accomplish this task, will be showcased.
CASE REPORT
Diagnosis and Treatment Planning
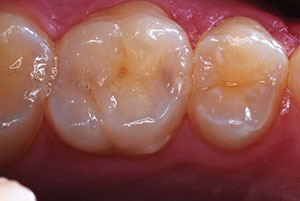
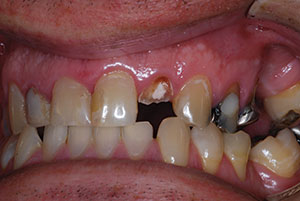
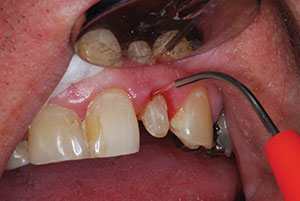
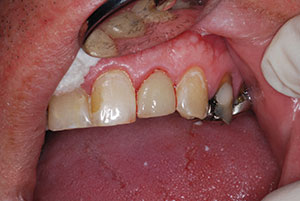
Recently, a 50-year-old male was referred to me after the fracture of tooth No. 10 and subsequent endodontic therapy. He was asymptomatic, negative to percussion, and showed no oral signs of inflammation and/or infection. The radiograph indicated a normal periodontal ligament, and surrounding osseous tissue appeared normal (Figure 1). The patient had some missing teeth, and the remaining teeth displayed large amalgams and some composite bonded restorations. There was an end-to-end anterior incisal relationship (Figure 2). An overall treatment was established with the area of No. 10 needing immediate therapy. The specific therapy would include building up the tooth with a post-core followed by the fabrication and placement of an all-ceramic crown as the definitive restoration.
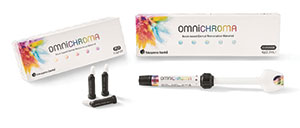
All the necessary materials were assembled to accomplish this task. This included drills, adhesives, cements, post, and core materials (3M) (Figure 3).
Clinical Protocol
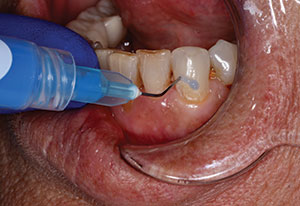
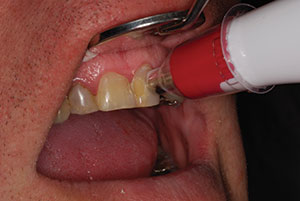
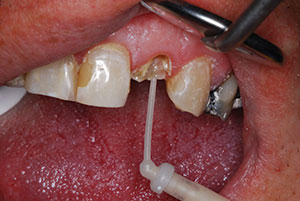
Before any dehydration of the teeth took place from our clinical procedures, an accurate shade was taken utilizing a spectrophotometer (VITA Easy Shade V [VITA North America]) (Figure 4). A photo was taken (Nikon 3300 DSLR camera) and printed out (Lester Dine).
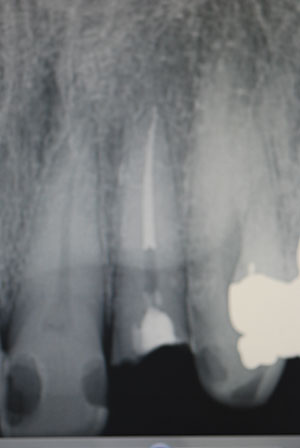 |
| Figure 1. Pre-op radiograph, tooth No. 10. |
 |
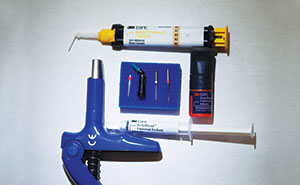 |
| Figure 2. Pre-op labial view, endo tooth No. 10. | Figure 3. Dental materials (3M) utilized for post-core. |
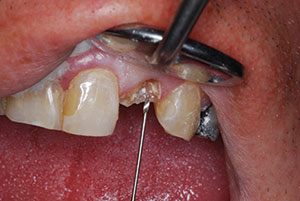
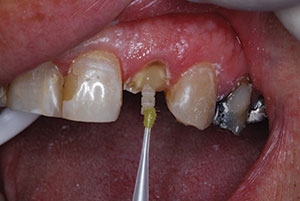
The first step in the placement of a post was to analyze the radiograph to gain a sense of length and width of the canal for proper post selection. There are many recommendations regarding this matter. The clinician should remove as little intraradicular dentin as possible so as not to weaken the root; this is dependent on the endodontic preparation and calcification level. For long-term success, it is important to leave at least 5.0 mm of apical gutta-percha to act as a seal, with placement of the post approximately two thirds down the root. The initial access opening had a temporary filling which was removed using an electric handpiece (Forza ELM [Brasseler USA]). The access area was then enlarged somewhat to follow tooth morphology and to act as an anti-rotation component (Figure 5). The author prefers an electric handpiece due to controlled torque, RPM reduction, and the quieter nature of the procedure.
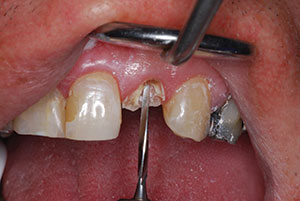
The process of canal preparation was initiated using a flexible Gates Glidden end-cutting drill to remove the desired amount of gutta-percha (Figure 6). Once the gutta-percha was removed, the appropriate size post was selected. The size selection was done through measurements of the canal and careful review of the radiograph.
The kit to be utilized in this case was the very latest 3-D Fiber Post from 3M. This clinical product represents a true advancement in post design. The key enduring feature of the 3-D fiber-reinforced glass post is that the inherent flexural modulus is similar to that of dentin. The post has a knurled coronal portion to engage the core material. It is 60% parallel glass fibers in a resin matrix that has been presilanated to enhance chemical bonding. The microstructure creates an ideal surface for mechanical interlock. The components of this system include the 3-D post, 35% phosphoric acid gel (Scotchbond Etchant [3M]), bonding adhesive (Scotchbond Universal [3M]), self-etching dual-cured resin cement (RelyX Unicem 2 [3M]), bulk-fill core material (Filtek Bulk Fill [3M]), and reamers.
 |
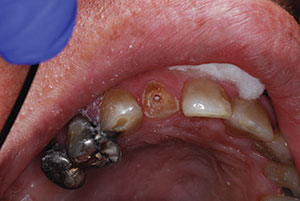 |
| Figure 4. Taking proper shade with VITA Easy Shade V (VITA North America). | Figure 5. The access opening was enlarged slightly. |
 |
 |
| Figure 6. Initial removal of gutta-percha with Gates Glidden drill. | Figure 7. Preparation of canal with reamer. |
 |
 |
| Figure 8. Try-in of red 3-D Fiber Post (3M). | Figure 9. Try-in of stock core over adjusted post. |
 |
 |
| Figure 10. Injection of RelyX Unicem 2 (3M) into the canal. | Figure 11. Using a bonding adhesive (Scotchbond Universal [3M]) to coat the 3-D Fiber Post. |
 |
 |
| Figure 12. Compression of the composite (Filtek Bulk Fill [3M]) (shade A3) onto the post. | Figure 13. Light curing the core material (Elipar Deep Cure LED [3M]). |
 |
 |
| Figure 14. Performing gingivoplasty with a soft-tissue diode laser (Picasso Lite Laser [AMD LASERS]). | Figure 15. Completed IPS e.max (Ivoclar Vivadent]) lithium disilicate crown. |
Once the gutta-percha was removed, the appropriate size reamer (corresponding to the post size) was utilized to extend to the desired length (based upon the initial depth). This reaming portion was done slowly, with consistent torque and an up-and-down motion, to gently enlarge the canal. The taper of the reamer used was the exact taper and dimension of the post (Figure 7).
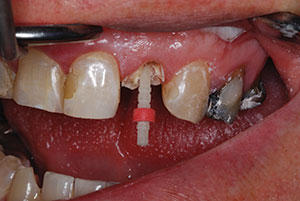
Once the canal was flushed with water and dried out, the preselected post size was tried in to determine the proper length (Figure 8). The post should extend coronally close to the anticipated length of the final crown. A silicone ring was used to mark the post length at the point where it would be cut. Then, the post was cut in about one second using a thin diamond disk with a straight laboratory handpiece. The advantage of this post system is that, once bonded into the canal, the functional load will be dissipated throughout the entire root to prevent buildup of peak forces (unlike that which can take place with a stiff modulus post that could lead to root fracture). These posts are very strong with a flexural modulus of 1,600 MPS.
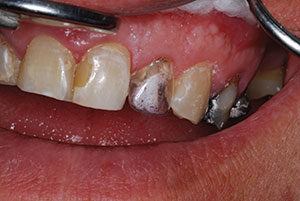
Once the adjusted post was tried in, a stock polycarbonate crown form of appropriate dimensions was tried in over the post (Figure 9). Another method is to have a 0.020” polypropylene stent made from a prepared preoperative model. The key to success with this system is that all the components are tied logically and consecutively together. To debride, clean, and etch the canal, the 35% phosphoric etch (Scotchbond Etchant) was placed on the coronal structure and in the canal for 20 seconds. Once rinsed and dried thoroughly, a paper point was placed in the canal to absorb any residual water present. The next step was to place the Scotchbond Universal adhesive on the coronal aspects of the root. It was scrubbed in for 20 seconds, dried, and light cured (Elipar Deep Cure LED [3M]) for 10 seconds.
In my office, all the clinical work is done with the aid of magnification and LED illumination using an eyewear system fabricated by Designs for Vision. This is important in the next step, in which an orange filter was utilized to prevent premature polymerization of the cement. Under the orange filter, the post was covered with the luting agent (RelyX Unicem 2) first, and then, using a very small endo tip, the cannula was extended to the deepest apical location and injected as it was withdrawn. This protocol completely engulfed the canal with the resin cement. The self-etch, dual-cured cement bonds tenaciously to the intraradicular canal walls and to the post (Figure 10). Once the position was verified, the post was stabilized by transillumination through the post via use of the LED curing light. Scotchbond Universal was also placed on the post extension and light cured for 10 seconds (Figure 11).
After post placement, an appropriately shaded core material (Filtek Bulk Fill, shade A3) was compressed onto the post to engage the undercuts (Figure 12). Before curing the compressed core material, the core form was filled completely with the composite resin core material, making certain to eliminate any voids. The core was positioned properly according to tooth position, angulation, and occlusal scheme. Once satisfied with that, the entire mass was light-cured with the Elipar Deep Cure LED placed as close as possible to the core. It was light cured from the labial, lingual, and incisal for 10 seconds each (Figure 13). The curing light would cure the core material completely, up to a depth of 5.0 mm.
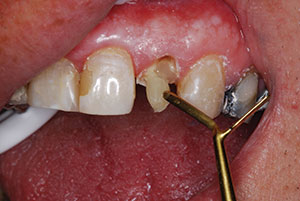
After the initial preparation of the tooth for a full-coverage lithium disilicate crown (IPS e.max [Ivoclar Vivadent]), a soft-tissue diode laser (Picasso Lite [AMD LASERS]) was utilized to perform a gingivoplasty. This was also done to more easily allow the placement of a ferrule of at least 2.0 mm onto natural tooth structure to support and strengthen the entire tooth-root-restoration complex (Figure 14). After taking the final vinyl polysiloxane impression (Extrude [Kerr]), a provisional was constructed from an impression matrix of the core and an opposing impression was secured.
The dental laboratory team pressed the crown using a shade darker ingot (IPS e.max Press Multi [Ivoclar Vivadent]) than the central incisors to match tooth No. 7.
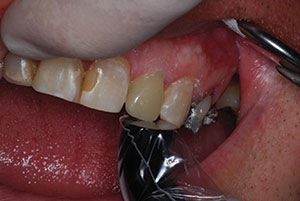
The restoration was returned from the dental lab and the usual cementation protocol was carried out. The intaglio surfaces were silanated for 60 seconds and dried. Then, the crown was adhesively cemented using a self-etching self-adhesive resin cement (RelyX Unicem 2) (Figure 15).
CLOSING COMMENTS
There are many advantages found in the clinical protocol featured in this case report article. The clinician can take a decimated endo tooth, build it up, place an aesthetic crown, and reinforce the entire tooth-restoration complex. All components act as one, being that mechanical and chemical bonding take place on every level with every material. Certainly, the clinical outcome is a very durable and aesthetic restoration that is physiologically integrated within the natural dentition. Furthermore, by observing sound clinical principles related to the biological width, minimally invasive preparation techniques, and proper use of the diode laser, the soft-tissue response is very favorable.
Using the clinical protocol described herein, dentists can offer premier services, done efficiently and predictably, and resulting in patients who will be ever grateful for their restored smiles.
Dr. Braun received his master’s degree in prosthodontics and his DDS degree at the University of Michigan. In Saginaw, Mich, he has maintained a full-time private practice specializing in prosthodontics for more than 30 years. His staff appointments have included the University of Michigan School of Dentistry and hospitals in Ann Arbor and Saginaw. For 15-plus years, Dr. Braun has lectured internationally, including presentations at more than 20 ADA-affiliated state dental associations. He has lectured at the ADA, Hinman, Greater New York, and Chicago Midwinter meetings. He also conducts hands-on workshops, webinars, and has published a variety of articles on aesthetic restorative dentistry for journals. Several major dental manufacturing companies utilize his professional skills on a consultant basis for the development of new products. Dr. Braun continues to be selected by Dentistry Today as a Leader in Continuing Education. He can be reached at (989) 793-5551, or via email at jbraundds@sbcglobal.net.
Disclosure: Dr. Braun reports no disclosures.
Related Articles
Student Develops One-Shot Root Canal Alternative
GentleWave Procedure: Today’s Alternative to Standard Root Canal Treatment
Prefabricated Blood Vessels May Improve Root Canal Treatment