
INTRODUCTION
Light-activated dental materials have been available in dentistry since the 1970s. Today, most restorative practices utilize dental materials that are dependent on, or are aided by, photoinitiators when providing dental care to patients. It is estimated that more than 260 million direct resin composite restorations are placed worldwide each year.1 These dental procedures are at risk of not performing at the highest levels if the techniques and equipment used to polymerize them are not understood, implemented properly, or routinely monitored.
Restorative materials that are aided by light curing may include sealants, dentin bonding agents, restorative composites, resin-modified glass ionomers (RMGIs), build-up materials, cements, and pulpal liners. Understanding the proper use and limitations of the dental light-curing unit can strongly influence the long-term outcome of our restorative procedures.
Dental curing units have evolved from ultraviolet lights to quartz tungsten halogen (QTH) lights to plasma arc lights to argon-ion laser lights and now to light-emitting diode (LED) lights. The goal of each new technology is to provide increased speed and depth of cure with less heat generation. Chemical changes in restorative materials have also been introduced with the same goals of faster and deeper depth of cure with less shrinkage and shrinkage stress while maintaining high physical properties.
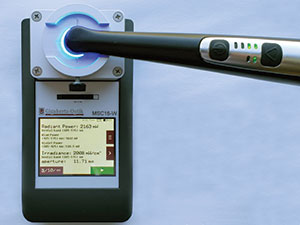 |
| Figure 1. An example of a light irradiance being measured in the dental office. |
 |
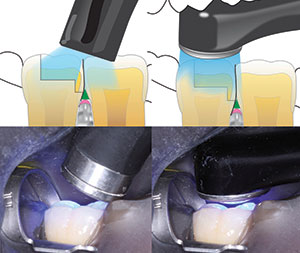 |
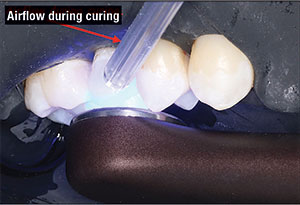
| Figure 2. Using the air syringe to apply a stream of air to the tooth during curing. | Figure 3. Note the difference in angle required with 2 light tips/guides when used in the posterior. |
Understanding Energy Density
According to the literature, 12 J/cm2 is considered adequate energy density to polymerize a 2-mm increment of traditional paste composite of shade A2.2,3 Adequate cure is achieved when measuring a minimum 80% bottom Knoop hardness value as compared to the top. The average maximum degree of conversion of the top is 55% to 60%.4 This recommended energy density value is an average and can have an actual range of 6 J/cm2 to 36 J/cm2 depending on the shade and the material. One study found that 82% of the operators tested delivered less than 10 J/cm2 to a Class V restoration.5 How could this occur if all the lights were confirmed to be in excellent operating condition?
The following outlines a few of the basic concepts that should be considered when purchasing or using a curing unit for everyday intraoral resin composite light-curing procedures.
Measuring the Irradiance Levels (mW/cm2) and Calculating the Energy Density (J/cm2)
It is believed that most dental practices do not check or monitor their curing lights. Every dental office should have systems and equipment in place to routinely check the power levels of each unit in the office (Figure 1). The power level reading provided by most measuring units will be in mW/cm2. This value can be converted to the energy density value and used as a reference for minimum curing times based on the manufacturer’s recommendations for each material, shade, and increment thickness. To determine what your light energy density value is, simply multiply the irradiance of your light with the target curing time in seconds (eg, 1,000 mW/cm2 × 10 seconds = 10 J/cm2). There are several dental light radiometers available for purchase. It is best to consult with your light manufacturer for the irradiance value that the light unit should measure and the recommendation of a meter that is most accurate for the light. Measuring a larger-diameter-tip curing unit with a small-diameter sensor on the radiometer may give you a false value. Once you have confirmed that your light is emitting the manufacturer’s set irradiance level, record this value and use it as your control. If the value starts decreasing, locate the problem and correct it. Always confirm that your light tip is clean before each test or clinical use.
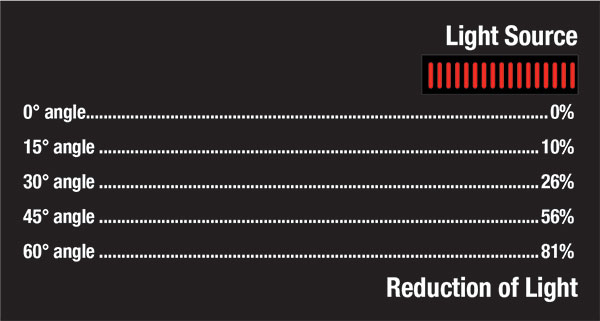 |
| Figure 4. The reduction of light energy with an increase in tip angle. |
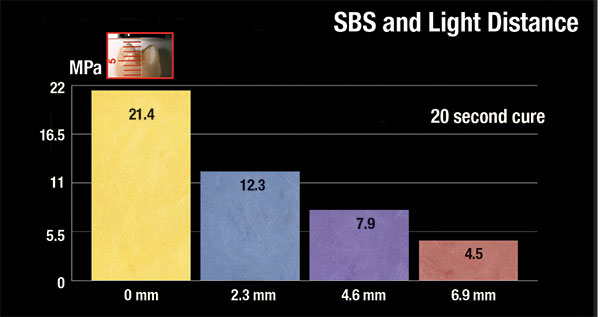 |
| Figure 5. Note the reduction in SBS with an increase in distance from the adhesive layer to be cured. |
Concerns With High Irradiance Levels
The desire for shorter procedure times continue to drive the introduction of ultra-high-power lights. Concerns include increased shrinkage stress, pulp tissue damage due to heat, and potentially inadequate cures of bulk-cure materials. Shrinkage stress is one factor that is responsible for clinical failure of composite restorations. High-intensity lights can increase stress at the composite/tooth interface when the pre-gel phase time is reduced, causing less flow of the material during the initial moments of polymerization.6-8
All light energy generates heat. Lights have been introduced with irradiance levels up to 7,000 mW/cm2. Many studies use a threshold temperature increase value of 5.5° C as the value when potential harmful effects may occur to the pulpal tissue.9 Many of the available light-curing units on the market can generate a heat increase of pulpal tissue that can exceed this value if care is not used. Techniques such as continuous air flow over the tooth during curing (Figure 2) and a spray of water following the final cure should be considered to lower any risk to the pulpal tissue.10
When using ultra-high-powered lights to cure bulk-filled composites, short exposure times with high irradiance results in a significantly lower depth of cure and degree of polymerization compared to longer exposures and lower irradiance values.11 This would support that the previously discussed energy density formula is not always the complete answer. When working with light units designed with a selection of power settings, it may be preferred to keep the power in the 1,000 to 1,500 mW/cm2 range and calculate the required curing time from this setting.
 |
 |
| Figure 6. An example of how different matrix bands can change the distance of the light tip to the cured surface. | Figure 7. An example of 2 light-tip diameters and how a smaller light tip might introduce challenges when curing a larger restoration on a molar. |
Angle of the Light Guide
It is critical to position the light guide perpendicular to the area to be polymerized. As the angle of positioning increases from the material, the irradiance rapidly decreases. For example, a 30° angle would decrease the energy delivered by 26%.2 This angle change will have an even greater effect on the material placed into an interproximal box preparation (Figures 3 and 4). The design of the light guide can negatively affect the potential cure in the posterior regions of the mouth, especially in patients who have limited openings. One study evaluated the posterior access with a simulated 35-mm inter-incisal opening and determined that only 2 of the 6 lights tested were able to maintain a perpendicular orientation to the occlusal surface of the lower second molar.12
Battery Drain With Cordless Curing Light Units
There is an assumption that all cordless lights maintain the same power level over the period of a single charge. There are now concerns that some models of cordless curing lights may experience battery drain that can greatly reduce the performance of the light over multiple uses between charges. Just seeing blue light emitting from the guide is not enough. Studies have confirmed that light units purchased from quality manufacturers showed an average 6% decrease in irradiance over their use within a single charge.12 Budget light units demonstrated a reduction of irradiance ranging from 26% to 99% during use within a single charge.13 Reductions in power, as seen in these low-budget lights, can lead to catastrophic failure of your clinical procedures. It is critical to the success of every clinical procedure to select a light-curing unit with a stable light intensity over the period of a single charge. Even with quality lights, it is important to place the light back onto the charging stand between procedures to maintain a full charge and, as stated above, monitor the power with a testing device regularly. Corded units (such as VALO Grand Corded [Ultradent Products]) have been introduced that have addressed the larger footprint of the earlier tabletop models and can eliminate this battery-drain concern.
Effect of Distance From Light Tip to Material
Much detail has been presented on the irradiance at the light-guide surface, but every clinical case requires that this light energy reach the tooth surface farthest from the light determined by the preparation. In every case, the irradiance measured will be lower than the value measured at the light-guide tip, but how much lower?
 |
| Figure 8. Note the “hot” and “cold” spots on the beam profile of light A (right) compared to the much-preferred beam profile of the VALO Grand Corded (Ultradent Products) on the left. |
 |
| Figure 9. These 2 beam profiles are of the same lights as in Figure 8 but at a distance of 10.0 mm. Note the significant reduction of energy of light A (right) compared to the VALO Grand Corded on the left. |
 |
| Figure 10. An example of a polywave light’s interaction with 3 commonly used photoinitiators. |
The collimation of the beam must be part of the discussion when evaluating the performance of a light-curing unit. A well-collimated beam has low divergence with little beam radius change as it propagates. Every light tested has a different limit for the maximal distance that adequate energy can reach to achieve a fully cured material. Some lights tested had significant loss of irradiance in as little as 2 mm of distance.14,15 I use a distance of 10 mm (per the manufacturer’s recommendation) for the VALO Grand Corded as my maximal comfortable distance from a surface to be cured. As the distance from the light tip to the surface with the uncured dentin bonding agent (Figure 5) or the bottom of each uncured increment of composite increases from 2.0 mm to 8.0 mm, my curing time may reach 60 seconds per increment with an irradiance starting value of 1,000 mW/cm2 and a constant flow of air to prevent tissue damage from the heat16 (Figure 6). I have frequently measured distances of 12 mm or more from the light guide to the gingival floor once the matrix band and separation ring have been placed. When measuring a distance greater than 10 mm, I will elect to place a restorative material, such as a pure glass ionomer or an RMGI, that is not dependent on a light-cured dentin bonding agent and can fully cure independent of any light exposure. This will also be my preferred direction when the area is compromised due to the lack of proper isolation or when working in a high-risk environment.
Color/Composition of the Composite
Color and type of composite resin material can also change the required curing times and affect the degree of polymerization. With all else being equal, darker shades of composite resin material could be cured for double the time as a lighter shade of similar material and still not achieve the same degree of polymerization or depth of cure.14 Some Microfil and flowable composite resin materials have also been shown to require additional curing times. When working in deep areas of a preparation where color is less important, it is preferred to use lighter color composite resin material. Bulk-fill composites follow these same rules and should always be limited to a single increment of no more than 4.0 mm.11 Multiple smaller increments are always a better choice.
 |
| Figure 11. An example of a Blue Blocker light shield placed behind a set of loupes. |
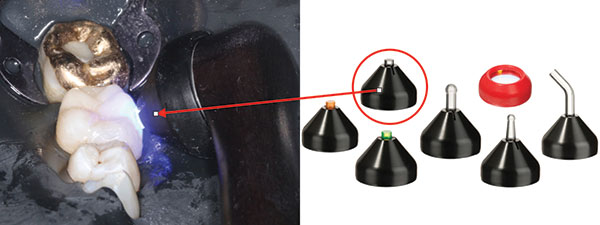 |
| Figure 12. Placement of the bonded porcelain onlay restoration while using the PointCure (Ultradent Products) light tip on the VALO Grand Corded curing light. |
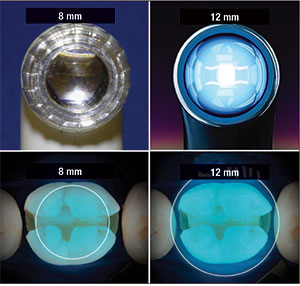
Tip Diameter
Practitioners should evaluate the internal light source diameter at the tip of the light guide. This diameter should allow full coverage of the length and width of the restoration to be cured (Figure 7). If not, multiple exposures should be used to cure a single restoration that is larg
er than the tip selected.12 It is also important that your light unit has adequate total power as the light-tip area increases. The irradiance equals power/tip area. Increasing the tip diameter will require more total power to maintain the same irradiance levels as a smaller tip. Obviously, a 12-mm tip diameter may seem better than a 7-mm one, but only if the power is uniform over the entire tip area. This may explain why we continue to see smaller tip light guides on many of the units available. A low-power unit can still generate a high irradiance value if the tip diameter is smaller.
Beam Profile/Light Beam Distribution Across the Light Tip
When the light energy is not well distributed across the light tip, there are areas of hot and cold spots seen with laser beam analyzers. The “hot spot” areas provide adequate irradiance to cure the restoration, but the areas of “cold spots” do not have the needed irradiance to cure the restoration. When these images are superimposed over the tooth preparation, there is concern that if the irradiance is not uniformly delivered over the entire surface of the light tip, areas of the restoration will not be fully cured.17 The only way to know if your light has concerns in this area is to request, from the light manufacturer, beam-profile images that show where the light energy actually exists (Figures 8 and 9). As these light tips continue to increase in size, more power is required to deliver a quality beam to the restoration. It is important that the unit have adequate total power. Many lights may have a smaller tip because the unit lacks the total power needed to achieve an even distribution of high irradiance levels over a larger diameter tip. Again, this is an important question to ask the light manufacturer.
Polywave Technology
As composite materials evolve with expanded shade selections and increased depth of cure, alternate photoinitiators have been introduced. The most common photoinitiators used in today’s composite resin materials are Camphorquinone (CQ), Lucirin TPO (TPO), and Phenylpropanedione (PPD). The absorption spectrum of each is 380 to 425 nm for TPO, 350 to 490 nm for PPD, and 420 to 540 nm for CQ. Light-curing units with LED chips limited to the blue range (420 to 540 nm) may not cure all of the photoinitiators within the composites available today.18 Many bleach shade and bulk-fill composite resins contain a greater percentage of these alternate photoinitiators. New lights being introduced may include LED chips emitting irradiance in the violet range (360 to 420 nm) (Figure 10). To guarantee the best possible results with your restorative procedures, check with the manufacturer of the light unit and the composite to confirm that they are compatible with one another. If you have an LED unit with a limited range and are concerned about polymerizing a selected material, then have no worries and unpack your QTH light. These lights have a broad-spectrum range that can activate all photoinitiators currently in use in dentistry.
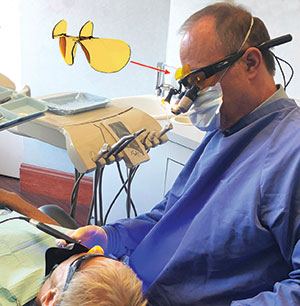
The Dangers of Blue Light
It has been discussed how important it is to position and maintain the light tip in the ideal relationship to the material being cured. It is also well understood that all curing lights emit blue light in the hazard zone, 440 nm. When the retina has multiple exposures to low levels of blue light, it can be absorbed, leading to accelerated macular degeneration.19 Many dentists may use the “turn away” method of protection. Looking at the light for only a second to confirm positioning during each curing cycle presents a great risk to your eyes when understanding that the damage is cumulative over years of practice. The use of unfiltered magnification/loupes can be of even greater concern when looking at an activated light. If you do not confirm placement, the light position can change, causing under-polymerization. There are many filter designs to help block blue light. These designs include glasses, oral filters, nose cones placed over the light guide, and loupes with built-in filters. The filters that I find to be most practical with my clinical procedure flow are the slip-in, orange Blue Blocker shields (Orascoptic) that can be placed behind my loupes (Figure 11).
Light Guide Accessory Lenses
At least one LED curing unit has several optional lenses that attach to the tip. The lens I reach for daily is the PointCure (Ultradent Products), available for the VALO Grand Corded light. The PointCure lens aids in the placement of all indirect restorations (Figure 12).
CLOSING COMMENTS
Light curing is not as easy or as straightforward as most would want to believe. Incorrect techniques or equipment can place your clinical care at great risk for recurrent decay, excessive wear, fractures, bond failures, and bio-incompatibility/cytotoxicity. You should consider each of the above highlighted points when purchasing and using light-curing devices for clinical care. Measure and clean your light guides regularly to confirm that they are working properly. As technology continues to strive for improvements in this arena, there will be bumps in the road. Hopefully, the guidelines covered herein will assist the reader in asking the right questions and to better understand the everyday needs of an effective light-curing unit.
References
- Heintze SD, Rousson V. Clinical effectiveness of direct class II restorations—a meta-analysis. J Adhes Dent. 2012;14:407-431.
- Price RB, McLeod ME, Felix CM. Quantifying light energy delivered to a class I restoration. J Can Dent Assoc. 2010;76:a23.
- International Organization for Standardization (ISO). Dentistry—Powered Polymerization Activators. ISO 10650:2018(E). Geneva, Switzerland: ISO; 2018.
- Miletic VJ, Santini A. Remaining unreacted methacrylate groups in resin-based composite with respect to sample preparation and storing conditions using micro-Raman spectroscopy. J Biomed Mater Res B Appl Biomater. 2008;87:468-474.
- Price RB, Felix CM, Whalen JM. Factors affecting the energy delivered to simulated Class I and Class V preparations. J Can Dent Assoc. 2010;76:a94.
- Stritikus J, Owens B. An in vitro study of microleakage of occlusal composite restorations polymerized by a conventional curing light and a PAC curing light. J Clin Pediatr Dent. 2000;24:221-227.
- Lopes LG, Franco EB, Pereira JC, et al. Effect of light-curing units and activation mode on polymerization shrinkage and shrinkage stress of composite resins. J Appl Oral Sci. 2008;16:35-42.
- Pires-de-Souza Fde C, Drubi Filho B, Casemiro LA, at al. Polymerization shrinkage stress of composites photoactivated by different light sources. Braz Dent J. 2009;20:319-324.
- Zach L, Cohen G. Pulp response to externally applied heat. Oral Surg Oral Med Oral Pathol. 1965;19:515-530.
- Zarpellon DC, Runnacles P, Maucoski C, et al. Controlling in vivo, human pulp temperature rise caused by LED curing light exposure. Oper Dent. 2019;44:235-241.
- Daugherty MM, Lien W, Mansell MR, et al. Effect of high-intensity curing lights on the polymerization of bulk-fill composites. Dent Mater. 2018;34:1531-1541.
- André CB, Nima G, Sebold M, et al. Stability of the light output, oral cavity tip accessibility in posterior region and emission spectrum of light-curing units. Oper Dent. 2018;43:398-407.
- Che F, Felix C. Endurance testing of dental light curing units. J Dent Res. 2019;98(special issue A). Abstract 1105.
- Rueggeberg F. Contemporary issues in photocuring. Compend Contin Educ Dent Suppl. 1999;25:S4-S15.
- Price RB, Labrie D, Whalen JM, et al. Effects of distance on irradiance and beam homogeneity from 4 light-emitting diode curing units. J Can Dent Assoc. 2011;77:b9.
- Xu X, Sandr
as DA, Burgess JO. Shear bond strength with increasing light-guide distance from dentin. J Esthet Restor Dent. 2006;18:19-27. - Price RB, Labrie D, Rueggeberg FA, et al. Correlation between the beam profile from curing lights and the microhardness of four resins. Dent Mater. 2014;30:1345-1357.
- Rocha MG, de Oliveira D, Correa IC, et al. Light-emitting diode beam profile and spectral output influence on the degree of conversion of bulk fill composites. Oper Dent. 2017;42:418-427.
- Rueggeberg FA, Giannini M, Arrais CAG, et al. Light curing in dentistry and clinical implications: a literature review. Braz Oral Res. 2017;31(suppl 1):e61.
Dr. Brucia is a graduate of the University of the Pacific Dugoni School of Dentistry where he is currently an assistant professor. He practices full time in San Francisco and is the co-director and department chair of the F.A.C.E. occlusion study club. He currently serves as secretary of the American Academy of Esthetic Dentistry. He can be reached at info@facedentistry.org.
Disclosure: Dr. Brucia received an honorarium from Ultradent Products for this article.
Related Articles
Supragingival Dentistry for Aesthetic Rehabilitations: Implementing the 3 Golden Rules of Occlusion
No-Preparation Porcelain Veneers


