In this issue of Dentistry Today, our editor-in-chief, Damon Adams, DDS, recently led an interview with David Hornbrook, DDS, and his ceramist, Kent D. Kohli, CDT.
First off, thanks to both of you for being willing to share some time with us to discuss the important topics of collaboration and communication within doctor-technician teams. Would you both please give our readers a little background as it relates to your expertise in doctor-technician communication and the interprofessional relationships that serve to bolster excellence with aesthetic and functional outcomes?
DH: I have been in clinical practice for the past 33 years and have experienced much success that can be attributed to good communication between my dental laboratory technicians and me, and the journey included learning from any mistakes made along the way as well. Over my career, I also founded several live-patient aesthetic programs that paired up the attending clinicians with ceramists, teaching and emphasizing a collaborative approach to dentistry. In addition, I have had the valuable experience of being the director of education at Utah Valley Dental Lab for the past 3 years. My role there is to act as a liaison between the clinicians and ceramists. This has allowed me to directly witness the importance of great doctor-technician communication skills and the compromises that can and will occur with poor, little, or even no communication.
KK: I have been in the dental laboratory profession for nearly 30 years. First as an in-house technician, second as an owner/operator of a commercial laboratory for nearly 23 years, then as a general manager, and now as the chief operating officer (COO) of 2 large commercial dental laboratories. In addition to these work experiences, I have taught hands-on courses and given lectures over these past 18 years on ceramics, aesthetics, and the importance of good communication between doctors and technicians to ensure predictable and successful clinical outcomes.
 |
 |
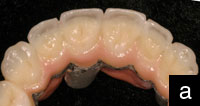
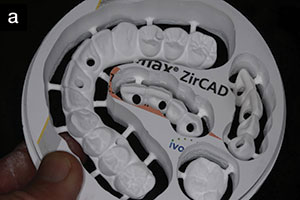
| Figure 1a. Zirconia disc (IPS e.max ZirCAD [Ivoclar Vivadent]) after milling and before pre-sintering. After sintering, these restorations will change to white according to their corresponding tooth shade. | Figure 1b. Leucite-reinforced anterior restorations (IPS Empress Esthetic [Ivoclar Vivadent]) on a printed model. The impression was taken using the TRIOS Intraoral Scanner (3Shape). |
To achieve consistent and predictable clinical success, do you feel it is important to work with a ceramist who is located near your dental office?
DH: Although, at times, it would be nice to walk next door or across the street to hand a case to my ceramist, I really feel, in this age of digital files and efficient shipping, that having a technician close by is no longer necessary. For many years now, I have not used a ceramist who works in my hometown. I believe that it is more important to find a ceramist who has the same goals, work ethic, occlusal philosophies, and aesthetic eye than one based on location. The bottom line is that the most important aspect of a successful partnership is more about effective communication skills than proximity. Since my ceramist is about 1,000 miles away from me, I rely on texts, emails, and photographs to achieve the desired results for our patients.
KK: This is a great question, and I have experience in both an in-house setting as well as long-distance working relationships with hundreds of clients. While it is nice for the doctor to have a ceramist in an adjoining suite to come over each time one needs a custom shade, it is entirely possible to attain an equally acceptable result via quality intraoral photography, custom light-cured shade tabs, and shade communication software.
 |
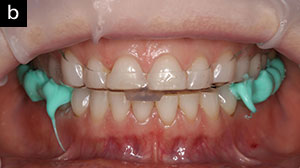 |
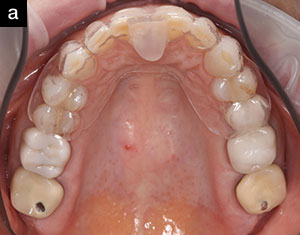
| Figure 2a. The Freedom Appliance is shown on the maxillary arch. Molars are not covered so that a deprogrammed bite can be taken with the appliance in place. The anterior composite stop only opens the bite to obtain molar clearance. | Figure 2b. With the Freedom Appliance in place, a bite registration is injected over the molars bilaterally; then the patient bites gently into this reproduced physiological bite (in centric relation). |
 |
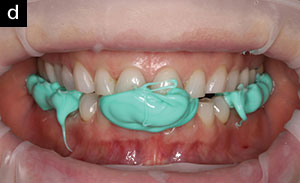 |
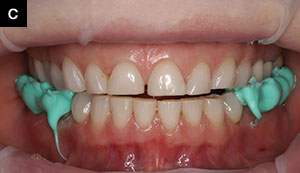
| Figure 2c. The Freedom Appliance is then removed, and the patient bites back into bilaterally placed posterior bite registration material. | Figure 2d. Bite registration material is injected into the anterior segment. This “tripod” bite is used by the technician to mount the case. |
What advice can you share with doctors that can help them find top-notch dental lab technicians?
DH: Probably the best places to start the search are at certain dental meetings and by reading journals written by technicians. Meetings, such as the ASDA (American Society of Dental Aesthetics) Conference, AACD (American Academy of Cosmetic Dentistry) Scientific Session, and the Chicago Dental Society Midwinter Meeting, are all excellent places to meet dental technicians, see their work, get to know them personally, and even hear them lecture. The LMT Lab Day is primarily for technicians, but I really enjoy going as a clinician to be with and hear from talented ceramists and other laboratory experts who have a wealth of knowledge. Another great way is to note who did the laboratory work for the authors of clinical case report articles, such as those you read every month in Dentistry Today. If you see clinical cases involving lab work that you are impressed with in an article, check the end of the article for an acknowledgment of the dental technician or dental laboratory team.
KK: One need not look much further than the continuing education programs that you attend as clinicians. In addition to meetings like the ones Dr. Hornbrook just mentioned, talented dental technicians can be found attending didactic and hands-on CE programs offered by organizations such as the Pankey Institute, Dawson Academy, Kois Center, Spear Education, Hornbrook Center for Dentistry, and more. As dental technicians, we strive to be like-minded co-professionals who value multi-disciplinary education where each participant checks his or her ego at the door in the pursuit of excellence.
 |
| Figure 3. Photos of incisal edges are used to communicate incisal characteristics to both the patient and the ceramist (IPS Empress Esthetic restorations). |
What recommendations can you both share regarding impression materials and the types of impressions that should be taken for different scenarios? Where do you stand regarding the use of digital impression techniques?
DH: Accurate impressions, especially related to the capture of margins, is still the No. 1-reported challenge for dental technicians. Before I actually discuss impression types themselves, I’d like to say that bad impressions will always yield bad results. “Garbage in, garbage out,” as the old saying goes. Your patients deserve quality impressions! As for impression materials, most technicians do not prefer a putty/wash impression because there is a higher chance of rebound and distortion if the putty begins to gel slightly before being placed in the mouth. All the technicians I have worked with prefer a heavy-body/light-body wash; this involves utilizing a simultaneous technique where the clinician injects the light-body material around the preps while the dental assistant fills the tray with the heavy-body material. Most clinicians are using vinyl polysiloxane (VPS) materials, although technicians have no problem with polyether impression materials. If traditional physical impressions are being taken, I would absolutely suggest taking a full-arch impression for all your larger multiple-unit cases and any bridge cases. This is because the lab team needs the stability of more teeth in contact to accurately articulate and mount the models. I would also always recommend taking a face-bow with any multi-unit cases. Not only are you going to achieve more accurately mounted models, you are also sending a message to your lab team that you do not compromise and that you expect the same from them. I think quadrant dual-arch or check-bite trays are fine for single units as long as the case does not involve the most distal tooth in the arch. To help prevent impression distortion, I would recommend against the use of a flexible plastic dual-arch for a definitive impression and for the use of a tray that incorporates metal in the design, such as an appropriately sized Bite Relator Tray (Temrex). Also, when taking dual-arch tray or quadrant impressions, be sure to capture the teeth all the way to the canines in the arch; this ensures that the technician can create great occlusal anatomy without introducing working interferences. If the canine is not captured, they will be guessing and will usually design a very flat and inefficient occlusal anatomy.
 |
 |
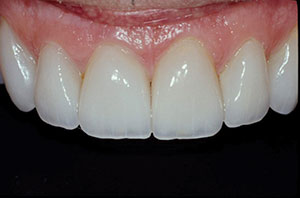
| Figure 4a. Preoperative image of anterior teeth with chemical erosion. | Figure 4b. Postoperative photo of the 4 minimally invasive IPS Empress Esthetic veneers. |
Regarding digital impressions, I am personally a huge fan of this technology and how it has continued to evolve, becoming more and more user friendly and efficient and featuring increasingly sophisticated hardware and software. I use the TRIOS Intraoral Scanner (3Shape) in my office and appreciate its accuracy and integration directly into my technicians’ digital design software. The new scanners are faster and more accurate than analog (vinyl) impressions, and if you miss a margin in your scan for some reason, you can see it immediately and need only to rescan over that one area rather than take an entire new impression. The model printers are very accurate and can even print soft-tissue models, which I prefer when doing implants and anterior restorations. I also feel that the accuracy is so high with these scanners and the design software that there is really no need to even utilize models to ensure the desired occlusal and proximal contacts or marginal fit.
KK: I am somewhat of a progressive in my viewpoint on this matter, and I am growing ever more fond of the digital intraoral scanner (IOS) workflow. However, from my long-term experience, I would add here that a high-quality VPS impression, when taken properly, is equal to, or rivals, most digital impressions. Many clinicians are often under the misconception that a digital IOS will overcome all their previous technical challenges found in taking traditional physical impressions, but this is not always the case, as it is still quite necessary to isolate the field and to provide adequate tissue retraction in order to capture all of the necessary details.
 |
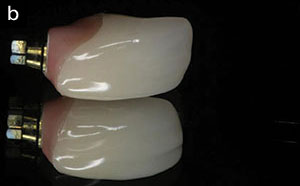 |
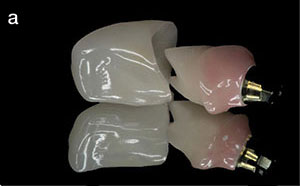
| Figure 5. An IPS Empress Esthetic crown with an “H-abutment” using lithium disilicate over a titanium base. |
How should a clinician communicate the desired materials to be used in specific restorative cases?
DH: Of course, these matters should always be discussed up front with the laboratory team before preparations are ever begun as a part of the treatment planning process. Different materials require different preparations, and poorly designed preparations may limit what materials could, or should, be used. Dental technicians are so knowledgeable on what is available. The materials side of the dental laboratory business is changing so rapidly, especially with regard to all-ceramic dental materials, and I have found that ceramists are usually much more up-to-date on materials than even most clinicians. Ceramists and dental lab teams really want to give you the best restoration possible in terms of aesthetics, fit, and long-term prognosis, so involve them in the decision-making process when appropriate, and take a collaborative approach that will help ensure success. The more educated the clinician becomes on materials, the more input they should provide. With all that is available today, I think it is no longer appropriate to simply request an “all-ceramic” crown on a lab prescription, leaving the material choice up to the lab team to make on its own. We, as clinicians, need to become more familiar with the advantages, disadvantages, indications, and contraindications of different materials so we can thoughtfully request materials and collaboratively discuss options with our lab teams.
KK: Over my many years, I have come to appreciate having a dialogue with my clients rather than simply being told what material to use. Each clinical case presents specific challenges, and, dependent upon the desired aesthetic outcome, patient expectations, preparation design, restorative space provided, material thickness, stumpf (dentin) shade, functional situation, and strength requirements, a suitable restorative material may then be collaboratively chosen.
 |
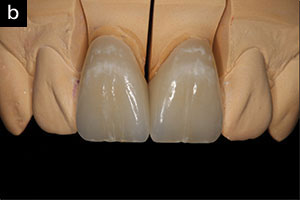 |
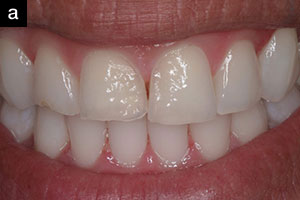
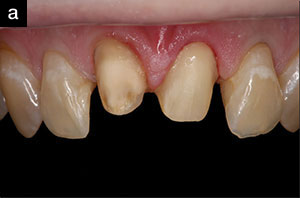
| Figure 6a. The removal of 2 anterior PFMs on maxillary centrals. Numerous photographs were taken to provide characteristics of adjacent teeth to match. | Figure 6b. The all-ceramic crowns on the model. |
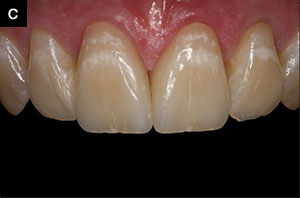 |
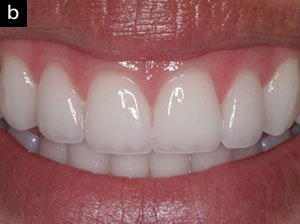
| Figure 6c. The completed IPS Empress Esthetic crowns on the maxillary centrals. All shades and characteristics were transferred to the ceramist via photos. |
What materials do you prefer for the majority of your restorative cases, both anterior and posterior?
DH: Based upon more than 25 years of experience with it, I am a huge fan of IPS Empress Esthetic (Ivoclar Vivadent), and I request that all anterior restorations are fabricated using this very aesthetic, leucite-reinforced all-ceramic material. I especially like the way it interacts with light better, compared to any of the other materials. For posterior teeth, it really depends upon my preparation design. For full coverage on molars, I use high-translucency zirconia. The aesthetics are excellent, and studies have shown that this material can be bonded in using resin cements. It also exhibits good wear characteristics. Also, I only need a 1.0-mm minimum occlusal reduction with this material, which is helpful on second molars with short preparations and minimal inter-arch distances. For inlays and onlays on molars, I prefer lithium disilicate (IPS e.max [Ivoclar Vivadent]). All bridges in my office are zirconia frameworks overlaid with either a powder/liquid ceramic or a pressed ceramic. The only time I use metal in my practice is when I restore implants using hybrid abutments.
KK: As I mentioned earlier, each case is a little different. However, if we begin with the end in mind, and if we collaboratively develop a comprehensive treatment plan and put in place specific “fail-safes,” an appropriate material may be selected for each case. While we still do a fair number of IPS Empress Esthetic restorations, and certainly do a large number of lithium disilicate IPS e.max restorations as well, today’s higher translucency zirconia materials afford exceptional aesthetic alternatives, so these should also be considered.
When doing a full-mouth case, what is the first and most important step that you complete prior to a diagnostic wax-up?
DH: There are 2 very essential parts to this question: The first is based on aesthetics, and the second is related to function. The smile must be designed by the clinician before the technician can even begin the wax-up. This design must include the following: (1) the incisal edge position of the centrals, (2) the smile line, (3) incisal edge inclination, (4) the midline position, (5) the profile of the anterior teeth, (6) the buccal corridor, and (7) gingival changes. This is the same list of information needed by denture technicians before the teeth are set, and the final assessment and adjustments are made by the clinician during the wax try-in. With regard to establishing proper function, I take a physiological bite driven by muscles and determine any changes that will be made to the vertical dimension of occlusion (VDO). The technician cannot even begin a wax-up without an accurate restorative bite position. My personal occlusal philosophy is based upon using a midpoint stop appliance, or a deprogrammer, to allow the muscles to determine where the condyle should be placed. This is a physiological bite and is muscle driven, which is why I use what I call a Freedom Appliance. This appliance is designed by opening the bite on an articulator just enough so that we have posterior clearance and then placing a composite platform behind the maxillary central that is in contact with the lower incisors. This composite is then light cured. Next, I remove the maxillary model and take an Essex-like suck-down material and vacuum form it over the model with the composite platform. This Freedom Appliance is then trimmed to the premolars only. The patient wears this for several weeks, and without posterior teeth influencing the seating of the condyles, I can then take a bite with this appliance in place. I realize that I am sharing this as an abbreviated description of a very important, detailed step in achieving success with full-mouth rehabilitations.
KK: From a laboratory technician’s perspective, I want the patient to be deprogrammed and the muscles to be in a relaxed state so that the condyles are seated in their most optimal positions and, ultimately, that any occlusal prematurity or interference may be eliminated to provide a stable joint and an optimal functional situation. By abiding by these principles, I know that when we choose the appropriate maxillary incisal edge position and develop the envelope of function around it, our restorations will not only be highly aesthetic but will also service the patient well for the long term.
What information or variables are required to obtain a functional and aesthetic wax-up from your lab technician?
KK: In addition to the information Dr. Hornbrook just shared, first and foremost, we need a maxillary incisal edge position for teeth Nos. 8 and 9. If there is a new VDO, then we need that information as well. Additionally, a bite record of the current situation; a stick bite; and, finally, the 12 recommended AACD photos will provide us with the necessary information to develop the new smile design.
How important is it to deprogram the muscles and to identify occlusal prematurities and interferences prior to establishing a new VDO?
DH: In my opinion, anytime we see anterior wear of teeth, deprogramming or taking a muscle-driven physiological bite is mandatory. Changing the VDO requires this step as well. If I am restoring a smile, and there is no tooth wear, then there really is no need to take a deprogrammed bite.
KK: In my opinion, it is paramount, as mentioned previously.
How do you convey subtle nuances in incisal characteristics to your ceramist?
DH: Always take and share photos! I have created a library of different incisal edges that I can first show my patient and get his or her approval and then send directly to my ceramist to match. Ceramists are all very visual individuals, and if you send a photo, they can match it. I think the best source of information is to fill your library with photos of cases that you have done and, even better, photographs of natural, unrestored anterior teeth taken of patients in your practice.
KK: We have a unique working relationship with our clients. Each client has full access to his or her cosmetic ceramist, and as a natural consequence of getting to know one another and each other’s preferences, we develop specific smile styles, mamelon characteristics and corresponding translucency, and subtle color nuances that will serve as the standard for restoring smiles going forward. Some of our clients also prefer to draw pictures to communicate some of these details.
When you and your ceramist approach a cosmetic case, how much artistic freedom is allowed? What parameters are within this approved arena of creativity?
DH: Other than subtle shape characteristics, I do not give them much creative license. This is because I need to discuss all the variables with my patient during my smile design consultation and then transfer these variables to the ceramist to match. I am always open to discussing any suggestions that my ceramist has and will often incorporate them back into my smile design. This comes into play most often with changes to provisionals when the ceramist sees the photos and suggests changes in things like the buccal corridor, length, embrasures, etc.
KK: As I mentioned earlier, our clients develop a very unique and specific preference for their smile design cases, and while they still afford us some artistic freedom, once we arrive at a “look” that serves their clientele well, we tend to stick with that signature.
What do you feel is the most important detail you can provide the lab technician when creating a new smile on a worn dentition case?
DH: The most important detail is the final maxillary incisal edge position! A talented ceramist can usually design a reasonably nice case if he or she knows where the incisal edges need to be. Without this vital information, the ceramist is lost.
KK: I totally agree! It’s definitely the new maxillary incisal edge positions of teeth Nos. 8 and 9. Even a crude mock-up in the mouth and a photo and measurement of the incisal edge positions are incredibly helpful!
Why is the maxillary incisal edge position so critical for a technician, and how is this information used?
DH: Because the position of every tooth in the mouth is determined by the incisal edge position of the maxillary central incisor. Think dentures! As the denture is designed, the first thing the clinician determines in the wax rim is where the maxillary incisal edge will be placed.
KK: The maxillary incisal edge position governs and frames the smile. With this detail, everything else will fall into place. From observing natural smiles that we find attractive, we then begin to work from the front of the mouth and move posteriorly, not only developing the elements of aesthetics but also the envelope of function, which will guard and protect the posterior teeth. Inter-incisal embrasures progressively open as one moves distally, and by the time one completes the canines, the buccal corridor begins to fill in, and the smile can then come to life. Dr. Hornbrook likes to say that “Aesthetics drive the case, and function completes it.”
Acknowledgments:
Dr. Hornbrook and Mr. Kohli would like to acknowledge Josh Walker, Phil Nebeker, and Taylor Salinas, ceramists at Utah Valley Dental Lab in Lindon, Utah, for the work performed in the images accompanying the cases in this article.
Dr. Hornbrook graduated from the University of California, Los Angeles School of Dentistry and maintains a private practice in San Diego focused on adult restorative and functional aesthetic dentistry. He is the clinical director of education at Utah Valley Dental Lab in Lindon, Utah. He can be reached via email at david@hornbrook.com.
Disclosure: Dr. Hornbrook is director of education at Utah Valley Dental Lab.
Mr. Kohli is COO and director of operations at Utah Valley Dental Lab. He can be reached at kent@uvdl.com.
Disclosure: Mr. Kohli is an international instructor for Kuraray Noritake. He did not recieve compensation for this article.
Related Articles
Focus On: Continuing Education
Integrating Dentistry, Lab Work, and Education in One Facility
Enhancing Zirconia Restoration Workflow: Implementation of Stand-Alone Scanners