


INTRODUCTION
Implant dentistry is at the forefront of treatments that our patients are considering. With the Internet, our patients easily search for solutions to their dental problems, including “missing teeth,” “teeth hurt,” or “I hate my denture/removable partial.” Inadvertently, what comes up in the Google search results is information about dental implant treatment and a list of dentists who provide this service. All the information may not be completely correct, but it is our job as dental professionals to accurately explain the options available and to discuss the benefits and risks of each of these solutions with our patients.
Once a patient elects to proceed with dental implant surgical procedures and eventual prosthetic completion, the implant surgeon—whether a general dentist, an oral surgeon, a periodontist, a prosthodontist, or even an endodontist—must understand the vital anatomy involved in the particular site. Understanding nerve and sinus position, quality and quantity of available hard tissue, and any anatomical anomalies in the lingual concavity area is important. Implants can be ideally positioned when bone is available. If sufficient hard tissue is not available, there are several predictable techniques to grow bone in preparation for future placement.
Implant dentistry has become a relatively routine dental procedure as our patients present to our practices requesting permanent dentition to replace their ill-fitting removable appliances. Correctly diagnosing our implant candidates is the preliminary goal prior to any surgical intervention. With the advent of special tools, including the use of CBCT analysis and virtual planning software, the clinician can now predictably determine the size and shape of the implant required and can review any vital anatomy, especially in the posterior mandible where the mandibular nerve rests and the posterior maxilla where the maxillary sinus often collapses following tooth removal. These 2 prominent sites create a challenge for clinicians. We must also confirm that our patients have no significant healing complications that could affect the implant prognosis, such as uncontrolled diabetes or immunosuppressive diseases. Adequate bone height and width must be determined, and any lack of acceptable hard tissue can be addressed with our modern grafting procedures. Guided surgical procedures are nice to have but are not mandatory, as implants can often be placed without a surgical guide. However, CBCT analysis is indeed a valuable tool in diagnosing and treatment planning cases to determine which cases are within our clinical skills and which cases are better off being referred.
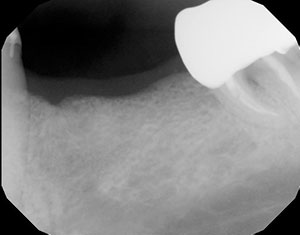 |
| Figure 1. A patient presented with a mandibular posterior edentulous site, requesting an implant-retained fixed restoration. The periapical radiograph appeared to indicate adequate vertical height of bone and was thus deemed a good site for safe dental implant placement. |
 |
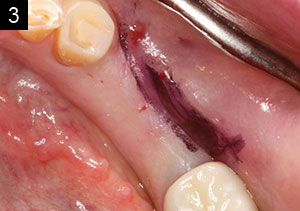 |
| Figures 2 and 3. The occlusal view of the edentulous space. An infiltration of local anesthetic balloons up the unattached mucosa, allowing the visualization of available width of the attached gingiva on the facial aspect of the surgical site. The mucogingival line was marked with a Sharpie marker, helping to determine the next step. |
Our primary goal with the surgical placement of our implants is initial stabilization and proper angulation, both mesial-distally and facial-lingually/palatally. Emergence profile is an important consideration, so visualizing the finished restoration before ever starting will ensure a functional and aesthetic end result. CBCT analysis and dental implant software also allow us to virtually design our cases. As mentioned, guided surgical procedures can be followed to help in positioning the implant and evaluating vital anatomy.
Modern implant designs from many manufacturers have made integration predictable and the final prosthesis stable and functional. Form and function are our ultimate goals in today’s dental implant procedures. However, we can’t forget ultimate tissue health. This article will present a minimally invasive technique to create attached gingiva where only mucosa is present on the facial aspect of dental implants. The repositioning of a healthy band of attached gingiva from the crestal-lingual aspect of an edentulous site to the facial aspect of the implant will be presented. This is completed with little or no discomfort to the patient.
Important Soft-Tissue Considerations
There are differences in the soft tissue around dental implants and natural teeth. There are also differences in the dental implant interface when compared to that of natural teeth. The oral mucosa is actually attached to the implant body by a junctional epithelium. With natural teeth, there is also a connective tissue attachment apically. This is not seen with implants. Parallel or oblique fibers around the implant are not connected, and there are no periodontal ligaments. Because of this lack of vascularization and the lack of the implant to prevent bacterial invasion, having a band of attached gingiva facial to the implant itself is often considered paramount to a healthy condition.1 With a lack of keratinized tissue comes the potential for inflammation with compromised plaque control, which can extend apically around the implant body.
 |
 |
 |
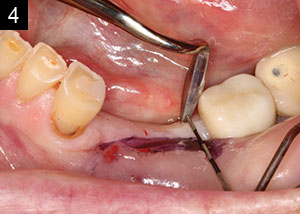
| Figures 4 to 6. An Orban knife was used to control the incision in keratinized tissue on the palatal aspect of the edentulous ridge. The goal was to reposition a band of 2.0 mm or more of attached gingiva on the facial aspect of the dental implants, once placed. |
 |
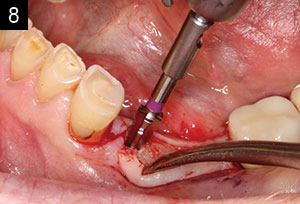 |
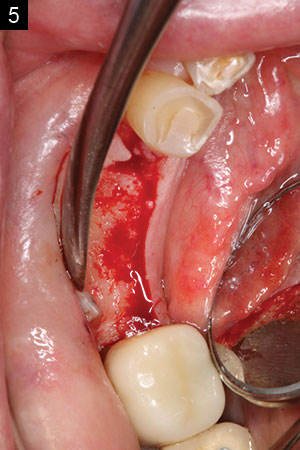
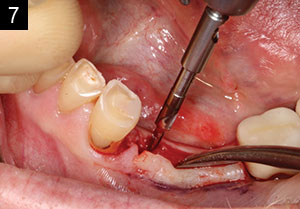
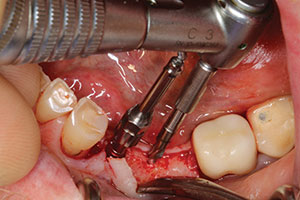
| Figures 7 and 8. Conventional implant site osteotomy is made for this Hahn Tapered Implant System (Glidewell Laboratories). A 2.2-mm-diameter pilot bur was used to establish mesial-distal and facial-lingual angulation. The osteotomy was widened with tapered burs corresponding to the diameter of the implant to be placed: in this case, a 3.5-mm-diameter implant. |
 |
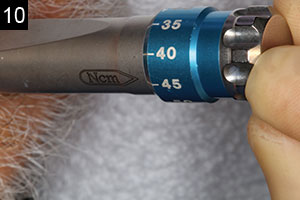 |
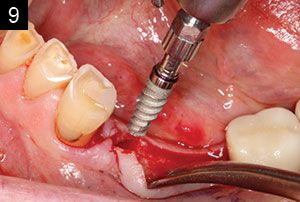
| Figures 9 and 10. The Hahn Tapered Implant System was threaded to place and torqued to 45 Ncm. This initial stability would allow for the placement of taller healing abutments, eliminating the need for uncovering the implant following integration. This tall healing abutment was used to suture the repositioned keratinized tissue. |
 |
| Figure 11. The second implant was placed in identical fashion parallel to the mesial implant. |
 |
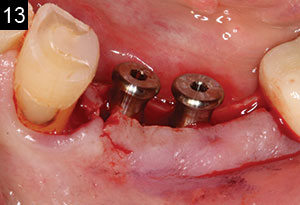 |
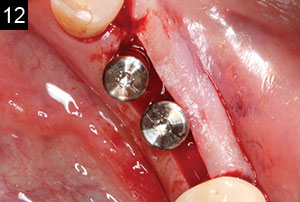
| Figures 12 and 13. Because initial stability is achieved with a torque above 25 Ncm, 5.0-mm-tall healing abutments were threaded into the implants and torqued to 20 Ncm. These taller healing abutments would serve to support the sutures holding the repositioned keratinized tissue to the facial aspect of the abutments. |
The amount of useable attached gingiva varies from patient to patient. Long-standing edentulous sites often have more vertical and horizontal bone loss. Research has indicated that a minimum band of 2.0 mm of keratinized tissue around the implant will help in reducing trauma and inflammation. The flabby mucosal tissue that often presents at our surgical sites can be eliminated.2-6 Therefore, the one critical area of implant surgery that is sometimes missed is the availability of a band of keratinized tissue on the facial aspect of our implants. As teeth are lost, the bone will shrink apically and lingually/palatally, minimizing the available bone. When this occurs, the mucosal tissue will often follow, reducing or eliminating the normal keratinized tissue on the facial aspect of the edentulous ridge.3
As we proceed with our surgical procedures, I find it helpful to first infiltrate into the vestibule with my local anesthetic. The fluid will bubble up the mucosa, leaving the attached gingiva. This allows me to clearly visualize and determine the amount of keratinized tissue I have to work with in the implant site.
Dental implant treatment is a predictable and long-lasting solution to many of our patients’ dental needs. Understanding the surgical protocols will make the final prosthesis more functional and the implant healthy over a long period of time. Thus, soft-tissue considerations have to be evaluated. Being able to reflect tissue to evaluate the available underlying hard tissue is one way to maximize the position of the implant. Although flapless surgical procedures are popular and less invasive to the patient, the practitioner must be able to comfortably create a reflection when necessary or if there is any doubt as to the amount of available bone.
One periodontal treatment that can be used when there is a lack of keratinized tissue where we want to place our dental implants is the repositioning flap technique. This technique will aid in establishing stable and healthy gingival margins. The attached gingiva we need helps provide protection from external injury and is very important when plaque control is compromised. We want healthy pink tissue around our implants to maintain aesthetics and gingival health. A tight contact of keratinized tissue around the gingival margin is important for proper maintenance and implant health.4,7
CASE REPORT
A patient presented with a mandibular posterior edentulous site and requested dental implants to provide a permanent fixed restoration. An adequate vertical height of bone appeared to be present in the periapical radiograph, indicating a good site for safe dental implant placement (Figure 1). Following tooth extraction, the available bone shrinks vertically and horizontally, bringing the mucosal tissue with it. An infiltration of local anesthetic balloons up the unattached mucosa, allowing us to visualize the available width of attached gingiva on the facial aspect of the surgical site. The mucogingival line was marked with a Sharpie pen, helping to determine the next step (Figures 2 and 3).
 |
 |
 |
 |
 |
 |
 |
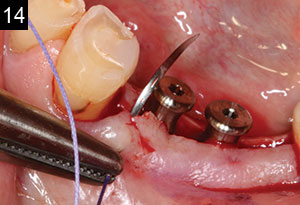
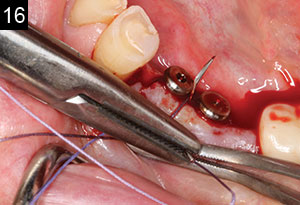
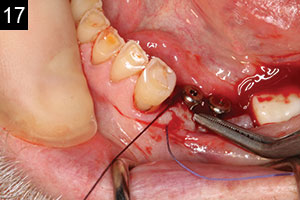
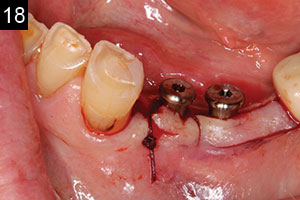
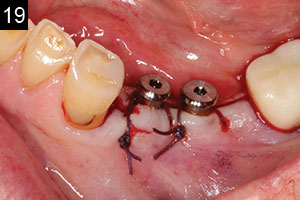
| Figures 14 to 20. A reverse cutting needle (FS-2, 3/8) was first passed from the facial aspect of the mesial of the most anterior implant. The palatal tissue was not engaged; instead, the polyglactin braided suture (Vilet [Implant Direct]) was looped around the tall healing abutment. Then the needle was turned around to engage the facial aspect of the distal tissue and looped around again to the facial, and then the knot was tied. The procedure was repeated around the more posterior implant healing abutment. Note that the palatal tissue was not engaged and a 2.0- to 3.0-mm gap of exposed hard tissue was left. This area granulates 0.5 to 1 mm per day. |
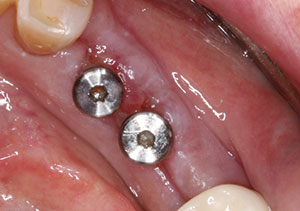 |
| Figure 21. The one-week postoperative suture removal reveals healing of the site and closure of the exposed hard tissue. |
An Orban knife was used to control the incision in keratinized tissue on the palatal aspect of the edentulous ridge. Note that my goal was to reposition a band of 2 mm or more of attached gingiva on the facial aspect of the dental implants, once placed. This reflection is referred to as an envelope flap where there are no vertical incisions made. This allows for great control and no incisions into the mucosa. Incising the mucosa results in prostaglandin release and increased postoperative pain. This type of reflection will allow for easy replacement and repositioning of the keratinized tissue from the crestal portion of the edentulous site (Figures 4 to 6). A conventional implant site osteotomy was made for the chosen implant system (Hahn Tapered Implant System [Glidewell Laboratories]). A 2.2-mm-diameter pilot bur was used to establish mesial-distal and facial-lingual angulation. The osteotomy was then widened using tapered burs corresponding to the diameter of the implant to be placed; in this case, for a 3.5-mm-diameter Hahn Tapered Implant System (Figures 7 and 8).
The Hahn Tapered Implant System, with its aggressive thread design and 1.0-mm machined collar, was threaded to place and torqued to 45 Ncm. This initial stability allowed for the placement of taller healing abutments, eliminating the need for uncovering the implant following integration. A 5.0-mm-tall healing abutment was used to suture the repositioned keratinized tissue (Figures 9 and 10). The Hahn Tapered Implant System is designed to facilitate proper angulation and initial stability, thus reducing resorption in all bone types. The surfaces of the implants are treated with resorbable blast media. The machined collar helps with maintenance of the soft tissues, and the conical internal hex connection promotes a secure and stable prosthetic seal.
 |
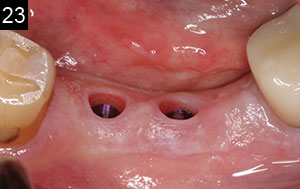 |
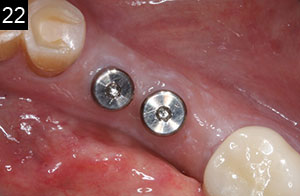
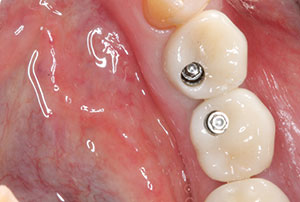
| Figures 22 and 23. After approximately 3 months of implant integration, the healing abutments were removed. Note the healthy pink tissue cuffs and attached gingiva on the facial aspect of the surgical site. The case was now ready for the impression of the implants and fabrication of the final screw-retained implant crowns. |
 |
| Figure 24. The final restorations (BruxZir [Glidewell Laboratories]) are shown in place before the access openings were filled using a composite resin. |
The second implant was placed in identical fashion parallel to the mesial implant (Figure 11).
Because initial stability is achieved with a torque above 25 Ncm, 5.0-mm-tall healing abutments were threaded into the implants and torqued to 20 Ncm. These taller healing abutments would serve to support the sutures holding the repositioned keratinized tissue to the facial aspect of the abutments (Figures 12 and 13). A reverse cutting needle (FS-2, 3/8) was first passed from the facial aspect of the mesial of the most anterior implant. The palatal tissue was not engaged; instead, the polyglactin braided suture (Vilet [Implant Direct]) was looped around the tall healing abutment. Then the needle was turned around to engage the facial aspect of the distal tissue and looped around again to the facial, and the knot was tied. The procedure was repeated around the more posterior implant healing abutment. Note that the palatal tissue was not engaged and a 2.0- to 3.0-mm gap of exposed hard tissue was left. This area granulates 0.5 to 1 mm per day. No covering for the exposed site was used. The patient reported minimal discomfort (Figures 14 to 20). At the one-week post-op suture removal, healing of the site and closure of the exposed hard tissue was observed (Figure 21).
 |
 |
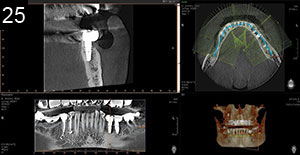
| Figures 25 and 26. A post-op CBCT analysis (Vatech America) illustrates the positioning of the Hahn implants in available bone. |
After approximately 3 months of integration of the implants, the healing abutments were removed, exposing healthy, pink tissue cuffs and attached gingiva on the facial aspect of the surgical site (Figures 22 and 23). The case was now ready for the impression of the implants and fabrication of the final screw-retained implant crowns (BruxZir [Glidewell Laboratories]) (Figure 24).
Post-op CBCT analysis (Vatech America) illustrated the proper positioning of the Hahn Tapered Implant Systems in available bone (Figures 25 and 26).
CLOSING COMMENTS
Dental implants are a viable alternative to conventional dental procedures and are in such great demand from our patients. The improved quality of life created by giving the patient back both form and function with permanent dentition, or even to better stabilize a removable appliance, is an important reason why dentists should train themselves well on the surgical and prosthetic techniques.
Along with understanding the vital anatomy involved with the surgical protocols, we must attempt to maximize the positioning of the implants in bone to best create emergence profiles and smile designs. There is much more to implant placement than simply drilling holes in the bone and threading in the implant. One common error in the technique is not recognizing a lack of attached gingiva on the facial aspect of the placed implant and, if recognized, knowing how to resolve this potential problem. Being able to reflect and predictably reposition the attached gingiva is a procedure within the realm of the properly trained general dentist.
References
- Lindhe J, Berglundh T. The interface between the mucosa and the implant. Periodontol 2000. 1998;17:47-54.
- Schrott AR, Jimenez M, Hwang JW, et al. Five-year evaluation of the influence of keratinized mucosa on peri-implant soft-tissue health and stability around implants supporting full-arch mandibular fixed prostheses. Clin Oral Implants Res. 2009;20:1170-1177.
- Berglundh T, Lindhe J, Ericsson I, et al. The soft tissue barrier at implants and teeth. Clin Oral Implants Res. 1991;2:81-90.
- Adibrad M, Shahabuei M, Sahabi M. Significance of the width of keratinized mucosa on the health status of the supporting tissue around implants supporting overdentures. J Oral Implantol. 2009;35:232-237.
- Warrer K, Buser D, Lang NP, et al. Plaque-induced peri-implantitis in the presence or absence of keratinized mucosa. An experimental study in monkeys. Clin Oral Implants Res. 1995;6:131-138.
- Kim BS, Kim YK, Yun PY, et al. Evaluation of peri-implant tissue response according to the presence of keratinized mucosa. Oral Surg Oral Med Oral Pathol Oral Radiol Endod. 2009;107:e24-e28.
- Lang NP, Löe H. The relationship between the width of keratinized gingiva and gingival health. J Periodontol. 1972;43:623-627.
Dr. Kosinski is an affiliated adjunct clinical professor at the University of Detroit Mercy School of Dentistry (Detroit Mercy Dental) and is the associate editor of the AGD journals. He is a past president of the Michigan Academy of General Dentistry. Dr. Kosinski received his DDS from Detroit Mercy Dental and his Mastership in Biochemistry from the Wayne State University School of Medicine. He is a Diplomate of the American Board of Oral Implantology/Implant Dentistry, the International Congress of Oral Implantologists, and the American Society of Osseointegration. He is a Fellow of the American Academy of Implant Dentistry and received his Mastership in the AGD. He can be reached at (248) 646-8651, via email at drkosin@aol.com, or via the website smilecreator.net.
Disclosure: Dr. Kosinski reports no disclosures.
Related Articles
Create an Emergence Profile to Establish Smile Design
Proper Preparation for Prosthetically Driven Implants: CBCT Diagnosing and Surgical Protocol
Creating an Autogenous Graft from Extracted Teeth: A Faster Implant Integration Time


