INTRODUCTION
Continuing education has changed our dental profession. When I graduated from dental school, there was hands-on training, but not like we have today. Today, I get emails regarding all CE types available, with opportunities to train in all dental specialties. We didn’t have social media platforms such as YouTube, Facebook, and Instagram. With all of this knowledge at our fingertips, GPs are now doing more procedures in their offices that might have been referred out in the past. The advancements made in implant dentistry have led to GPs placing their own implants rather than referring out to specialists. With technology such as 3D cone beam, digital scanning, digital printing, and implant planning software, placing implants is safer—and in some ways, possibly more dangerous. Surgical guides are great, but as a clinician, you must have an in-depth knowledge of anatomy and proper surgical placement concepts, know how to use the implant armamentarium, have a good understanding of hard and soft tissue, and be able to handle complications if they arise. If a difficulty arises, are you prepared to handle it? Just because you use a surgical guide to place a couple of implants doesn’t mean the sites will heal correctly. Most importantly, know your limits and refer to a specialist when the case is beyond your expertise.
I can’t remember one lecture about rehabilitating patients’ edentulous areas with dental implants in dental school. We briefly discussed dental implants in school, but when I saw a missing tooth or teeth, the treatment planning consisted of either a fixed bridge or a removable appliance. If the patient had a terminal dentition, full immediate dentures were treatment planned. In my practice today, a removable appliance is offered for missing teeth, but only as a backup to restoring teeth permanently with dental implants.
CASE REPORT
Diagnosis
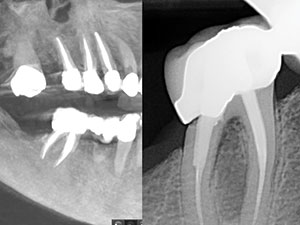
A 67-year-old female presented with pain on the lower right side. Visual examination showed a fixed bridge from teeth Nos. 27 to 30, and she was also missing tooth No. 19. Periodontal examination showed a 9-mm pocket upon the facial probing of No. 30, which had past root canal treatment with post and core. Radiographic examination showed R/L in the furcation area. The advised treatment plan was to section the bridge, keeping the abutment on No. 27 and extracting No. 30 (Figure 1).
After the bridge was sectioned, tooth No. 30 was removed via separating the mesial and distal roots and removing them using the PIEZOTOME Cube (ACTEON North America). The socket was debrided and cleaned, and the surgical site was packed with OraPlug (Salvin Dental Specialties) and sutured to stabilize the tissue.
The patient was given the following treatment options for restoring the missing dentition on the lower:
1. Lower implants placed in the area of site Nos. 28 and 30 for future placement of a fixed implant prosthesis from Nos. 28 to 30. No. 19 would need GBR prior to implant placement, then an abutment and a crown.
2. A mandibular removable partial that would replace the edentulous areas on both sides. Since the patient was also missing No. 19, a partial would have bilateral stability.
 |
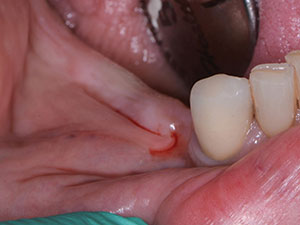 |
| Figure 1. The advised treatment plan was to section the bridge and keep the abutment on No. 27 and extract No. 30. | Figure 2. Being disappointed in her choice of the partial, the patient asked if implants were still an option on her lower right side. |
 |
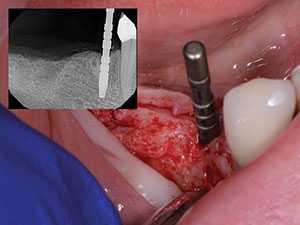 |
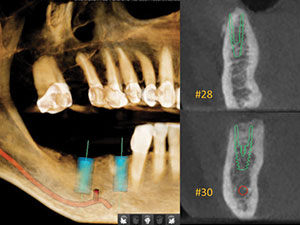
| Figure 3. CT was taken to evaluate sites for implant placement. | Figure 4. A full-thickness flap was utilized to see the bony ridge. Purchase points with a 2-mm round bur were made on the ridge after careful calculation of the proper tooth size for the final prosthetics prior to the placement of both implants. The pilot drill was started for No. 28. |
 |
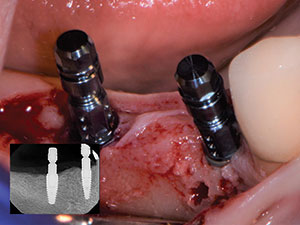 |
| Figure 5. Once the pilot for the osteotomy on No. 30 was drilled, a radiograph was taken with both positioning pins to ensure that the trajectory and proper depth for both implants were on point. | Figure 6. A radiograph was taken after the final placement to verify the final positions. |
The patient’s major concern was to re-establish chewing on her lower right side. At first, the patient decided on a lower removable mandibular partial based on finances. For this reason, socket preservation was not performed during the removal of No. 30. The patient healed for 6 weeks prior to fabrication of the lower mandibular partial. The patient wore the partial for 6 months. Minimal adjustments were needed, but the major complaint was that she had difficulty chewing hard foods with the partial. Being disappointed with her choice of the partial, she asked if implants were still an option for her lower right side (Figure 2).
CT was taken to evaluate sites for implant placement (Figure 3).
Planning and Placement
When placing implants in an edentulous area, a considerable amount of thought goes into the planning. Utilizing cone beam imaging will help you plan where the implants should be placed. Where the patient’s final teeth need to be should be planned prior to surgical placement. This can be done utilizing implant planning software. Once the prosthetic architecture is envisioned, a decision on whether or not to use a surgical guide can be made. Since I knew where the Nos. 28 and 30 implants needed to be placed, a surgical guide was not fabricated.1 This is also a cost reduction for the patient. In the No. 28 area, a Straumann SL Active BLT 3.3 × 10 mm implant was planned, and in the No. 30 position, a Straumann SL Active 4.1 × 10 mm implant was planned. SL Active implants were utilized due to their hydrophilicity, which allows for faster integration by decreasing the time from primary to secondary stability.2
Two implants were planned instead of 3 to keep the financial cost down for the patient.
A full-thickness flap was utilized to see the bony ridge. Purchase points were made on the ridge with a 2-mm round bur after careful calculation of proper tooth size for the final prosthetics prior to the placement of both implants. The pilot drill was started for No. 28 (Figure 4). A radiograph was taken prior to reaching final depth, ensuring proper angulation and the correct trajectory. If anything is off, corrections then can be made before proceeding to the final working length.
The positioning pin was left in the No. 28 osteotomy, so the line of sight could be used before starting the implant’s osteotomy on No. 30. Once the pilot for the osteotomy on No. 30 was drilled, a radiograph was taken with both positioning p
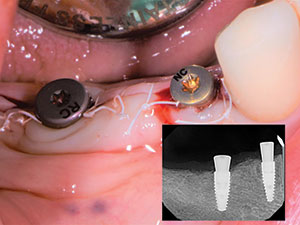
ins to ensure the trajectory and proper depth for both implants were on point (Figure 5). Osteotomies were completed to the proper widths and lengths. Both implants were placed, torquing them to 40 Ncm. A radiograph was taken after final placement to verify final positions (Figure 6). Healing collars were placed for both implants. Tissue was repositioned and sutured into place, maximizing the amount of connective tissue around the implants (Figure 7).3
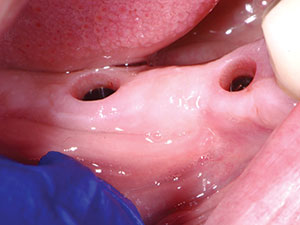
The patient healed for 8 weeks (Figure 8), and the hygiene was immaculate. Healing collars were removed to reveal healthy connective tissue collars around both implants (Figure 9). A full-arch impression was taken utilizing a closed impression coping and an open-tray impression coping. A radiograph was taken to verify seating of the impression copings prior to taking the impression (Figure 10). The case was sent to the lab for the fabrication of a screw-retained zirconia bridge. No. 28’s abutment was made with an engaging abutment, and No. 30 utilized a non-engaging abutment.
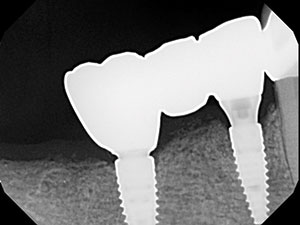
The bridge was seated and verified by radiograph prior to checking the occlusion (Figure 11). Implant-protected occlusion was achieved following adjustments. The bridge was then polished to remove any imperfections (Figure 12).4
 |
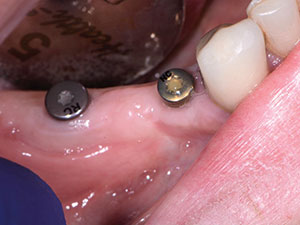 |
| Figure 7. Healing collars were placed for both implants. Tissue was repositioned and sutured into place, maximizing the amount of connective tissue around the implants. | Figure 8. The patient healed for 8 weeks. |
 |
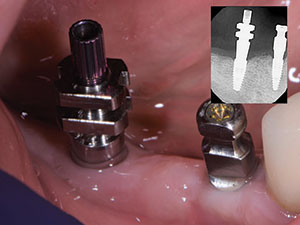 |
| Figure 9. The patient’s hygiene was immaculate. Healing collars were removed to reveal healthy connective tissue collars around both implants. | Figure 10. A radiograph was taken to verify the seating of impression copings prior to taking the impression. |
 |
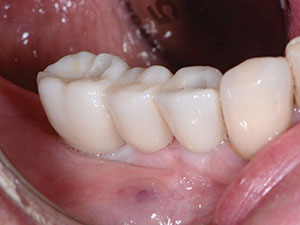 |
| Figure 11. The bridge was seated and verified by radiograph prior to checking the occlusion. | Figure 12. The bridge was then polished to remove any imperfections. |
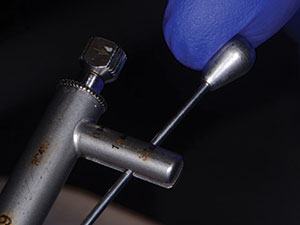
Both abutments were torqued to 35 Ncm (Figure 13). Teflon tape was placed (instead of cotton pellets) to protect the screws before sealing up the screw holes with composite. Occlusion was checked again to ensure the composite wasn’t creating any occlusal discrepancies. A screw-retained bridge was chosen instead of cementing a bridge as a security against any future issues (Figure 14).5 If this was a cemented bridge and one of the abutment screws got loose, depending on the cement used, you would have to drill into the bridge to access the screw hole. With a screw-retained bridge, you know exactly where the access hole is, and it is easily accessible if a complication such as a loose screw arises.
IN SUMMARY
When planned and placed correctly within the bony envelope, implants serve as a fixed solution for missing teeth. First considering where the final teeth need to go before placing implants is important not only for function but also for cosmetics. Advancements in technology have increased the efficiency and safety of performing procedures for clinicians today. Proper training is advised before attempting a case like this in your office. As a GP, I have logged many hours of surgical training. When I started placing implants, I chose areas in the mouth that were relatively safe. These included lower molar and premolar areas with plenty of width buccolingually and plenty of length while also maintaining a minimum of 2.0 mm from the inferior alveolar and mental nerves.Also, upper areas had a minimum of 10 mm of bone from crest to sinus. The minimum width requirement for both arches is 7mm for premolars and a 10 mm for molar region. Once you feel comfortable and have had success in these cases, you should feel ready to advance to more complex placements and anterior cases.
 |
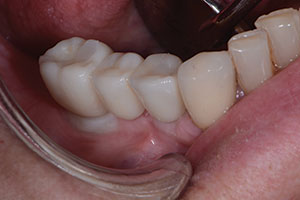 |
| Figure 13. Both abutments were torqued to 35 Ncm each. | Figure 14. Teflon tape was placed (instead of a cotton pellet) to protect the screw before sealing up the screw hole with composite. The occlusion was checked again to ensure the composite wasn’t creating any occlusal discrepancies. |
GPs need to know their limitations. Relying purely on technology and surgical guides without proper surgical implant training can get you into trouble. The surgical guide is exactly what it says: a guide. I do use guides in complex cases, but only for orientation. Once the initial pilots are drilled, I finish the case freehand because I like to see what I am doing. As accurate as a guide may be, I personally do not feel comfortable following a flow sheet telling me to take the implant down to a certain line on a handle through a guide. I prefer to use my own eyes to take that implant down to bone level by hand and feel the torque as I reach the appropriate depth. When tackling cases like this in your office, you need to envision the whole picture. If you can’t, you need to refer to and work with a specialist who’s experienced and capable of helping you achieve the final result for a successful case. In conclusion, if you can’t envision the case at 100%, then work with a specialist who will help you achieve that goal. Remember, our patients’ health and well-being come first.
References
- Vasilios A, Mitov G, Stoetzer M, et al. A retrospective study of the accuracy of template-guided versus freehand implant placement: A nonradiologic method. Oral Surg Oral Med Oral Pathol Oral Radiol. 2019;128(3):220-226. doi: 10.1016/j.oooo.2019.01.009. Epub 2019 Jan 16.
- Wennerberg A, Galli S, Albrektsson T. Current knowledge about the hydrophilic and nanostructured SLActive surface. Clin Cosmet Investig Dent. 2011;5;3:59-67. doi: 10.2147/CCIDEN.S15949.
- Ivanovski S, Lee R. Comparison of peri-implant and periodontal marginal soft tissues in health and disease. Periodontol 2000. 2018;76(1):116-130. doi: 10.1111/prd.12150. Epub 2017 Nov 30.
- Sheridan RA, Decker AM, Plonka AB, et al. The Role of Occlusion in Implant Therapy: A Comprehensive Updated Review. Implant Dent. 2016;25(6):829-838. doi: 10.1097/ID.0000000000000488.
- Shadid R, Sadaqa N. A comparison between screw- and cement-retained
implant prostheses. A literature review. J Oral Implantol. 2012;38(3):298-307. doi: 10.1563/AAID-JOI-D-10-00146. Epub 2010 Nov 23.
Dr. Burke graduated from the Loyola University Chicago College of Dental Surgery in 1992. He has been in private practice in Concord, Calif, for 22 years. His practice mainly focuses on implant and reconstructive dentistry. He received his implant training from The Engel Institute in Charlotte, NC. He maintains active memberships in the ADA, the AGD, the California Dental Association, the Contra Costa Dental Association, the International Team for Implantology, and the International Congress of Oral Implantologists. He is the founder of the Burke Implant Academy designed to teach predictable, safe implant dentistry for GPs. He can be reached at burkedds007@msn.com.
Disclosure: Dr. Burke reports no disclosures.
Related Articles
Personalized Dental Implant Solutions: One Size Fits None
Efficient Chairside Attachment Processing Made Simple
Prosthetic Complications: Challenges Created by Poor Implant Positioning


