


INTRODUCTION
Try as we may, ours or someone else’s dentistry does not last forever. Throw in lack of dental care, periodontal disease, decay, or the occasional popcorn kernel, and you can end up with a tooth that needs to be extracted.
Alveolar ridge preservation, or socket preservation, is the first step to successful implant placement if a patient does not want to have an implant placed immediately at the time of extraction. According to Christensen,1 this simple procedure should be the standard of care, is easily accomplished, and is especially important in areas where shrinkage of bone and soft tissue will not allow implant placement.
During the first year after tooth loss, 40% to 60% of the width of the alveolar ridge resorbs after tooth extraction.2 The amount is greatly dependent on the reason for the extraction and the length of time pathology has been present. Studies provide the clinical rationale for grafting fresh extraction sockets as preventive care. Preserving the alveolar ridge offers patients choices in their restorative treatment plans, including endosseous implants.3
Consistency and simplicity should be the standards we hold ourselves to when contemplating materials and methods. There are numerous techniques and many different grafting materials on the market today. I will demonstrate the techniques that work in my hands and provide my patients with outstanding results.
All successful ridge preservations have a common starting point, and that is the atraumatic extraction. Again, there are many methods to achieve this and many instruments on the market that can make it easier. A few of the instruments I utilize are periotomes (Alvelogro), a spade proximator (Alvelogro), and atraumatic extraction forceps (Dental USA). In addition, on multi-rooted teeth, I like to section the teeth to facilitate extraction using a 557 LS surgical carbide (Henry Schein). The key to a successful, atraumatic extraction is minimal disruption or damage to the hard and soft tissues. By minimizing the trauma to these tissues during extraction, the likelihood of increased crestal remodeling is prevented.
The progression of healing for an extraction site, which is a host-response, is as follows:
 |
- The first 24 to 48 hours—inflammation and hemorrhage
- In 3 to 5 days—the start of vascular infiltration
- In 17 to 21 days—osteoblastic activity
- Beyond 30 days—maturation of the site
By placing grafting materials, we can not only create a framework for new bone growth but also use the physical properties of the material to maintain the space to prevent labial plate collapse and potential soft-tissue infiltration.
To preserve a ridge, or graft a socket, the following protocol is followed:
1. Atraumatic extraction
2. Thorough debridement of the socket
3. Place the graft material of choice
4. Contain the graft material in the socket with sutures
5. Allow 4 to 6 months for healing, depending upon the graft material used
An extremely important requirement for success is that we need a bleeding socket. In order to kick off the healing process, we take advantage of something called the regional inflammatory phenomenon. This response is a tissue reaction to a noxious stimulus that increases the healing capacities of the affected tissues.4 Therefore, if you extract a tooth and the socket is not bleeding, use a sharp curette to get it to bleed. If this is unsuccessful, then take a 557 LS surgical carbide and punch holes through the lamina dura of the socket to get profuse bleeding points.
 |
Grafting Materials
When grafting, we have the choice of using allograft, alloplast, xenograft, or autogenous bone grafting materials.
- Allograft—derived from cadaveric sources
- Alloplast—derived from natural or man-made sources
- Xenograft—derived from animal sources
- Autogenous—derived from the patient
For this article, I am going to focus on the 2 classes of grafting materials that I use in my practice: allograft and alloplastic products. I am confident in these 2 classes of grafting materials since we know from the literature that both allograft and alloplastic graft materials have little to no difference in the ability to grow bone.5
I do believe that you should have at least 2 types of grafting options within your office, with one of them being an alloplast since it is possible to have some resistance to the use of allografts, or xenografts for that matter. There will be some patients who will decline the use of an allograft or xenograft due to religious or other beliefs. I have found that very few, if any, patients will decline the use of an alloplast.
I will now introduce and take you through the use of the various products I utilize within my own practice.
 |
CASE REPORTS
Case 1: Allograft
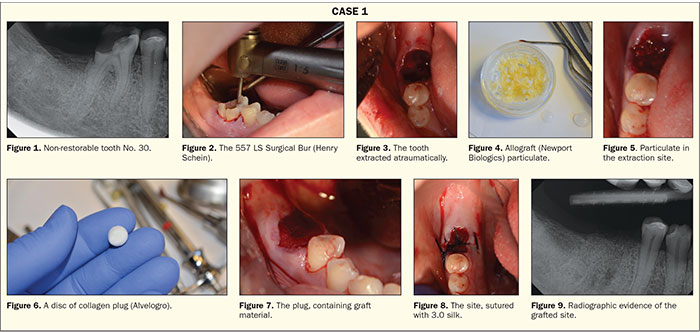
A 46-year-old female presented to our office for the extraction of tooth No. 30. Her medical history stated she was taking Lipitor (Pfizer) and that she had been diagnosed with prediabetes. She was not currently on any medications to control her blood glucose. Intra-oral and radiographic evidence (Figure 1) supported the decision to extract the tooth.
A high-speed handpiece with a 557 LS surgical carbide was utilized to section the tooth through the furcation (Figure 2). Once the roots were separated, atraumatic forceps (Dental USA) were used to remove the 2 roots. The site was thoroughly debrided with a sharp currette (Figure 3). A cortico/cancellous blend of allograft (Newport Biologics) was rehydrated with sterile saline (Figure 4). The advantage of a cortical/cancellous blend is that it contains 2 types of bone and supplies the advantages that each can provide. The cortical component provides structural support; a mineralized graft; and, ultimately, slower resporption of the graft. The cancellous bone provides collagen and a faster resorption time to allow cellular ingrowth and re-establishment of a continuous blood supply. We need this balance to ensure that the graft material breaks down at a rate that will allow complete replacement by native bone. Rehydration of the product not only helps with the handling characteristics of the particulate but also allows the cancellous portion of the graft material to absorb the fluid and “bulk up” in volume. Once the graft material was gently packed into the site (Figure 5), a disc of collagen plug (Alvelogro) was cut (Figure 6) and then placed over the particulate to contain the graft (Figure 7). The plug was then secured with a silk suture (Figure 8). The graft material has filled the existing socket (Figure 9), and the site will be allowed to heal for 3.5 to 4 months before implant placement.
 |
Case 2: Alloplast Composite Putty
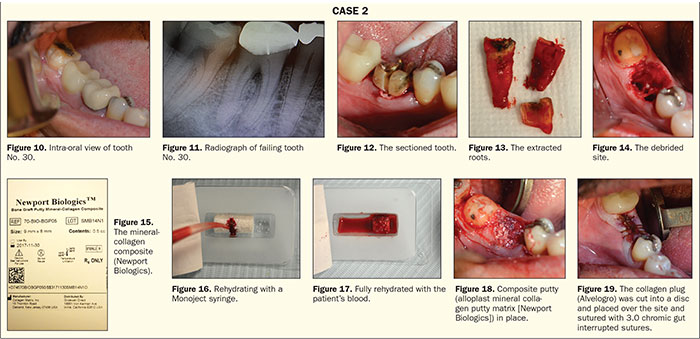
A 35-year-old female patient was referred to the office with a non-restorable tooth No. 30 by her GP (Figures 10 and 11).
The tooth was then sectioned with a 557 LS surgical carbide (Figure 12), and the roots were removed individually (Figure 13). The socket was thoroughly debrided with a serrated curette (Zoll Instruments) (Figure 14). To graft this particular site, I chose to use an alloplast mineral collagen putty matrix (Newport Biologics). This graft material is composed of 95% CaPO4 and 5% collagen and is supplied as cylinders of varying sizes (Figure 15). This material is moldable when rehydrated before placement and can be rehydrated with sterile water, saline, or blood from the patient. In this case, the cylinder was rehydrated with blood from the extraction site. The blood was collected with a Monoject syringe (Figure 16). Once the graft material was fully saturated (Figure 17), the cylinder was placed into the site and gently packed in place (Figure 18). An advantage of this material is that the CaPO4 crystals are bound by the collagen and less likely to wash out. Following placement, a collagen plug (Alvelogro) was cut into a disc and placed over the site and sutured with 3.0 chromic gut interrupted sutures (Figure 19). A healing time of 5 months is recommended with this product for complete turnover.
Case 3: OsteoGen Plug
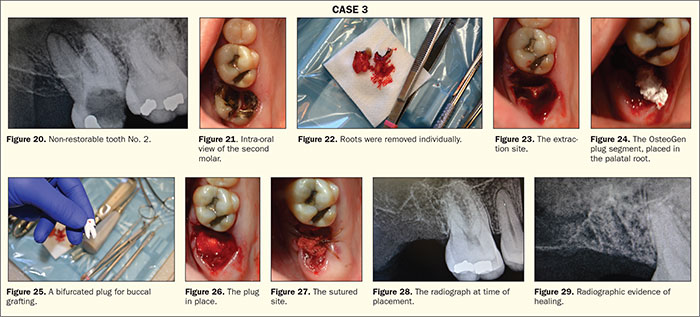
A 54-year-old patient with an unremarkable medical history presented with a failing tooth No. 2. The tooth radiographically presented with large decay and a periapical radiolucency associated with the roots (Figures 20 and 21). The decision to extract the tooth in preparation for an implant at a later date was decided upon by the patient.
Profound anesthesia was achieved with a PSA block and palatal soft tissue infiltrate using 2% lidocaine with 1:100K epi (Cook-Waite). After sectioning the tooth mesial-distally with a high-speed handpiece, the tooth roots were extracted individually (Figure 22). The resulting socket was thoroughly debrided (Figure 23). In this case, the site is going to be grafted with an OsteoGen Plug (Impladent Ltd). These plugs are bioactive, non-ceramic (un-sintered), calcium phosphate-based grafts with physicochemical properties similar to human bone mineral. The unique low-temperature production process generates osteoconductive and resorbable low-density crystals and crystal clusters with a unique calcium-to-phosphate ratio that is neither a beta-tricalcium phosphate nor a dense non-resorbable ceramic hydroxyapatite.6-8 After adequate debridement, the site showed profuse bleeding and was ready for placement of the plug. The plug is placed dry, and, in this case, it was cut to form a grafting solution that would fill both the mesial and distal roots and the palatal root. First, the palatal root was filled (Figure 24), and then the plug was bifurcated to fill the buccal roots (Figure 25). Being extremely hydrophilic, the plug will absorb blood and fluid into its collagen structure and become moldable. Once moldable, the plug is condensed into the site (Figure 26) and a figure 8-shaped suture chromic gut was placed to stabilize the plug in the socket (Figure 27). Clinicians can follow the healing process radiographically as the site changes from radiolucent to radiopaque as the material is replaced by native bone over the course of 3 to 6 months.9 You can see the differences at the time of placement (Figure 28) and 4.5 months later (Figure 29) in the radio-opacity of the site, which confirms the growth of bone.
Discussion The Presence of a Defect
The previous cases showed extraction sites that were fully intact with all bony walls present, but what if you have a defect? Well, in these cases, we approach with the same steps of atraumatic extraction, debridement of the site, and grafting, but the difference is the use of a membrane instead of a collagen plug. These cases now move from a socket preservation code D7953 to the addition of a GBR code of D4267. This code is for resorbable membrane usage, which is what I currently use exclusively.
Alveolar ridge preservation (ARP) techniques are aimed to reduce the resorption after tooth extraction. The combination of a graft material covered with a resorbable membrane represents one of the most common strategies performed in the clinical practice.10 There are many practitioners who use non-resorbable PTFE membranes when doing socket preservation or guided bone regeneration (GBR), and, since 1982, when the GBR technique was first introduced, the expanded polytetrafluoroethylene (e-PTFE) membrane has been considered the gold standard for barrier function materials.11 Indeed, this non-resorbable material has all the features for the GBR technique, such as biocompatibility, covering the defect, and coagulum stabilization.12 Nevertheless, e-PTFE membranes also have certain limits, such as the need for a second surgical operation to remove them and the possibility of bacterial infection.13-16
I prefer a resorbable collagen membrane since it does not require a second surgery to remove and the incidence of dehiscence is minimal in my experience. Collagen contributes to mineral deposition, vascular ingrowth, and growth factor binding to provide a favorable environment for bone regeneration.17
The job of a membrane is two-fold; it can be used to contain the graft material but, more importantly, it keeps the growth of hard and soft tissue separated. The membranes are designed to inhibit the penetration of fibroblasts and, therefore, allow soft tissue to heal on one side of the membrane and not allow fibroblasts to cross into the area where we are trying to regenerate bone. One of the first requirements for membrane biocompatibility is permeability to body fluids. When membranes are applied to regenerate tissue, additional features, such as cell-occlusive properties and biocompatibility, become important.18
Case 4: Ridge Preservation Utilizing a Membrane
A 38-year-old male patient was referred for the extraction of tooth No. 18. The medical history on this patient was unremarkable. The preoperative radiograph demonstrated a non-restorable tooth with a perapical lesion and the potential loss of a portion of the facial plate (Figures 30 and 31).
The tooth was sectioned and atraumatically extracted as previously demonstrated. After thorough debridement and confirmation of the presence of a defect (Figure 32), the site was grafted with an allograft (Newport Biologics) (Figure 33). A 15- × 20-mm, 4- to 6-month collagen membrane (Newport Biologics) was trimmed to fit the space (Figure 34). The collagen membrane was then placed with the ends tucked into subperiosteal pockets that were created with a periosteal elevator (Figure 35). The site was then sutured with 3.0 chromic gut sutures (Johnson and Johnson) (Figure 36). The radiograph taken 3 months postoperatively shows complete fill-in of the defect and a site ready for implant placement, if the patient desires it (Figure 37).
CLOSING COMMENTS
As you can see, each of these grafting materials works well and will provide a solid foundation for later implant placement. In the cases where a portion of the socket is missing, a resorbable collagen membrane is a good choice for treatment.
The choice of materials and methods ultimately comes down to which material works in your hands as a clinician. Ridge preservation is simple, predictable, and a great practice builder. So why are you not doing it?
References
- Christensen GJ. Is socket grafting standard of care? Dent Econ. 2012;102(7). https://www.dentaleconomics.com/articles/print/volume-102/issue-7/practice/is-socket-grafting-standard-of-care.html. Accessed January 30, 2019.
- Misch CE, Dietsh F. Bone grafting implants in implant dentistry. Implant Dentistry. 1993;2:158-166.
- Murray VK. Anterior ridge preservation and augmentation using synthetic osseous replacement graft. Compend Contin Educ Dent. 1998;19:69-77.
- Verna C. Regional acceleratory phenomenon. Front Oral Biol. 2016;18:28-35.
- Viswambaran M, Arora V, Tripathi RC, et al. Clinical evaluation of immediate implants using different types of bone augmentation materials. Med J Armed Forces India. 2014;70:154-162.
- Valen M, Ganz SD. A synthetic bioactive resorbable graft for predictable implant reconstruction: part one. J Oral Implantol. 2002;28:167-177.
- Artzi Z, Nemcovsky CE, Dayan D. Nonceramic hydroxyapatite bone derivative in sinus augmentation procedures: clinical and histomorphometric observations in 10 consecutive cases. Int J Periodontics Restorative Dent. 2003;23:381-389.
- Ricci JL, Blumenthal NC, Spivak JM, et al. Evaluation of a low-temperature calcium phosphate particulate implant material: physical-chemical properties and in vivo bone response. J Oral Maxillofac Surg. 1992;50:969-978.
- Schlesinger CD. A novel approach to grafting around implants. Dent Today. 2017;36:50-54.
- Troiano G, Zhurakivska K, Lo Muzio L, et al. Combination of bone graft and resorbable membrane for alveolar ridge preservation: a systematic review, meta-analysis and trial sequential analysis. J Periodontol. 2017 Sep 12. [Epub ahead of print]
- Urban IA, Jovanovic SA, Lozada JL. Vertical ridge augmentation using guided bone regeneration (GBR) in three clinical scenarios prior to implant placement: a retrospective study of 35 patients 12 to 72 months after loading. Int J Oral Maxillofac Implants. 2009;24:502-510.
- Buser D, Dahlin C, Schenk RK. Guided Bone Regeneration in Implant Dentistry. Chicago, IL: Quintessence Publishing; 1994:101.
- Selvig KA, Nilveus RE, Fitzmorris L, et al. Scanning electron microscopic observations of cell populations and bacterial contamination of membranes used for guided periodontal tissue regeneration in humans. J Periodontol. 1990;61:515-520.
- Grevstad HJ, Leknes KN. Ultrastructure of plaque associated with polytetrafluoroethylene (PTFE) membranes used for guided tissue regeneration. J Clin Periodontol. 1993;20:193-198.
- Verardi S, Simion M. Management of the exposure of e-PTFE membranes in guided bone regeneration. Pract Proced Aesthet Dent. 2007;19:111-117.
- Barber HD, Lignelli J, Smith BM, et al. Using a dense PTFE membrane without primary closure to achieve bone and tissue regeneration. J Oral Maxillofac Surg. 2007;65:748-752.
- Rodella LF, Favero G, Labanca M. Biomaterials in maxillofacial surgery: membranes and grafts. Int J Biomed Sci. 2011;7:81-88.
- Friedmann A, Dehnhardt J, Kleber BM, et al. Cytobiocompatibility of collagen and ePTFE membranes on osteoblast-like cells in vitro. J Biomed Mater Res A. 2008;86:935-941.
Dr. Schlesinger has been an internationally renowned implant educator for the past 11 years. He graduated from The Ohio State University College of Dentistry in 1996. After completing a General Practice Residency at the Veterans Administration Medical Center (VAMC) in San Diego, he went on to become the Chief Resident of the GPR Program at the VAMC West Los Angeles. During his time in Los Angeles, he received extensive training in oral surgery, implantology, and complex restorative dentistry. He maintained a thriving practice in San Diego for 14 years before relocating to Albuquerque to become the COO of an implant company. In 2016, Dr. Schlesinger went back into private practice, where he provides comprehensive implant treatment through multiple offices in New Mexico. He can be reached via email at cdschlesinger@gmail.com.
Disclosure: Dr. Schlesinger is a speaker for Glidewell Laboratories and Impladent, Ltd.
Related Articles
A New Alloplastic Ring Grafting Technique: A Simple Way to Fill Gaps Around Immediate Implants
Aesthetic Success in the Anterior Region: Immediate Placement and Temporization


