INTRODUCTION
Simply put, contemporary dentistry has become a resin-based world. Every day, clinicians perform a variety of adhesion-based procedures that rely on a curing device to activate a material’s chemistry. The dental curing light is solely responsible for the conversion or polymerization of resin-based materials. As reported by the ADA, at least 50% of a practice’s income is tied directly to the successful use of light-cured materials, thus necessitating the recognition of how important proper light curing is and its dramatic impact on both the clinical and financial aspects of the practice.1
Studies also show that many curing lights used today are lackluster in their ability to deliver optimal light energy.2 Inadequate light curing of any dental material leads to an assortment of clinical failures and should be of paramount concern. Among those failures are postoperative sensitivity, secondary decay, fractures, discoloration, excessive wear, marginal leakage, and decreased bond strength.3 Currently, there is no test to measure if a restoration is completely cured to the extent of its foundational base because even partially cured restorations possess a top layer that is cured.
Proper polymerization relies on multiple factors, including the material, the curing light, and the operator.
 |
 |
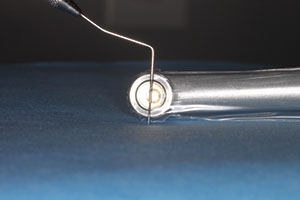
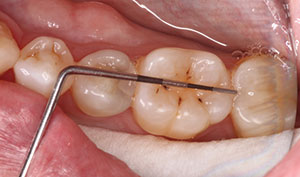
| Figure 1. Measuring actual light-tip beam width. | Figure 2. Measuring actual mesial-distal width of a molar. |
Material Factors
To achieve proper polymerization, each resin-based material has its own photo-initiator chemistry that must undergo activation. Shade, opacity, and the depth of the composite determine the curing time. The majority of dental materials today use camphorquinone (CQ) as their photo-initiator, which has an absorption range of 425 to 490 nm. As contemporary light-emitting diode (LED) curing lights emit more radiation in that range, they are efficient and best suited for that role.
Traditional curing times using an LED light vary from 10 to 20 seconds for a 2.0-mm-thick composite increment. Research has shown that lighter shades that are more translucent allow a greater depth of cure compared to darker shades with more opacity.4 This explains how bulk-fill composites on the market today allow for an increment ranging from 4.0 to 5.0 mm to be cured within 20 seconds. Regardless of what material is chosen, practitioners should always consult the manufacturer’s instructions for specific curing times.
Curing Lights
The majority of curing devices offered today is composed of light-emitting diode (LED) sources. To better understand how these lights function, individual components must be factored into the discussion. The intensity of the LED curing light should be able to provide a thorough cure from the top through to the bottom of the restoration, with values measuring between 750 to no more than 2,000 mW/cm2. Ideally, the optimal curing light emits about 1,000 mW/cm2. While it is proven you cannot over-cure a restoration, you can overheat the tooth. Most research confirms that a higher intensity light does not promote a shortened curing time, and many lights with higher output can cause pulpal irritation and affect the vitality of the tooth. A simple method to test for heat that is generated from your curing light is to hold your finger approximately 2.0 to 3.0 mm from the activated tip for 10 seconds.5
 |
A key performance parameter of curing is the irradiance of the curing beam—essentially an output measurement to illustrate effectiveness. Many curing lights will possess the same power; however, their irradiance varies. This parameter measures the inverse relationship between the power (milliwatts) of the light and the diameter of the beam (as measured in area-centimeters squared). For example, compare 2 devices that have the same power output of 1,000 mW, with one curing tip measuring 10.0 mm (0.786 cm2) and the other at 7.0 mm (0.385 cm2). The irradiance of the 10.0-mm tip is 1,273 mW/cm2; for the 7.0-mm tip, it is 2,597 mW/cm2, which is almost double the irradiance value. The takeaway from this guideline is that high irradiance does not equal high power; essentially, it is the focus of the power on a specific surface utilizing the correct wavelength to cure the resin.6 Even more concerning, BlueLight Analytics research shows that many curing lights deliver less than 35% of their stated output to the floor of a Class II gingival box.7
Other key factors are the diameters of the light tip, the exit beam, and the surface area of the resin. Many curing lights today offer tips that range from 7.0 to 12.0 mm. However, given their designs and housing, the actual beams that exit are smaller (Figure 1). Relating this information to clinical presentations, it is not uncommon to restore a mandibular molar that measures 10.0 to 12.0 mm in a mesial-distal length (Figure 2). For light curing to be effective when using smaller diameter light tips, clinicians must employ some overlapping techniques to properly ensure the surface area is thoroughly cured.
Operator Technique
Curing may appear to be as simple as turning on the light and waiting, but proper understanding and training is needed for all dental professionals to create successful outcomes. Sadly, a contributing reason that composite restorations have a median longevity of 6 years is due to the use of an improper light-curing technique.8 Furthermore, a 2010 study completed by Price et al9 demonstrated that a fourfold difference existed when the same curing light was utilized by 20 different professionals on the same test specimen.
Dental professionals are encouraged to implement the CORE concept: curing light, operator technique, restoration (location, depth, size, opening), and energy requirement.6 Key guidelines have emerged to provide consistent and effective curing. Among them:
- Hold the light at a stable, perpendicular angle to the tooth surface as close as possible, as a tilted light can alter the light beam and dramatically reduce the focus and polymerization effect on the resin material.10
- Use a finger rest, and cure for the allotted amount of time.
- Do not violate incremental placement thickness—measure proximal boxes and other deeper preparation areas with a periodontal probe when placing bulk-fill materials so as to not violate the material’s stated depth of cure.
- Remember that access to the restoration is critical from all directional aspects—occlusal, buccal, and lingual (care must be made to minimize any potential soft-tissue thermal damage, and air cooling may be required during the curing process for l
arger restorations). - Always use eye protection, ensure the light position, and be free from distraction (the use of shields, eyewear, or coverings are critical to prevent irradiation to the eyes, as there is a risk of retinal damage, photo-retinitis, premature aging of the retina, and macular degeneration if proper eye protection is not practiced).12
- Check the light for any damage before use, clean and disinfect the light, and use a barrier.13
- Check the output of the curing device on a regular basis—the curing light must be tested with a radiometer or a professional testing service, such as BlueLight Analytics (ideally, a detailed report can be provided that shows the overall light performance).
Final considerations when selecting a new curing light should include ergonomics and other features. These options include cordless and lightweight devices that allow for good full-mouth access, tips that can swivel, the position of the on/off button, intuitive programs, and the choice of a handle or pen-style grasp. Also, many lights currently offer interchangeable magnetic tips for various procedures.
CASE EXAMPLES
Case 1
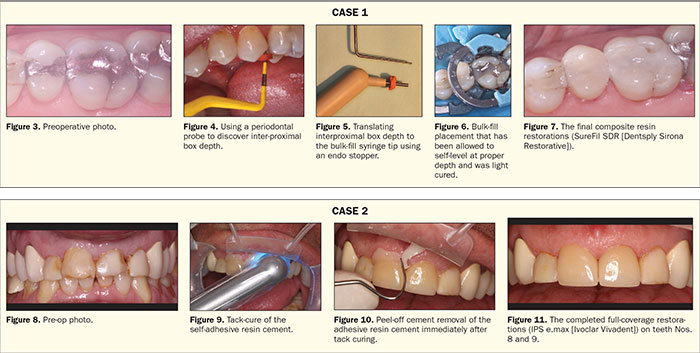
A patient presented with recurrent decay in teeth Nos. 13 and 14 that required direct composite restorations (Figure 3).
A local anesthetic was administered. Then a 330-carbide bur was used to remove the existing amalgams and decay. Once the preparations were finalized, a periodontal probe was used to measure the depths of the inter-proximal boxes and found them to be 6.0 mm deep (the average depth of a Class II). This depth was then translated to the delivery tip of the bulk-fill composite by positioning a stopper (Figures 4 and 5). Next, a sectional matrix system and wedges (Palodent Plus [Dentsply Sirona Restorative]) were placed to ensure the recapture of the proper anatomic contacts and also to provide a tight seal at the base of the gingival boxes. A 2% chlorhexidine solution, acting as a disinfectant, was blotted into the preparation and then lightly suctioned.
A selective-etch adhesion method was performed, and a universal bonding agent (Prime&Bond Elect [Dentsply Sirona Restorative]) was generously scrubbed onto all the internal preparation surfaces for 20 seconds, followed by a thin stream of air and light curing for 10 seconds (SmartLite [Dentsply Sirona Restorative]). Care was taken to hold the light source as close to the preparations as possible for complete curing of the adhesive bonding agent. Next, a bulk-fill material (SureFil SDR [Dentsply Sirona Restorative]) was dispensed into the base of the gingival box, keeping the delivery tip submerged and allowing for complete coverage of the margins of the boxes. Care was taken to cover approximately 1.0 mm of the pulpal floor on tooth No. 13 by using a 4.0-mm increment of the bulk-fill. The material was light cured for 20 seconds using an LED curing light that was supported by a finger rest and observed using a protective light shield. A final 2.0-mm capping layer of universal composite followed; it was then sculpted and light cured for 20 seconds. Tooth No. 14 followed suit (Figure 6).
The sectional matrix system was removed from both teeth, and additional light curing from both the buccal and lingual aspects of the Class II distal box were completed—each for 20 seconds. Finishing and polishing procedures were completed, and occlusion was verified on both teeth (Figure 7).
Case 2
A patient presented with both maxillary centrals needing full-coverage crowns (Figure 8).
Local anesthetic was administered. Preparations were done for the all-ceramic crowns (IPS e.max [Ivoclar Vivadent]), a digital impression scan was taken, and temporaries were fabricated.
The patient returned in 3 days. The temporaries were removed, and the new all-ceramic crowns were tried in to confirm fit. Due to the nature of retentive preparations, a self-etching resin cement was chosen for final placement. The preparations were scrubbed with a 2% chlorhexidine solution and then allowed to remain slightly moist. Each crown was loaded with the self-etching cement (Calibra Universal [Dentsply Sirona Restorative]) and seated using thumb pressure. Immediately after seating, a 5-second tack curing from the buccal and lingual aspect of both centrals was done with the curing light. This tack curing expedited the peel-off cleaning of the cement (Figures 9 and 10). Once cement cleanup and flossing were completed for both crowns, the occlusion was checked and adjusted as needed. The curing light was held at a right angle and directly on both crowns for 20 seconds, from both the buccal and lingual aspects, to ensure a well-bonded marginal seal (Figure 11).
CLOSING COMMENTS
As dental materials have evolved, so has curing light technology. The goal of any curing light is to deliver an optimally collimated beam that delivers homogenous irradiance to the restoration and tooth for complete polymerization. Clinicians must remember the basic principles for a complete cure of the resin material, which include selecting and using a high-quality curing light, focusing on operator technique that directs the light into the preparation, and measuring the curing time for the individual type and shade of material per the manufacturer’s recommendations. Dental professionals must become familiar with all of these variables, understand the differences in curing light features, and recognize the clinical consequences of insufficient light curing.
References
- American Dental Association. Dental Fees: Results from the 2013 Survey of Dental Fees. Chicago, IL: American Dental Association; 2014.
- Price RB, Barghi N, Ernst CP, et al. Effective use of dental curing lights: a guide for the dental practitioner. ADA Professional Product Review. 2013;8.
- Megremis S, Ong V, Lukic H, et al. An ADA laboratory evaluation of light emitting diode curing lights. ADA Professional Product Review. http://www.ada.org/en/publications/ada-profes sional-product-review-ppr/archives/2014. Accessed September 23, 2018.
- Moore BK, Platt JA, Borges G, et al. Depth of cure of dental resin composites: ISO 4049 depth and microhardness of types of materials and shades. Oper Dent. 2008;33:408-412.
- Translating the science: high-intensity LED light-curing units—the heat they produce. Dental Advisor. 2009;4.
- Price RB. Light energy matters. J Can Dent Assoc. 2010;76:a63.
- BlueLight Analytics. Irradiance Value Comparison Among Commercially Available Curing Lights. Halifax, Nova Scotia, Canada: BlueLight Analytics; 2012.
- National Institute of Dental and Craniofacial Research. Strategic Plan 2009–2013. Bethesda, MD: National Institute of Dental and Craniofacial Research, US Department of Health and Human Services; 2009:19. NIH Publication No. 09-7362.
- Price RB, Felix CM, Whalen JM. Factors affecting the energy delivered to simulated class I and class V preparations. J Can Dent Assoc. 2010;76:a94.
- Konerding KL, Heyder M, Kranz S, et al. Study of energy transfer by different light curing units into class III restoration as a function of tilt angle and distance, using a MARC Patient Simulator (PS). Dent Mater. 2016;32:676-686.
- Labrie D, Moe J, Price RB, et al. Evaluation of ocular hazards from 4 types of curing lights. J Can Dent Assoc. 2011;77:b116.
- Roberts HW, Vandewalle KS, Berzins DW, et al. Accuracy of LED and halogen radiometers using different light sources. J Esthet Restor Dent. 2006;18:214-224.
Dr. Trost received her dental degree from the Southern Illinois University School of Dental Medicine. She maintains a private practice
in the Greater St. Louis area. Dr. Trost offers postgraduate courses to dentists and their team members that draw from her extensive private practice experience and focus on restorative dentistry, digital technology, dental materials, orthodontics, business management, and patient communication. She is an author, clinical evaluator, and editorial board member and is listed as one of Dentistry Today’s Leaders in Continuing Education. She can be reached at loritrost.com and via email at trost@htc.net.
Disclosure: Dr. Trost reports no disclosures.
Related Articles
Dentistry Named Fourth Best Job By US News & World Report
Curing Light Features Larger Head Size and 50% Bigger Lens
Curing Light Integrates into All Delivery Systems


