


INTRODUCTION
As patients seek more conservative dental treatments, well-rounded general practitioners (GPs) will include limited orthodontic services, if not full comprehensive orthodontic care to better serve their patients’ needs and desires. Dental consumers are not as keen on having their teeth irreversibly prepared and porcelain placed in what has been described in recent years as “instant orthodontics.”1,2 The gross misuse of the term is misleading, and presents an ethical dilemma in that when teeth are prepped for the purpose of aligning and placing porcelain veneer restorations, it is neither conservative nor orthodontic.1 If orthodontic insurance coverage is involved, one would be hard pressed to legitimately file for reimbursement if no orthodontic movement was actually treatment planned, much less achieved. With the orthodontic systems available today, it makes sense to become familiar with one that allows the clinician to integrate a truly conservative treatment option.
The Essix Technique: Background
Many general dentists began their orthodontic journey with a very simple and predictable in-office technique for minor tooth movement and orthodontic retention using Essix appliances. The Essix Technique was developed by Dr. Jack Sheridan and introduced in 1993.3 Dr. Keith Hillard developed specialty thermo-pliers to make the technique more precise and to allow reactivation of the appliance without having to re-impress and make new models.3 The short explanation of the Essix (now DENTSPLY Raintree Essix) system is that an intimately adapted orthodontic aligner is made from the patient’s models and force bumps placed in the aligner using Hilliard Thermopliers (DENTSPLY Raintree Essix) that will safely move a tooth up to 1.0 mm per month. The plastic used to make the aligner is specially formulated to allow temporary deformation of the plastic while the tooth is moving. At the same time, the plastic is rigid enough to put the appropriate force on the tooth, but not so rigid that it fractures or cracks.
 |
| Figure 1. Example of case submission review (as seen on computer). |
Many systems have been introduced since then, but very few if any would prove to be as aesthetic, inexpensive, predictable, and easy to fabricate. Although this technique has myriad attributes, allowing GPs to gradually and confidently add orthodontic care to their practices with little investment for materials and equipment, some have reported that they would prefer an alternate method that would eliminate their direct involvement in the design and fabrication of the aligners, but still remain profitable for the practice and affordable for their patients.
Introduction of a Lab Design and Fabrication System
Recently, DENTSPLY Raintree Essix received FDA approval for their laboratory-designed and fabricated minor tooth movement system, MTM Clear Aligner Service Center (mtmclearaligner.com). This system is unique when compared to other lab fabricated aligner systems in that it evolved from the traditional MTM In-Office system that has been practiced for more than 20 years. The important aspects of using force bumps and reservoirs in the aligner to move target teeth were upgraded into what DENTSPLY Raintree Essix now calls “open pathway architecture,” while facilitating tooth movement using “force points” with no bonded attachments.
 |
| Figures 2 and 3. Example of a final summary, waiting on approval from the clinician before aligners are fabricated. |
MTM Clear Aligner Service Center is a clinician-friendly system because the required training can be accomplished online for a reasonable fee. This training also includes some appealing introductory offers to help the clinician get started. Because the Service Center truly focuses on minor tooth movement, cases submitted will almost always be addressing the teeth in the smile zone. Minor alignment issues, post-orthodontic relapse, finessing orthodontic cases, and prerestorative cases are usually well suited for this system.
This system further simplifies case submission by providing specific criteria to be considered when entering a case. It also allows the clinician to enter his or her own prescription for tooth movement, or to allow the service center to propose the tooth movements for the clinician. If crowding is involved in the area of minor tooth movement, the clinician may enter his or her own prescription for interproximal reduction (IPR) or allow the service center to prescribe the IPR for them. Once the case has been entered, a Case Submission Review will pop up, allowing the user to assess the summary of the case objectives including target teeth (the teeth that are to be addressed), tooth movement, IPR, as well as retention options for when the case is completed (Figure 1). Once the clinician is satisfied with the information entered, the information can be submitted.
 |
| Figure 4. Vinyl polysiloxane impressions and bite registration. |
 |
| Figure 5. Pretreatment photographs of the patient. |
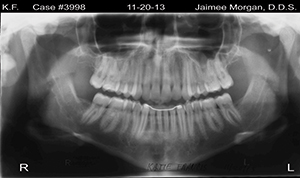 |
| Figure 6. Current panoramic radiograph of the patient to be treated. |
The MTM Clear Aligner Service Center continues to offer even more support after the case is submitted—one of its experts will personally evaluate the case and develop a proposed treatment plan for review and approval. Once reviewed by the submitting clinician, the treatment plan can be revised if need be according to the clinician’s desires (Figures 2 and 3). Once the clinician approves the case, the aligners go into fabrication. The Service Center will continue to offer clinical and technical support throughout the patient’s treatment.
CASE REPORT
Diagnosis and Treatment Planning
A 25-year-old female patient presented with a chief complaint of malaligned upper lateral incisors. She reported that she previously had comprehensive orthodontics at an earlier age and, after losing her removable retainer, the upper laterals had moved lingually and were now a distraction to her otherwise beautiful smile.
Full upper and lower vinyl polysiloxane (VPS) impressions were taken in addition to a bite registration, pretreatment photographs, and a new panoramic radiograph to send to the MTM Clear Aligner Service Center (Figures 4 to 6). Digital impressions are also acceptable. The clinician may also want to take before and after treatment alginate impressions and have them poured up for record keeping.
 |
 |
| Figure 7. Pretreatment photograph of upper arch (occlusal view). Note the obviously malaligned laterals. | Figure 8. Each aligner is delivered from the lab in its own numbered case. |
Note the obvious mesiolingual rotations of the upper laterals on this patient’s upper occlusal pretreatment photograph (Figure 7). The photographs and panoramic radiograph were submitted electronically. The VPS impressions and bite registration were put into the provided protective cases with a printout of the proposed treatment plan and sent to the Service Center. One of the advantages of digital impressions is that the entire case can be submitted online, eliminating lag time from shipping. Once the Service Center received the case, a treatment plan was designed based on the recommendations of the dentist, and within a few days, an email was sent to the clinician for approval of the treatment plan.
This case was originally submitted with the target teeth being the upper laterals only. When the Service Center experts reviewed the case, they suggested adding the upper centrals as well to the treatment plan. There is no extra charge for additional aligners, and knowing that someone else is reviewing your case to ensure optimal results is reassuring. Once the clinician approved the case, aligner fabrication began.
In approximately 2 weeks, notification was received that the aligners had been shipped. A detailed treatment plan summary was printed from the patient’s record from the MTM Clear Aligner Service Center website as well as an informed consent form for the patient to read and sign prior to beginning treatment. The informed consent explained the importance of complete compliance for the treatment to be successful. The treatment plan summary indicated where IPR was needed prior to delivery of each aligner, and how much enamel should be removed. This summary also specified the directional forces that each aligner would apply to each target tooth.
This case required 3 aligners for active movement and a fourth aligner for retention. Each aligner was delivered in its own numbered container (Figure 8). Included with the aligner container were instructions for the patient, including the cleaning and care of the aligners along with aligner removal tools and Retainer Brite cleaning tablets. For the clinician, by reviewing the detailed treatment plan summary provided by the MTM Clear Aligner Service Center, it is easy to understand what tooth movement each aligner will provide (Figures 9 to 14).
IPR was required in only one area (in the amount 0.25 mm) on the mesial of the upper left canine (tooth No. 11) prior to the delivery of the first aligner. The IPR was easily and safely carried out with a safe-sided medium-grit Flexview (DENTSPLY Raintree Essix) strip using an appropriate measuring gauge (DENTSPLY Raintree Essix) (Figure 15). The tooth was then finely polished and treated with neutral sodium fluoride. The first aligner was then tried in. Instructions for wear and care of the aligner were reviewed with the patient, and she appointed to return to the office in 4 weeks.
|


At the next visit, tooth movement was assessed. Reviewing the detailed treatment plan summary provided by the Service Center, it was easy to determine if the correct tooth movement had occurred. In her case, the appropriate teeth had moved into their proper positions for that aligner, and the next aligner was delivered. Appointments should be, and were, 4 weeks apart until completion of the case.
 |
 |
| Figure 15. Minimal interproximal reduction was easily and safely done with a safe-sided medium-grit Flexview strip (DENTSPLY Raintree Essix) using the appropriate measuring gauge (DENTSPLY Raintree Essix). | Figure 16. Post-treatment occlusal view. |
Once the target teeth were in their proper positions as dictated by the treatment plan summary, retention was the final step of the case (Figure 16). A removable Essix retainer, a Hawley retainer, or a bonded retainer may be used. Regardless of the method, post-orthodontic retention is a must to prevent relapse.4 In this case, the patient preferred to have a removable Essix retainer instead of a bonded retainer.
CLOSING COMMENTS
This system is a much-needed service for GPs and specialists alike. It is clinician friendly, and generous support is provided by the experts at the Service Center for any clinician who is not experienced with orthodontic treatment. Also, there is no limit to the number of aligners needed to complete the case, once the case is accepted by the MTM Clear Aligner Service Center and approved by the doctor. The required training can be accomplished online, so no expensive travel or time out of the office is necessary. The fee for this service is reasonable, which means affordability for the patient while still maintaining a healthy profit margin for the practice. The convenience factor for both the clinician and patient, of not having to refer the orthodontic services out for this kind of treatment, is immense.
References
- Jacobson N, Frank CA. The myth of instant orthodontics: an ethical quandary. J Am Dent Assoc. 2008;139:424-434.
- Elashvili A, Denehy GE. Instant orthodontics: a case report using direct resin composite for malpositioned anterior teeth. Inside Dentistry. 2010;6:54-56.
- Sheridan JJ, Hillard K, Armbruster P. The Essix appliance technology: applications, fabrication and rationale. Am J Orthod Dentofacial Orthop. 2003;124:749.
- Parker WS. Retention—retainers may be forever. Am J Orthod Dentofacial Orthop. 1989;95:505-513.
Dr. Morgan received her dental degree from the University of Texas Health Science Center at San Antonio. She practices with her husband, Dr. Stan Presley, in Salt Lake City. She has served as a founding member of the South Texas Chapter of the American Academy of Cosmetic Dentistry and is on the board of directors of the American Orthodontic Society. She lectures internationally on various conservative cosmetic topics, and she teaches an orthodontic continuum for general dentists and pedodontists in partnership with Henry Schein Orthodontics Straight Wire Seminars. She can be reached at (801) 561-9999, at morganjaimee@hotmail.com, or via the websites orthodontictraining.net and prestigeseminars.com.
Disclosure: Dr. Morgan discloses that funding for this article was provided by DENTSPLY Raintree Essix.
Dr. Presley received his dental degree from Baylor College of Dentistry in 1977. He is a general dentist practicing with his wife, Dr. Jaimée Morgan, in Salt Lake City. His training at the L. D. Pankey Institute and Dr. Bob Gerety’s straight wire continuum has provided him with a sound cosmetic treatment philosophy. He was one of the founding members of the South Texas Chapter of the American Academy of Cosmetic Dentistry, where he served as secretary and vice president. He lectures internationally and also teaches an orthodontic continuum for general dentists and pedodontists in partnership with Henry Schein Orthodontics Straight Wire Seminars. He can be reached at (801) 561-9999 or via the websites orthodontictraining.net and prestigeseminars.com.
Disclosure: Dr. Presley discloses that funding for this article was provided by DENTSPLY Raintree Essix.


