INTRODUCTION
An estimated 120 million people in the United States are missing at least one tooth.1 Therefore, the need for general practitioners (GPs) who can perform standard implant procedures is growing, especially as awareness of and patient demand for implant treatment continues to grow. The high clinical success rates of implant treatment are well-documented in the scientific literature.2-4 Single-unit cases, in which a patient exhibits good general health with adequate bone in the area of implantation, are most common today and can be performed with confidence by the properly trained GP.5 In the past, 3-unit bridges and fixed partial dentures were the standard tooth replacement procedures performed in the general practice. However, the function and comfort of fixed partial dentures are unsatisfactory to many patients and require preparing healthy tooth structure in the dentition adjacent to the edentulous space, leading to potential complications. Now that education and technology, from implant systems that greatly simplify the surgical procedure to straightforward restorative solutions like screw-retained crowns, have made implants more accessible and predictable, general dentists increasingly have the opportunity to provide their patients with direct implant services.
Postgraduate Training is Essential
In the following case report, I will demonstrate how my training and evaluations better prepared me to complete my first dental implant procedure. At the Misch International Implant Institute, I learned how to confidently place and restore implants based on scientifically verified, literature-based techniques and principles. There are a host of other educational options for dentists who wish to add implant placement to their skill sets, so this mode of treatment is more accessible than ever. After receiving training, which can typically be acquired during weekend courses `that minimally disrupt the operation of the dental practice, general dentists have a new, highly effective treatment option that provides an optimal long-term outcome for patients who present with missing teeth. Upon completion of training, clinicians can begin with simple cases with an ample margin of safety and plenty of bone and ease into whatever scope of practice feels comfortable, with the option of referring out more complex or challenging cases to a specialist. One such case is illustrated in the following clinical report.
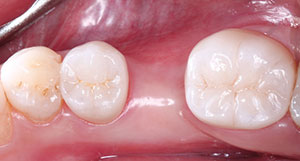 |
| Figure 1. Preoperative occlusal view of the patient’s lower right first molar. The site had previously been treated with a 3-unit bridge, as well as orthodontic treatment that resulted in distal angulation of the tooth roots of No. 31. |
Implant systems have advanced to the point that there are many options that are accessible to the general dentist. In my case, I felt quite comfortable using the Hahn Tapered Implant System (Glidewell Laboratories), with which I gained experience at the Misch Institute. The surgical kit is designed in a way to guide clinicians through each step of the implant procedure in an intuitive manner, with length-specific drills and visible depth markings that eliminate the complexity of prior surgical protocols.
The most important element of completing your first implant cases with confidence is proper preparation and evaluation prior to the surgical procedure. Some of the critical preparatory measures that clinicians new to implant placement should evaluate before taking a case include whether there is enough space between adjacent teeth, significant depth from the crest of the bone, and adequate distance from vital anatomical structures like the sinus cavity or the inferior alveolar nerve.
This article will demonstrate how straightforward restorative procedures have become, seating a screw-retained crown that simplifies the final delivery appointment and avoids complications related to retained cement.6-8 The case presented herein will additionally highlight the basic treatment protocol and specific parameters for placing an implant in the posterior mandible and how to achieve an optimal restorative outcome.
CASE REPORT
Diagnosis and Treatment Planning
A female patient in good general health presented for treatment of an existing edentulous site in the area of tooth No. 30 (Figure 1). Previously, the patient received treatment at another practice, including restoration of the edentulous space with a 3-unit bridge between teeth Nos. 29 and 31. The bridge subsequently failed and, after placing crowns on the adjacent teeth, an attempt was made to close the gap through orthodontic treatment, resulting in a slight angulation of tooth No. 31.
 |
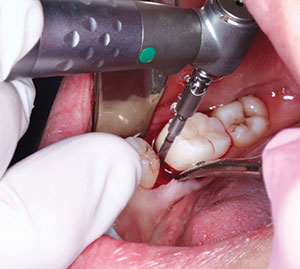 |
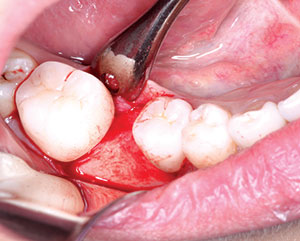
| Figure 2. After making the initial mesial-distal incision, a full-thickness flap was reflected. Note the abundant amounts of host bone that were present at the edentulous site. One of the reasons mandibular implant sites are ideal for clinicians new to implant surgery is the ease of access and visualization relative to sites located in the maxilla. | Figure 3. The pilot drill was used to create the initial osteotomy, placing my ring finger on the patient’s anterior teeth to establish a fulcrum and stabilize drilling. |
 |
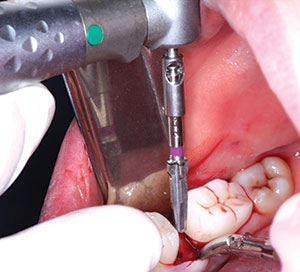 |
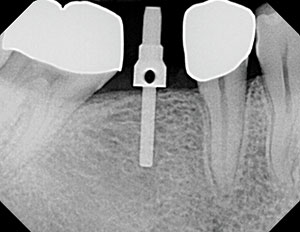
| Figure 4. A parallel pin was then placed in the initial osteotomy site, and a radiograph was taken to confirm proper angulation of the implant. | Figure 5. A series of color-coded shaping drills was used, establishing the osteotomy needed to accommodate the 4.3-mm x 10-mm Hahn Tapered Implant System that was selected for the procedure based on the bone volume present at the implant site. |
 |
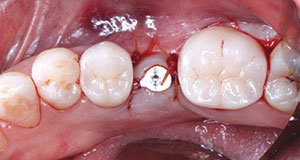 |
| Figure 6. A handpiece was used to place the implant to proper depth, and then full seating was done using a torque wrench; sufficient primary stability was achieved for the placement of a healing abutment. Note that the bone of the mandible is typically denser than that of the maxilla, which is one of the reasons posterior locations in the lower jaw are excell ent candidates for implant surgery when first getting started. |
Figure 7. An interrupted suture technique was used to achieve primary closure of the implant site. The placement of the healing abutment helped contour the soft tissue during the healing phase, setting the stage for an aesthetic emergence profile and a final restoration. |
 |
 |
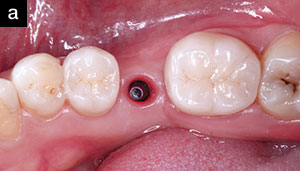
| Figure 8. After 4 months with the healing abutment in place, full integration was attained, and excellent gingival health was observed at the implant site. |
The intraoral examination, along with radiographic and CBCT analysis, revealed that there was adequate host bone in the area to safely accommodate an implant. Through careful evaluation, it was determined that other factors that might hinder an otherwise straightforward implant procedure, including the proximity of the mandibular nerve and the adjacent tooth roots, were not present in this case.
The patient specifically requested implant treatment and, provided the ample amounts of bone axially, buccolingually, and mesial-distally, this made for an ideal first case. The treatment plan was accepted by the patient, and appointments for the surgical procedure and subsequent followups were scheduled.
Surgical Protocol
The standard surgical protocol for placing implants calls for thorough diagnostic evaluation and treatment planning, followed by local infiltration, full-thickness flap reflection, precise angulation of the implant osteotomy, the use of a parallel pin to verify proper positioning, and a series of progressively wider shaping drills. Throughout the surgical procedure, the adjacent teeth are used as “goal posts” to keep the implant osteotomy at the proper angulation in all dimensions.
To begin the surgical procedure, I ensured that all instruments were easily accessible and injected the site with local anesthetic. Next, an initial mesial-distal incision was made, and a full-thickness flap was done (Figure 2). At this time, it was vital that the osteotomy was positioned in a such way that would avoid later complications. Because the implant site was in the mandible, it offered better visibility and access to move forward. Note that for implant sites in the maxilla, lower visibility and bone density may make for a more complicated procedure.
 |
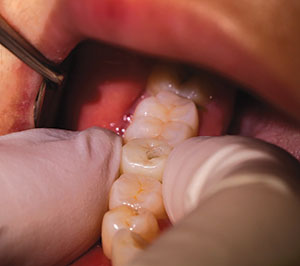 |
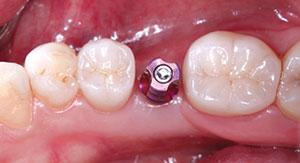
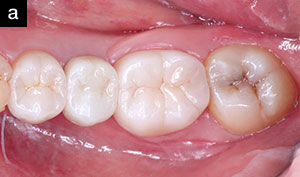
| Figure 9. To begin the restorative phase of treatment, a closed-tray final impression was taken. The case was sent to the dental lab team with a request to fabricate a screw-retained crown, a restorative choice that would help simplify and reduce chair time at the final delivery appointment. | Figure 10. At the next appointment, the BruxZir Screw-Retained Implant Crown (Glidewell Laboratories) was seated. The restoration fit was excellent, and it aligned precisely with the anatomy at the implant site. |
 |
 |
| Figure 11. The final restoration exceeded the expectations of the patient, who was overjoyed with the final outcome. The implant crown was virtually indistinguishable from the adjacent natural teeth, and the healthy bone levels surrounding the implant suggest an excellent long-term prognosis for the restoration. |
Next, a 1.5-mm pilot drill was used to initiate the osteotomy (Figure 3). In order to confirm proper angulation, a parallel pin was inserted and evaluated with a radiograph of the site (Figure 4). The angulation was correct, so I proceeded through the remainder of the surgical drills, using a sequence that was exceptionally easy to follow, with all drills clearly marked and color-coded for ease of selection and use, according to the 4.3-mm x 10-mm implant I selected for the case (Figure 5). With the implant on a driver, the speed of the handpiece was adjusted to a lower setting, and the device was held like a hand press. The implant was initially placed using the handpiece, followed by the use of a torque wrench to achieve the final seating (Figure 6). The aggressive threads of the implant helped achieve excellent primary stability, enabling the connection of a healing abutment to the implant; this helps optimize gingival contours while avoiding the need for a secondary surgical procedure to access the implant site for the restorative phase of treatment. The flap was then sutured to achieve primary closure (Figure 7).
Final Impression
The patient returned after 4 months for an assessment of implant stability. After removing the healing abutment, excellent soft-tissue health was observed. Radiographic evaluation showed ample amounts of bone around the integrated implant (Figure 8). A closed-tray impression was taken to serve as the basis of the final restoration (Figure 9). A monolithic zirconia crown (BruxZir Full-Strength Solid Zirconia [Glidewell Laboratories]) was determined as the best choice for this patient, offering long-term durability.
Delivery of the Final Restoration
At the final delivery appointment, the healing abutment was removed, and the BruxZir Screw-Retained Implant Crown (Glidewell Laboratories) was placed (Figure 10). All contacts were evaluated, and no issues were found. After filling the screw access hole with Teflon tape, the opening was sealed with Camouflage Flowable NanoHybrid Composite (Glidewell Laboratories). The procedure was completed successfully, with a perfect fit and exceptional site healing, giving the patient an excellent long-term solution for a missing tooth that had caused issues and discomfort for quite some time (Figure 11).
CLOSING COMMENTS
With the confidence that comes from proper training, and the use of straightforward surgical and restorative solutions, single-unit implant procedures like the one detailed herein can be completed by a great majority of general dentists. In this particular case, implant angulation was ideal, and the screw-retained crown achieved a precise fit and natural emergence profile that helped exceed the expectation of the patient. By receiving these products and procedures at their local dentists’ offices, patients are likely to experience less stress when they undergo a procedure with dentists they already know and trust.
From a patient perspective, these implants often exceed expectations and provide a more permanent, reliable alternative to the procedures traditionally performed in the general practice. Note how the initial surgical procedure I completed in my office was performed freehand an
d, with the advent of digital treatment planning and guided surgery, the path to successful implementation of implant placement in the general practice has been smoothed even further.
References
- American College of Prosthodontists. Facts & figures. https://www.gotoapro.org/facts-figures. Accessed October 22, 2019.
- Barrachina-Diez JM, Tashkandi E, Stampf S, et al. Long-term outcome of one-piece implants. Part I: implant characteristics and loading protocols. A systematic literature review with meta-analysis. Int J Oral Maxillofac Implants. 2013;28:503-518.
- Moraschini V, Poubel LA, Ferreira VF, et al. Evaluation of survival and success rates of dental implants reported in longitudinal studies with a follow-up period of at least 10 years: a systematic review. Int J Oral Maxillofac Surg. 2015;44:377-388.
- Pjetursson BE, Thoma D, Jung R, et al. A systematic review of the survival and complication rates of implant-supported fixed dental prostheses (FDPs) after a mean observation period of at least 5 years. Clin Oral Implants Res. 2012;23(suppl 6):22-38.
- Christensen GJ. Observations on current controversies in dentistry. Dent Today. 2015;34:100-105.
- Wittneben JG, Millen C, Brägger U. Clinical performance of screw- versus cement-retained fixed implant-supported reconstructions—a systematic review. Int J Oral Maxillofac Implants. 2014;29(suppl):84-98.
- Sherif S, Susarla HK, Kapos T, et al. A systematic review of screw- versus cement-retained implant-supported fixed restorations. J Prosthodont. 2014;23:1-9.
- Korsch M, Robra BP, Walther W. Cement-associated signs of inflammation: retrospective analysis of the effect of excess cement on peri-implant tissue. Int J Prosthodont. 2015;28:11-18.
Dr. Chi is the director of clinical technologies at Glidewell Laboratories. He joined the company as a clinical research associate in 2015 after graduating from the Herman Ostrow School of Dentistry of the University of Southern California. Dr. Chi’s previous education included receiving his Bachelor of Science degree in dental laboratory technology from the Louisiana State University School of Dentistry and earning his CDT in crown and bridge in 2007. He can be reached at justin.chi@glidewelldental.com.
Disclosure: Dr. Chi is director of clinical technologies at Glidewell Laboratories.
Related Articles
Should General Practitioners Place Implants?
An Implant Focus for the General Practitioner
Observations of an Experienced Implant Practitioner


