
About one third of my dental career has been spent as a doctor/technician liaison and technical consultant for a high-end commercial dental laboratory. I have also had the pleasure of speaking for, consulting, and visiting many other dental laboratories throughout the United States and Canada. Through these experiences, I have witnessed the dramatic effects that seemingly insignificant, overlooked treatment planning, preparation, impression, and occlusion issues can have on the stress levels, profits, and final outcomes for both doctors and their dental technicians. I have observed and heard from others that there is an ongoing need for an educational emphasis on many of the basics in dentistry. This need seems to be universal, spanning all regions, ages, and experience levels in dentistry. It can even be seen regardless of the quantity, quality, or type of postgraduate continuing education that has been undertaken by the most dedicated practitioners. Most notably, this includes certain preparation skills, a practical working knowledge of restorative dental materials, and interpersonal relationship skills.
This article will focus on preparation challenges that affect function, longevity, and aesthetics of all-ceramic restorations, no matter how simple or complex the restorative case may be. Recognition of these problems, along with a willingness to solve them, can improve the quality of patient care and will coincidentally help to elevate job satisfaction for our dental technicians. It can also have a positive long-term impact on the professional relationship with our laboratory team members by enhancing mutual respect from a job well done. The disciplines of dentistry and dental technology are extremely demanding. Perfection is always the goal, but it is so often elusive, and it has a way of quickly humbling all of us. However, if we are willing to review our daily work in careful detail and listen and learn from others including our dental technicians, we can experience professional growth that is profoundly rewarding.
What follows are 10 of the most common all-ceramic preparation errors seen routinely in our dental laboratories. They are coupled with solutions that first and foremost require simply an awareness of the problem. The solution might be as easy as employing a different bur and/or making a small change in the preparation technique utilized. (Some of the challenges discussed also apply to other types of indirect preparations and restorations.)
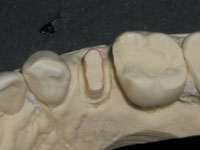 |
| Figure 1. An otherwise nicely done all-ceramic preparation with sharp line angles circumferentially on the occlusal aspect. |
(1) Sharp line angles: Sharp line angles can cause minor to major fit problems, all resulting in more time-consuming seating appointments (Figure 1). This is true for any type of restoration, not just all-ceramics. A premature stress fracture occurring at the seating appointment, or worse yet, some time after cementation, can be the costly result of leaving sharp line angles under an all-ceramic or indirect composite restoration. These issues can also cause an erosion of confidence between the doctor, staff, and/or patient. The solution in this case is simple. It is usually just a matter of remembering to round all sharp line angles after the rest of the preparation is completed. Use any tapered, fine diamond bur to perform this important procedure. A 7856-014 (Brasseler, SS White, Axis) would be an example of an appropriate bur to use.
(2) Beveled or feather margins: Dental technicians will not hesitate to tell us that porcelain is a nightmare to fabricate and finish over any beveled or feather margin. In addition, if it makes it through the laboratory procedures, it has a higher chance for fracturing during the seating or at some point after cementation. For optimal strength and fit with any all-ceramic restoration, use only a shoulder preparation (preferred for pressed ceramics and indirect composites) or a definitive chamfer preparation (ideal for all-ceramics built over aluminum oxide or zirconium oxide copings). If an old PFM restoration is being replaced with an existing beveled (metal) margin, and it cannot be modified into a definitive chamfer or shoulder margin, then consider staying with a PFM replacement crown.
 |
| Figure 2. Long bevels were inappropriately cut on the lingual surfaces of these laminate veneer preparations. |
With laminate veneers, long bevels placed on the lingual surfaces are not acceptable (Figure 2). Instead, a butt-joint margin is preferred for incisal edge reduction. A chamfered lingual wrap may be used occasionally to satisfy certain unique functional or aesthetic circumstances. This is typically reserved for cases in which it may be advantageous to have tooth structure internally supporting or showing through the porcelain. Chamfer burs such as the 856 (Brasseler, SS White, Axis), or shoulder burs such as the 846KR or 847KR (Brasseler, SS White, Axis), can be used to prepare all-ceramic margins successfully without bevels.
(3) The J margin: A word on chamfer margin design is in order before tackling the challenge of the J margin. All-ceramic restorations built over aluminum oxide or zirconium oxide copings (substructures) such as Procera (Nobel Biocare), InCeram (Vident), Lava (3M ESPE), and Cercon (DENTSPLY Ceramco), require a definitive chamfer margin. Unfortunately, sometimes with these and some recently in-troduced systems, doctors are told that any margin will work. This leads to a basic misunderstanding that some-how the material or the way it is manufactured will make up for a preparation design deficiency. The fact is, no matter what system is utilized, a certain amount of room is needed to allow for the underlying coping and the aesthetic layering porcelain. This is especially true in the area of the margin and cervical third. Many times, our laboratory technicians have to work with chamfers that are too shallow or even nonexistent. The resulting crowns can be bulky and far less aesthetic, especially in the cervical third. The solution is to prepare a deeper, definitive chamfer.
One of the dangers in preparing a definitive chamfer margin is the unintended creation of a J (or grooved) margin. This occurs when the apex of the diamond passes the edge of the margin and creates a groove inside the margin (Figure 3). If the coping fabrication technique requires scanning, it can lead to inaccuracy in the scan, resulting in a poor fit at the margin. Possible physical degradation of the die during handling and certain scanning procedures as well as thin porcelain created on this fragile margin makes a J margin unacceptable. If you use an 856 series chamfer diamond to prepare the margin, one must exercise caution not to exceed a depth into the tooth equal to one half of the width of the bur tip. This means an appropriate diameter bur must be selected to create the chamfer depth desired. Another potential solution to prevent this problem is to try a 30006 bur (Brasseler) that has a safe-sided center pin in the tip. This center pin helps to limit the depth the bur can cut into the tooth, thus reducing the chance for the creation of a J margin (Figure 4). If you wish to correct a J margin that has been accidentally created, it can be converted into a modified shoulder margin by reducing the outer lip with a 10839 end-cutting porcelain bur (B
rasseler).
 |
 |
| Figure 3. A J margin is created when the apex of the chamfer bur passes the edge of the margin, creating a groove. | Figure 4. The 30006 chamfer bur (Brasseler) eliminates the J margin by incorporating a nonabrasive center pin. |
(4) Incomplete and/or nonuniform shoulder (Figure 5): This problem causes the porcelain in the cervical areas to vary significantly in thickness, with a potential for premature fracture during fabrication, in the process of seating, or after cementation. There can also be potential aesthetic problems when-ever there are varying porcelain thicknesses. When pressed ceramics are being prescribed such as IPS Empress (Ivoclar Vivadent), IPS Empress Esthetic (Ivoclar Vivadent), IPS Eris (Ivoclar Viva-dent), Authentic (MicroStar), OPC (Pentron Laboratory Technologies), OPC Plus (Pentron Laboratory Technologies), OPC 3G (Pentron Laboratory Technologies),Cerapress (Vident), etc, be sure to maximize strength and aesthetics by preparing a complete, uniform, 360 degrees, 1- to 1.5-mm shoulder (butt-joint margin). An 846KR or 847KR diamond is an example of an appropriate shoulder bur to use (Brasseler, SS White, Axis).
 |
| Figure 5. A shoulder that needs revision to establish uniform width and eliminate roughness. |
(5) Rough shoulder (Figure 5): Much like taking a little extra time to go back and round any sharp line angles, a minor effort here will pay big dividends. A smooth shoulder will help to ensure an excellent fit, a minimal cement line, and improved aesthetics at the margin. It can also translate into a reduction in the potential for stress fractures at the seat or a delayed fracture after bond-ing the crown in place. After the shoulder is prepared with a shoulder bur such as the 846KR or 847 KR (Brasseler, SS White, Axis), go back with an appropriately sized 10839 (Brasseler) end-cutting bur and refine the shoulder. With this bur, it can be done quickly and safely without any further undesired removal of axial tooth structure.
(6) Sharp internal line angle (the axial wall-to-shoulder junction): The elimination of a sharp internal line angle at this critical junction will reduce the potential for internal stresses in the porcelain and subsequent premature fractures. It will also assist in reducing possible fit problems once the porcelain is fired or pressed into a sharp junction. This preparation challenge has an easy solution. Use diamond shoulder burs such as the 846KR or 847KR (Brasseler, SS White, Axis), and the line angle will be automatically rounded due to the rounded shape built-in at the cutting end.
 |
| Figure 6. The usable width of a shoulder is reduced by tipping in the bur too far at the margin, creating an undercut. |
(7) The “pseudo-shoulder”: This dilemma occurs when we lose orientation to the proper planes of reduction and angle the tip of the bur too deeply into the margin (Figure 6). The end result is a shoulder that may at first appear to be wide enough, but in fact if surveyed for undercuts, is really not. This can reduce the strength of the porcelain at the margin and can diminish the desired aesthetics for the cervical one third of the restoration. Ideally, one should consider using depth cuts to stay oriented in space. This will prevent cutting into the shoulder area at an angle that creates an undercut area which, once blocked out, reduces the effective shoulder width for the dental technician.
(8) Inadequate occlusal reduction and/or over-reduction: How many times does our laboratory have to call us for permission to reduce our preps, to make a reduction coping, or even to reduce the opposing dentition? Unfortunately, the nearly habitual need for these calls can go almost unnoticed in the routine of most busy practices. This can be a significant profit buster. First, there is the time and aggravation of making the back-and-forth calls. (These should be welcomed but reserved for important, nonroutine matters.) Then there is the potential for imprecision along with the extra time needed at the seat (which may now make the need for anesthetic a certainty). This happens despite even the most careful adjustments made by our well-intended laboratory technician. Even more importantly, it can have serious side effects for the relationships we have with our technicians and/or our patients.
Also, understand that our dental technicians are never as comfortable “finishing” our preparations as they are when we do so at the chair. We are the ones who are ultimately responsible to know how deep is deep enough, and where we should, and should not, remove tooth structure. In these situations, dental technicians are limited to stone models and verbal orders to reduce, and do not have a complete understanding of the clinical situation. All this is not to say that we will never have any calls from the laboratory regarding reduction, but it is important to minimize these calls to as close to zero as humanly possible.
Many times over-reduction is observed in the laboratories as well. Over-reduction and under-reduction can even be observed occasionally on the same preparation. Often, preparations do not match the restoration prescribed. For example, anatomic occlusal reduction should be less emphasized and smoother (not flat) in any CAD/CAM restorations that are physically scanned, such as Procera (Nobel Biocare). To solve this dilemma, we should first review the reduction requirements for any restoration prior to the preparation appointment. This is particularly important when we are doing a technique that is new to us. Rather than give all the preparation specifics in the scope of this article, suffice to say that there are a number of ways to verify the reduction requirements for any type of restoration. These include calling the dental technician who is creating the restoration, visiting the manufacturer’s Web site, calling the manufacturer’s technical hotline, or reviewing excellent written manufacturer or clinical textbook references.1,2
 |
| Figure 7. One-mm (pink), 1.5-mm (green), and 2-mm (blue) Flexible Clearance Tabs (Kerr Lab) for doctors. The multitab Flexible Clearance Guide (Kerr Lab) used in most laboratories. |
techniques like Flexible Clearance Tabs (Kerr Lab). These are conveniently precut and color-coded according to thickness (1 mm = pink, 1.5 mm = green, 2 mm = blue, Figure 7). They can be placed on preparation trays in advance of the appointment as a reminder that they should be utilized to verify reduction before placing any provisional restoration (Figures 8 and 9). In this way, we are on the same playing field as our technicians who use the laboratory version, the Flexible Clearance Guide, to verify reduction (Kerr Lab) (Figure 7).
 |
 |
| Figures 8 and 9. Compare these 2 photos. Figure 8 shows all-ceramic posterior preparations with what looks like “plenty of room.” In Figure 9, a 1-mm Flexible Clearance Tab verifies that the occlusal reduction is far short of the 2 mm recommended for posterior all-ceramic crowns. | |
(9) Lack of uniform, anatomic reduction: This is a challenge in the application of all-ceramic restorations for all areas and surfaces of the dentition, not just the facial aspects of anterior teeth. Again, over- and under-reduction can often be observed on the same preparation. How do we prevent this problem? Uniform, multiplane reduction needs to be done thought-fully so that the dental technician can replace the missing tooth structure with uniform layers of aesthetic porcelain. Depth cuts are strongly recommended to stay properly oriented in space, even for the most experienced doctors (Figures 10 and 11).
 |
 |
| Figures 10 and 11. Compare these 2 photos and observe the relative axial inclination of the anterior teeth. This will present a severe structural and aesthetic dilemma for the dental technician who must try to accomplish the end result as outlined in the model of the diagnostic wax-up in Figure 10, utilizing the preparations in Figure 11. | |
One of the most critical yet overlooked areas to reduce anatomically is the lingual of anterior teeth. Specifically, more attention to the lingual anatomic reduction of maxillary anterior teeth is needed. One bur that can be used to create lingual anatomic reduction is the 379 football diamond (Brasseler, SS White, Axis, Figures 12 and 13). This allows the dental technician to restore proper anatomic form and achieve proper occlusal coupling that will include stable, holding contacts in class I occlusions. The resultant effects of bulky, over-contoured crowns on muscular harmony, force management, long-term wear patterns, and joint health are significant and have been well documented.3
 |
 |
| Figure 12. Maxillary anterior central incisors prepped for all-ceramic crowns. (Gold dust painted on to visualize better the teepee shape that does not reflect anatomic lingual contour.) | Figure 13. With the doctor’s permission, the dies were revised in the laboratory before sending them back as a guide for a patient re-prep using the same 379-023 football diamond (Brasseler). |
Reduction (sometimes major) of the incisal edges of opposing mandibular teeth is done far too frequently to “make room” for the lack of maxillary anatomic lingual reduction. If the proper anterior coupling cannot be accomplished with anatomic reduction of the maxillary teeth alone, then one should consider other alternatives, such as an appropriate opening of the occlusal vertical dimension (Figures 14 and 15). This often involves having an understanding of comprehensive, interdisciplinary restorative dentistry.
 |
 |
| Figure 14. A case involving all-ceramic crowns. | Figure 15. The same case as Figure 14 viewed from the lingual, showing the measured clearance at 0.1 to 0.3 mm. The doctor was informed, and reduction of the opposing mandibular anteriors was requested. This was strongly discouraged by the dental technician due to the amount of reduction needed. |
Posterior teeth also require uniform, multi-plane reduction of the occlusal, lingual, and buccal aspects so the technician can build natural anatomic contours with optimal aesthetics (Figure 16). Once again, the use of depth cuts on the buccal, lingual, and occlusal aspects is helpful in keeping reduction oriented in the various natural anatomic planes.
 |
| Figure 16. This is the same all-ceramic case seen in Figures 8 and 9. On the left is the original solid pour model. On the right is a revised solid model sent back by request to the doctor for re-prep. Note changes in shoulder width and overall reduction. Crowns, if fabricated over the preparations as originally cut, would have been bulky, unaesthetic, and prone to premature fracture. If this doctor had refused to re-prep according to all-ceramic guidelines, then a PFM would have been recommended. |
(10) Inadequate lingual extension in diastema closures (with laminate veneers): The diastema closure can be accomplished in different ways depending on the etiology. When a restorative correction is considered appropriate, one of the main restorative challenges is the dental technician’s ability to reach out interproximally to make contact with the adjacent tooth surface in a way that gives a natural, cleansable, and aesthetic result that does not include a black triangle (or at least minimizes it). A common error seen in the dental laboratory is the lack of ext
ension through the interproximal far enough to close a diastema properly. Simply preparing the facial surface with the usual laminate veneer preparation is not adequate to accomplish this procedure. One must prepare through the interproximal as if preparing that surface conservatively for a full crown (Figure 17). Slight taper for draw can be accomplished by using a tapered diamond chamfer bur such as the 856 series (Brasseler, SS White, Axis). Be sure to place the margin below the tissue as it goes through the interproximal. (Usually 1 mm is sufficient. The placement of any subgingival margins should take biologic width into consideration.) Care should be exercised at the cervical aspect of the lingual extension to avoid undercutting this area and creating a potential draw problem.
 |
| Figure 17. Diastema closure: lingual view of laminate veneer preparation on right lateral incisor showing desired extension of the lingual margin through the interproximal. The interproximal margin is placed slightly below the tissue. |
Lingual cervical margin placement with full crown coverage is also important when closing diastemas. While it is always prudent to be conservative whenever possible, some-times in that same effort we can create contours that may be aesthetic from an anterior viewpoint but lack natural, hygienic form from another perspective (Figures 18 to 20).
 |
 |
| Figure 18. Note the attempt to save a small portion of the cingulum areas on these maxillary central incisors. | Figure 19. The facial view appears as if it will be aesthetically pleasing. (The die has also been blackened to help illustrate a potential aesthetic dilemma on the right central incisor. Depending on the underlying stump shade, failing to reduce in multiplanes will result in nonuniform porcelain coverage causing an aesthetic compromise or failure.) |
 |
| Figure 20. The lingual view shows the unnatural contours that the technician had to create due to the location of the final lingual and interproximal margins. |
CONCLUSION
In recent years, the growth and dynamic changes in dental technology have been almost hypnotic. Our adrenaline flows at the sight of new gadgets we want to buy, hoping to gain the latest technological or marketing edge. We spend thousands upon thousands of hard-earned dollars to attend the latest advanced continuing education courses. It seems to be the way many of us are hard-wired. I am in no way going to suggest that we stop acquiring thoughtfully chosen, new products for our practices or cease going to many of the excellent seminars and hands-on courses available to us. However, it is good to recognize that there are many existing, remarkably basic, low-tech, low-cost techniques we can utilize to ensure our work is more predictable and less stressful.
For example, we can immediately start to improve our professional skills by asking our laboratory technicians to give us meaningful feedback on our preparations, tissue-management effectiveness, and impressions. If we are open-minded and have a relationship with them that is based on mutual trust, they will be willing to offer us technical expertise based on their unique experiences and position in dentistry. By taking the time to collectively improve some of the “small stuff” (that I believe someone once said not to sweat!) we, and our dental technicians, can start enjoying a more rewarding career with functional and aesthetic results that we can consistently be proud to say are ours.
References
1. Miller M. The Techniques. Houston, Tex: Reality Publishing Co; 2003.
2. Shillingburg HT Jr, Jacobi R, Brackett SE. Fundamentals of Tooth Preparations for Cast Metal and Porcelain Restorations. Carol Stream, Ill: Quintessence Publishing Co; 1987.
3. Dawson PE. Evaluation, Diagnosis, and Treatment of Occlusal Problems. 2nd ed. St Louis, Mo: Mosby-Year Book; 1989: 7-13, 274-297, 470-476.
Dr. Adams, a graduate of the University of Michigan, is an assistant clinical professor at Medical College of Ohio, Division of Dentistry, Department of Otolaryngology, in Toledo, Ohio. He lectures nationally and internationally for many dental organizations and dental laboratories. In addition to Dr. Adams’ years in private practice, he has served as the doctor/technician liaison for a high-end commercial dental laboratory for more than 9 years. His lectures and hands-on seminars include “Excellence in Everyday Esthetics! Reduce Stress and Increase Profits Utilizing a Total Team Approach;” “Restorative Excellence” Problems and Solutions!;” and “Indirect Composites: Dentistry’s Best Kept Secret!” Dr. Adams has written articles on clinical, laboratory, insurance, and marketing topics for Dental Insurance Today, Dental Economics, Dental Practice Management, The Journal of Dental Technology, and Dentistry Today. He is a member of the ADA, MDA, AGD, AACD, and ICOI, and is a Fellow of the International College of Dentists. He can be reached at (231) 946-8880 or damona11@hotmail.com.

