The Internet now gives patients access to procedural information and treatment alternatives. Consumers have an increased level of awareness of procedures, as well as an increased understanding of how these procedures will affect the long-term health of their teeth. This increased knowledge, in turn, generates a higher demand for aesthetically pleasing results. Expectations can be very high, especially for retreatment of prior aesthetic procedures. The success of such treatment de-pends upon numerous other factors, which include patient expectations, smile design (treatment planning), and clinical excellence. However, the final criterion for success with any aesthetic treatment is patient satisfaction. This requires a vision that is shared by the clinician, laboratory technician, and patient prior to starting treatment.
This case report presents the replacement of composite veneers with porcelain veneers, and the steps taken to ensure patient satisfaction.
HISTORY
 |
 |
|
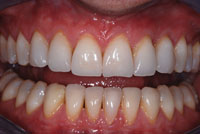
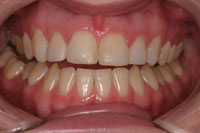
Figure 1. Before full smile of patient who presented for aesthetic enhancement. |
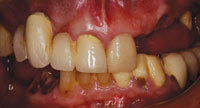
Figure 2. Retracted view shows old composite veneers. |
A 19-year-old female presented for aesthetic improvement of her smile (Figures 1 and 2). After orthodontic therapy, she had small gaps between her maxillary anterior teeth. Her orthodontist felt that closing these gaps would lead to nonideal occlusion and advised her to have them closed with restorations. Composite veneers were utilized to close the gaps and build out her teeth. After several years, she was no longer pleased with the color and shapes of her composite veneers. She was doing some modeling and felt that her teeth did not look good in photos. Her desires, concerns, and potential case limitations were reviewed. The appearance of a smile can dramatically influence how a person perceives him- or herself as well as how he or she is perceived by others. It is also important to remember that aesthetic dental treatment is subjective, and what the clinician views as attractive may be unsightly to the patient.
DIAGNOSIS
A thorough examination was performed, which included radiographs, mounted models, and photographs. The patient’s periodontal health was excellent, and her home care was good. There was no evidence of posterior wear, and she reported no muscle/joint symptoms. The patient’s smile presented the following cosmetic issues:
- Shade disharmony of the maxillary anterior teeth: multiple areas of composite were visible on the facial and interproximal aspects of the teeth.
- Asymmetric gingival architecture.
- Asymmetric tooth sizes.
- Improper width-to-height ratio of centrals.
- Slight smile reversal.
- Too much dark space in the buccal corridors.
TREATMENT PLAN
After reviewing the results of the examination and the patient’s expressed wishes for her smile, the following treatment plan was agreed upon:
1. At-home teeth whitening with custom-fabricated bleaching trays.
2. Removal of composite veneers Nos. 6 to 11.
3. Gingivectomies to balance gingival asymmetries.
4. Placement of porcelain veneers Nos. 4 to 12.
A diagnostic mock-up was done to evaluate the aesthetics, occlusion, and phonetics of lengthening her maxillary front teeth. Using this information, a wax-up was constructed to plan the changes to her incisal edge position, tissue positions, and tooth form. The diagnostic wax-up also was used to create an incisal putty matrix, which would be used as a preparation guide.
PREPARATION, IMPRESSION AND PROVISIONALS
 |
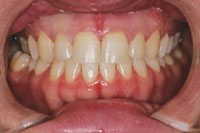 |
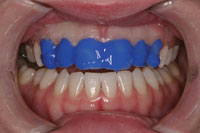
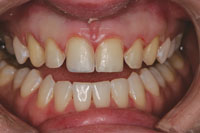
| Figure 3. Teeth were etched to display areas where composite material remained. | Figure 4. Underlying teeth after composite veneers were removed. |
 |
 |
| Figure 5. A preparation guide from the wax-up was utilized to minimize removal of tooth structure. |
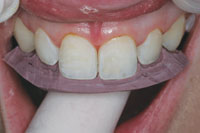
Figure 6. Final veneer preparations. |
 |
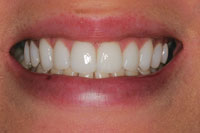 |
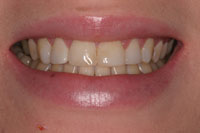
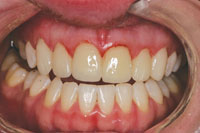
| Figure 7. Temporary restorations fabricated with a bis-acrylic composite. | Figure 8. Full smile view of final restorations. |
After anesthetizing the patient, the composite veneers were removed with a fine diamond bur. To ensure complete removal of the old composite, the maxillary anterior teeth were etched with 37% phosphoric acid for 5 seconds (Figure 3). Upon drying, the enamel appeared frosty white, while the old composite remained shiny (Figure 4). Upon complete removal of the old composite, tissue recontouring was accomplished using a diode laser.
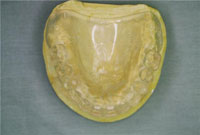
The putty matrix constructed from the wax-up was inserted to show how much preparation was necessary for ideal results (Figure 5). The use of a guide allows for the most conservative preparations that still yield ideal results. Preparation was done to ensure at least 0.5 mm of facial clearance from the putty matrix guide (Figure 6). The preparation guide demonstrated that there was no need to do preparations on the premolars, as these teeth had a lingual tilt and needed to be built out to reduce the negative space in the buccal corridor. Final impressions were taken using a polyvinyl siloxane (PVS) material. A face-bow transfer and stick-bite also were performed to give the lab the proper horizontal orientation. In addition, photos of prepared teeth were taken for the technician to plan color blocking.
The provisional restorations were fabricated using a putty template of the wax-up. After preparation, this template was filled with a bis-acrylic provisional material and placed over the teeth. After the initial set of the provisional material, the excess was removed with a No. 12 blade, and finishing was accomplished using fine carbide burs. The temporary was allowed to set completely on the teeth, locking the provisional in place by mechanical retention. The provisional restorations were polished using composite polishing points, and then a glaze was applied (Figure 7). Photos and models of the provisional restorations were sent to the laboratory technician, to be used as a guide for fabricating the final restorations.
LABORATORY FABRICATION
The goal in this case was to achieve a more pleasing, youthful, feminine smile. The teeth axis, length, and preoperative maxillary cant all were addressed to create a new smile. Therefore, it is crucial that the laboratory is provided with the necessary information to ensure a successful case.
Always make a point to include a stick-bite, shade of preparations, and a model of patient-approved temporaries in addition to the instructions with the case. The use of a stick-bite is to ensure the proper horizontal alignment of the casts when mounted. When taking a stick-bite, use a “squishy” bite material and capture a full occlusal, maximum intercuspal position (MIP). Overfill the anterior with the bite material and place a Bend-a-Brush (Centrix) into the bite material. When placing the Bend-a-Brush horizontally, use either the eyes as a horizontal reference or the midline of the face as a perpendicular reference.
The shade of the preparations will influence (positively or negatively) the final shade of all-ceramic restorations. Prep shade guides are on the market that can be utilized; however, any shade guide can work. If the prep shade is between 2 shades, err toward the darker shade.
An impression of the patient-approved temporaries serves as the final “blueprint” for what the finals will look like. Today’s patients tend to have a lot of input into what their new smile will look like. As long as their requests do not violate any function parameters, we can provide them with the smile they desire. The “blueprint” needs to be worked out in the temporaries. It is suggested that after the temporaries are placed, a follow-up appointment to discuss the design should occur 3 to 5 days later. By that time, the patient has spent a lot of time analyzing the new smile and may want to give you input. Once the patient approves the temporaries, take an impression and send the model to the laboratory.
Photography is the best way to convey much of the information, which is much easier to share with the increased use of digital technology. Below is a recommended list of photos to send to the laboratory:
- full-face photo of smile (preoperative)
- full-face photo of lips retracted (preoperative)
- full-face photo stick-bite (on preps)
- 1:2 photo of preparation shade (with shade tab)
- full-face photo of smile (temporaries)
- full-face photo of lips in repose (temporaries)
- full-face photo of lips retracted (temporaries).
Shade 010 chromascope had been selected as the desired final shade. Maintaining vitality with such a white shade can be challenging. However, due to the relatively light color of the patient’s preparations, this was achieved. The restorations were fabricated using IPS Empress E02 pressed ceramic (Ivoclar Vivadent). Using E02 gave the restorations a high value, yet maintained the desired natural vitality. A moderate to light incisal translucency, with a light texture and a high gloss, were used to finish the case.
CEMENTATION
After anesthetizing the patient, the provisional restorations were removed and the new restorations were inserted provisionally. With the patient’s approval, the 8 maxillary veneers then were cemented using phosphoric etch, adhesive, and resin cement. The excess cement was removed and the occlusion was adjusted.
CONCLUSION
The patient always is the final judge of aesthetic treatment. In this instance, the patient was thrilled with her new smile (Figure 8).
Sources
Magne P, Douglas WH. Additive contour of porcelain veneers: a key element in enamel preservation, adhesion, and esthetics for aging dentition. J Adhes Dent. 1999;1:81-92.
Gurel G. The Science and Art of Porcelain Laminate Veneers. Quintessence Publishing; 2003:248-253.
Paul SJ. Smile analysis and face-bow transfer: enhancing aesthetic restorative treatment. Pract Proced Aesthet Dent. 2001;13:217-222.
Sesmann MR. The diagnostic tracing analysis: visualization by the numbers. Pract Proced Aesthet Dent. 2004;16:567-572.
Ward DH. Proportional smile design using the recurring esthetic dental (red) proportion. Dent Clin North Am. 2001;45:143-154.
Magne P, Magne M, Belser U. The diagnostic template: a key element to the comprehensive esthetic treatment concept. Int J Periodontics Restorative Dent. 1996;16:560-569.
Cho GC, Donovan TE, Chee WW. Clinical experiences with bonded porcelain laminate veneers. J Calif Dent Assoc. 1998;26:121-127.
Morley J. The role of cosmetic dentistry in restoring a youthful appearance. J Am Dent Assoc. 1999;130:1166-1172.
Magne P, Belser UC. Novel porcelain laminate preparation approach driven by a diagnostic mock-up. J Esthet Restor Dent. 2004;16:7-16.
Kokich V. Esthetics and anterior tooth position: an orthodontic perspective. Part III: mediolateral relationships. J Esthet Dent. 1993;5:200-207.
Morley J, Eubank J. Macroesthetic elements of smile design. J Am Dent Assoc. 2001;132:39-45.
Kois JC. Altering gingival levels: the restorative connection. Part 1: biological variables. J Esthet Dent. 1994;6:3-9.
Kohl JT, Zander HA. Morphology of interdental gingival tissues. Oral Surg Oral Med Oral Pathol. 1961;14:287-295.
Dr. Javaheri maintains a private practice limited to appearance-related dentistry in Alamo, Calif. He has completed a 2-year Advanced Education in Dentistry program at the University of the Pacific, San Francisco, where he is currently an assistant professor and course director for the postgraduate program Setting New Standards in Cosmetic Dentistry. He can be reached at (925) 837-5889 or drj@drjavaheri.com.
Disclosure: Dr. Javaheri declares no financial interest in any of the products cited in the article.
Mr. West is the vice president and general manager of Frontier Dental Laboratories. He has spent years working with top clinicians across the country including Dr. David Hornbrook at PAC~live, Dr. Larry Rosenthal with Aesthetic Advantage, and Dr. John Kois with the Kois Center. He has lectured internationally and has written numerous articles on laboratory communication and restorative materials. He can be reached at (800) 790-3999 or brent@frontierdentallab.com.
Dr. Shahnavaz has a cosmetic/restorative practice in Danville, Calif. She is a published author and frequently teaches CE programs. She can be reached at (925) 837-5889.


