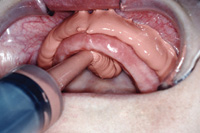
In my more than 55 years in dentistry, I attribute my success with dentures to the following 4 prerequisites: adhesion, true centric relation (CR), lateral and protrusive bites, and last but not least, remounting grooves. In the August 2006 issue of Dentistry Today (visit dentistrytoday.com to see the archived article), I showed how to make border molding easier for making mucostatic impressions. I was seeking adhesion in dentures equal to that of 2 glass slabs—in other words, molecular adhesion. In the August 2007 issue of Dentistry Today (see the article), I sought to prove that at the bite-rim stage my mucostatic impressions had given me the adhesion I desired for my final fully-processed dentures. I did this by making semiprocessed acrylic bases which would emulate the fit of fully processed bases for my bite rims. If the models poured from my mucostatic impressions were clones of the patient’s ridges, these semiprocessed bases would have the molecular adhesion that I desired for my dentures in the mouth.
ADHESION
Proving that one has achieved adhesion at the bite-rim stage has 2 particular purposes:
TRUE CENTRIC RELATION
 |
 |
|
Figure 1. Centric relation (CR). |
Figure 2. Fully adjustable articulator. |
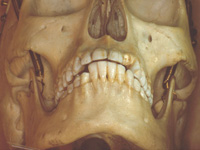
Having achieved the desired adhesion with my semiprocessed rims, we are ready to proceed to my second prerequisite—true CR. By definition CR is the uppermost, rearmost, centermost position of the mandible. We know that, in the natural dentition, CR ends when centric occlusion (CO) begins. Therefore, we can assume CR occurs just prior to closure within the free way space as is shown in Figure 1. This prior-to-closure position of the mandible is the key to obtaining a true registration of CR. The interarch tracer uses the prior-to-closure principle for obtaining true CR. To install the interarch tracer, we must first mount our models in the conventional manner on a fully adjustable articulator (Original Whip Mix Articulator 8500 Series [Whip Mix]) (Figure 2). A fully adjustable articulator can also be called a rotating hinge when locked in CR. Visualize that the lower member of the articulator shown in Figure 2 represents the mandible with the condylar heads seated in the fossae of the skull’s maxilla (represented by the upper member of the articulator). Visualize that with this instrument, or any other fully adjustable articulator, you can duplicate any movement of the patient’s mandible that starts at CR. With this instrument locked in CR, all occlusion produced is still in CR on closure—that means that CR and CO will be the same. Any movement from CR to maximum intercuspation (MI) should occur with no hits and slides—the perfect occlusion for a denture.
BITE RIM MOUNTING
 |
 |
|
Figure 3. Centric bite. |
Figure 4. Rims in centric. |
Now we will proceed with customizing our bite rims and mounting our models.
- Models should be properly trimmed for ease of flasking in the processing of the denture. Models should have remounting grooves.
- Models should be poured in die stone.
- Models should be mounted with a stone that has controlled expansion and contraction. Never use lab plaster.
- Models should be coated with Super-Sep (Kerr) (or similar) and allowed to dry thoroughly before mounting. Never use vaseline or any other gel.
CENTRIC RELATION AND THE INTERARCH TRACER
Remember, we are seeking a CR mounting and what we have in Figure 4 is a centric bite mounting. To convert this centric bite mounting to a CR mounting, we simply remount the lower rim and model with an interarch tracer. Before making any changes to our bite rims, we must lock in the vertical on the guide pin of the articulator. After locking in the vertical on the guide pin of the articulator, we then install the interarch tracer. The interarch tracer uses a technique of capturing CR where it occurs (prior-to-closure) as was explained in Figure 1 (the skull with the teeth separated). To create this prior-to-closure space between the rims, we remove 3 to 4 mm of wax from the occlusal table of the lower rim.
APPLYING THE INTERARCH TRACER TO THE RIMS
 |
 |
|
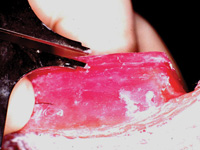
Figure 5. Scoring the wax with a Boley Gauge, creating interarch space. |
Figure 6. Heated upper member being applied with a hemostat. |
 |
|
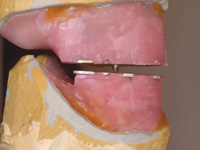
Figure 7. Bite rims before going into the mouth. |
The interarch tracer (Simplex Intra Oral Gothic Arch Tracing Device, DENTSPLY Prosthetics) consists of 2 parts—an upper member and a lower member. The upper member has a vertically adjustable stylus. This has a sharpened point that inscribes the movements (tracings) of the mandible on the occluding surface of the lower member, a plain metal disposable plate. After heating the plates in an open flame with a hemostat, the plates can then be applied to wax rims as shown in Figure 6. In placing the plates, we want the stylus to be as centered on the rims as possible so that when the tip of the stylus closes on the opposing lower plate, the pressure is evenly distributed to both bite rims. The tip of the stylus acts like the apex of a tripod. This tripodization evenly distributes the pressure on the underlying tissues of both arches, thus providing stability to the rims on the ridges for accurate tracings. This tripodiztion is not only a necessity for a more accurate CR mounting, but also for obtaining the proper plane of occlusion of the lower rim to the upper rim. If the underlying tissues are not evenly compressed under the entire surface of both rims, your recordings for the plane of occlusion would not be accurate. After securing both plates to their respective rims, place both rims back on their respective models which have remained on the articulator. Now adjust the vertical on the stylus of the upper plate with a hemostat where the sharpened point just touches the occluding surface of the lower plate. These vertical adjustments to the stylus are to be done without changing the patient’s vertical on the guide pin of the articulator.
The stylus has 3 main purposes:
1. To maintain the prior-to-closure space between the rims at the established vertical.
2. To keep the bite rims seated while in the mouth on their respective ridges by tripodization.
3. To record the movements of the mandible while in this prior to closure position.
Now the rims are ready to go to the mouth for the interarch tracings.
INTERARCH TRACING
 |
 |
|
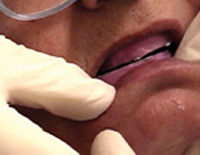
Figure 8. Interarch tracer in place. |
Figure 9. The tracing. |
After placing the rims in the mouth, the patient slides his mandible, forward-and-back, side-to-side, alternating repeatedly for 15 seconds. We are not assisting the patient in his movements shown in Figure 8. (We are merely positioning his lips for this photo.) After about 15 seconds of these excursions, have the patient open to separate the rims. When the rims are separated, use a mouth mirror to see if the stylus has inscribed a triangle with an apex on the lower plate. If a triangle with a definite apex can be seen, remove the lower rim for a closer inspection.
Lateral and Protrusice Movements
In elderly patients it may take more than 15 seconds to get a true CR tracing as seen in Figure 9. Note all the lateral lines created from side-to-side movement (indicated by the pink arrow). These are all the remounts you would get with compound or any other “assumed” CR bites. After about 2 minutes of moving the mandible from side-to-side and back-and-forth, you will see that we eventually got an apex to the triangle. This is CR for this patient. This is no assumption—this is it. With a half round bur, we now drill an indentation at the apex of the triangle indicated by the blue arrow in Figure 9. This indentation at the apex of the triangle will be used to record CR and the proper plane of occlusion. Next, drill the indentations for the right and left lateral bites, as well as the protrusive bite, approximately 5 mm back from the apex as shown in Figure 10. Note that Figure 10 also shows a modification of the interarch tracer’s lower plate for a lower partial against an upper denture.
REMOUNTING THE LOWER IN TRUE CENTRIC RELATION
 |
 |
|
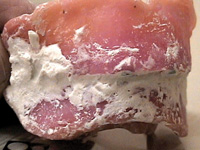
Figure 10. Indentations for stylus. |
Figure 11. Bite rims locked in bite stone. |
While the tip of the stylus is locked into each indentation, the dentist has ample time to inject a bite medium, such as a quick setting acrylic, between the plates (Temporary Bridge Resin Liquid [DENTSPLY Caulk]). Upon hardening, each acrylic bite wafer is removed and stored for setting the eminentias on the articulator later. After the right and left laterals and the one protrusive wafer are made with the quick setting acrylic, take a CR bite by injecting quick setting bite stone (Snap-Stone [Whip Mix]) between the plates while the tip of the stylus is locked in CR. We do this CR bite last. The CR bite was saved for last because we do not want to separate the rims until we have remounted the lower model. This bite stone, which is injected between the plates, locks the plates together in CR, as shown in Figure 11. It is a very accurate technique, but messy. To remount the lower model in true CR, all we have to do is place the rims (as locked together in Figure 11) back on the upper model. This upper model had never been removed from the original mounting on the articulator with the guide pin still maintaining the vertical. After securing the upper rim to the upper model with a hot wax gun, the lower model is reseated into the lower rim that is still locked to the upper rim. After securing the lower rim to its model again with a hot wax gun (HotStikz [Dental Ventures of America]), we apply a new coat of Super-Sep to the underside of the lower model and then apply a new mix of bite stone to the bottom of the lower model maintaining the same vertical. At this point, we have now remounted our lower model in true CR and a true plane of occlusion.
REMOUNTING GROOVES
If you are not using a magnetic mounting system that can be accurately and verifiably calibrated between instruments (examples include the Artex system [Jensen Industries], SAM 3 [Great Lakes Ortho], Stratos [Ivoclar Vivadent]), once the denture or a full-mouth reconstruction is mounted on an articulator, it stays on that same articulator until the case is completed. With all the mounts and remounts necessary in dentures and full mouth reconstructions, remounting grooves make it possible to stay on the same articulator. Changing standard (nonmagnetic, noncalibratible) articulators in the middle of production is a big no-no. Look again at Figure 2, the front view of the articulator. These are bite stone mountings you see. The raised ridges you see were formed during the mounting of the models by the bite stone going into the remounting grooves. Once a case’s models have been mounted in true CR/true plane of occlusion, the remounting grooves are your savior. During the processing of a denture, there are many steps that require that the models be removed from their stone bases on the articulator. To remount a model, all that is required is to guide the model back on its stone base on the articulator using the remounting grooves as guides. With the use of Super-Sep and have remounting grooves, all the mountings and remountings are not only easy, but far more accurate.
SETTING THE EMINENTIA
 |
 |
|
Figure 12. Remounted lower rim in CR with new plane of occlusion. |
Figure 13. Locked in maximum intercuspation. |
After remounting the lower bite rim and model, we can now remove the bite stone (Figure 12). The tip of the stylus is still locked in true CR, and in Figure 12, you can see the plane of occlusion has been corrected. You can see the changes to the plane of occlusion by looking again at Figure 7, which shows the rims as they were—before going to the mouth.
Steps to follow after setting the eminentias:
1. Remove the interarch appliance from the bite rims.
2. Smooth up the wax on the upper bite rim.
3. Rebuild the wax you took off the lower bite rim up to where it occludes with the upper bite rim without changing the vertical that is on the articulator.
4. Then follow the normal steps in selecting the teeth and setting the teeth, etc.
Note: Always use extra hard wax (Truwax Baseplate Wax Extra Hard, [DENTSPLY Prosthetics]) for making your rims. With soft wax, the individual teeth can move; and any prematurities would go undetected at the wax try-in. This would constitute a major problem in the final processed dentures.
FULLY FUNCTIONAL DENTURES
I have been amazed that dentures I made 40 years ago, with porcelain cusped teeth in perfect balance, maintain the underlying ridges. In addition, the teeth show very few, if any, facets of wear. While practicing for 50 years, my patients have been happy with porcelain teeth. My only experience in using 33° plastic denture teeth has been in my teaching work at University of Tennessee (UT). One case was for a UT colleague’s mother (shown in Figure 14 in maximum intercuspation). Another UT denture patient was an elderly childhood friend who could not wear her newly-made dentures. She requested permission to have me supervise a new denture at UT. We made her a fully functional denture with 33° cusped plastic teeth (UT only uses plastic teeth) and she could eat just about anything she wanted with her new dentures, but she was concerned about how much pressure had to be applied to chew tough items. Having only used procelain teeth in my practice, the topic of pressure when chewing never surfaced. Have you ever tried to cut a steak or chicken with a plastic knife? You may break the knife with all the pressure you have to apply. It’s a known fact that pressure melts bone. This might be a topic for further research.
MAXIMUM INTERCUSPATION
 |
 |
|
Figure 14. Plastic 33° teeth in maximum intercuspation (MI). |
Figure 15. Natural teeth in MI. |
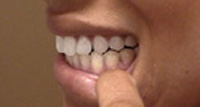
In fabricating dentures, I tried to duplicate the natural dentition. I found a perfect example in a student doctor’s dentition. You can see the patient’s perfect maximum intercuspation on the left side in Figure 15. Natural teeth can have prematurities while dentures can not have any prematuraties. A denture must be able to go from CR to MI on every closure with no hits and slides. This enhances the adhesion with every closure as shown in Figure 16.
CUSPID DISCLUSION IN DENTURES
 |
 |
|
Figure 16. Plastic 33° teeth in MI (left view). |
Figure 17. Natural teeth in left lateral. |
 |
| Figure 18. Plastic 33° teeth in left lateral. |
In the lateral cuspid disclusion of the natural teeth (Figure 17), the cusps of the posterior teeth are discluding through the opposing embrasures and bringing their marginal ridges in close proximity to their opposing marginal ridges for the shredding of food in these lateral disclusions. Your dental technician can achieve this in dentures if you provide lateral and protrusive bites (Figure 18). Note the close proximity of the opposing marginal ridges going through the embrasures. This motion is for shredding of food after the chop-chop moves that we make when chewing. We chop and then shred. The marginal ridges encircle the occlusal surfaces of all the posterior teeth. These marginal ridges form a circle and serve as cookie cutters on closure—that’s the chop- chop move in chewing. If you provide cuspid disclusion, further shredding of the food is possible by the lateral move that is pictured in Figure 18. Without the lateral and protrusive bites, these dentures could not function like natural teeth and would dislodge in these lateral and protrusive functions.
IN CLOSING
When I have had discussions with other dentists, especially prosthodontists, and have mentioned interarch tracers and taking true CR, I get comments like “I tried all that, but I still got failures.” When I posed the question, “What steps did you check after the wax try-in?” They would reply, “What steps are there other than delivery of the finished denture?” This is a topic for a future article on the importance of remounting grooves while processing dentures.
Dr. Futris received his DDS from the University of Tennessee (UT) and bachelor’s degree in physical chemistry from the University of Memphis. Originally an art major, he has practiced all phases of dentistry, combining science and art while concentrating heavily on prosthodontics and gnathological mountings. He practiced dentistry full-time in Memphis from 1957 until 2002, when he retired. Since 1967, he has been a part-time assistant professor in the UT Department of Fixed Prosthodontics. A life member of the ADA, Tennessee Dental Association, Memphis Dental Association, Delta Sigma Delta, Omicron Kappa Upsilon, and Dean’s Honorary Dental Societies, he has lectured nationally and internationally and has received CE awards from 1992 to the present. He can be reached at (901) 323-2135 or via e-mail at zoeste@bellsouth.net.
Disclosure: Dr. Futris reports no conflicts of interest.


