
INTRODUCTION
At first glance, a Class III direct composite restoration can appear to be a fairly routine procedure. However, any preparation that is “through-and-through,” requiring a light attenuating opaque back-up layer, can be challenging in creating the correct reproduction of the missing tooth structure. Certainly the thickness of the composite layer (or layers) plays a key role in the end result. However, the ability to utilize a matrix to form a lingual wall and address the anatomic requirements of the interdental space of the restoration, without being held by the operator’s fingers, is equally important. Couple that with a subgingival margin, hidden by the interdental papilla, and the challenge becomes even greater. A matrix that can adapt to a situation such as this is indispensable.
Fahl1 and Dietschi2 discussed the use of a freehanded “lingual shelf” of composite requiring several steps to create a wall for Class III and Class IV direct resins by first utilizing an enamel-replacement layer, then a dentin-replacement layer (opaque) to block the darkness of the oral cavity. Another well-documented and popular alternative is the use of a putty matrix technique, done by fabricating a vinyl polysiloxane jig or matrix based on a cosmetic preview or wax-up of the tooth to be restored.3-9 In addition, there are numerous anterior matrix systems available that are made from plastic, polyester, or Mylar, that can vary from a straight design to premolded options.
In all anterior restorations, an ideal matrix must create 2 different curves: the Labial Outline Curve (LOC) and the Cervical Surround Curve (Figures 1 and 2). The common practice of using a straight Mylar strip to slide interproximally to act as a matrix has severe limitations in meeting these goals. Even if it is bent to a 90° angle, or manipulated by the operator in an attempt to form the correct shape and contact surface, it fails to accomplish the desired result in many cases due to the inability to both properly seal and to create the proper anatomic shape. Plus, a straight-strip matrix folded around the complex curve of a tooth creates the potential for excess “flash” material around the margins, especially in the subgingival area. The key is to combine all the requirements for an anterior matrix into one: create a lingual shelf, seal the gingival margin, reproduce anatomic form, and be adaptable to multiple prep designs. One such universal system exists with the advent of the Margin Perfect Matrix (MPM) (Margin Perfect Matrix) (Figure 3).
CASE REPORT
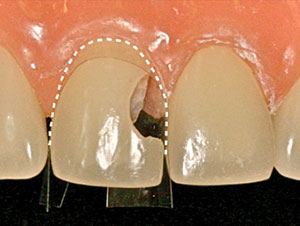
At the patient’s dental examination, recurrent caries were diagnosed in teeth with existing interproximal restorations and removed using standard techniques. After caries removal, the external margins were beveled with a 40-μm diamond (F889-009 [Axis Dental]) to expose additional enamel rods to aid in creating invisible margins. The through-and-through Class III preparations in adjacent teeth required a lingual wall of light-diffusing or opaquing composite to block the dark oral cavity (Figure 4).
 |
 |
| Figure 1. The Labial Outline Curve (LOC) created by placement of the Margin Perfect Matrix (MPM) (Margin Perfect Matrix). | Figure 2. The Cervical Surround Curve created by placement of the MPM. |
 |
 |
| Figure 3. Diagram illustrating the key landmarks of the MPM “Classic.” | Figure 4. Class III lesions with no lingual tooth structure displaying the through-and-through preparation. |
 |
 |
| Figure 5. Manipulating the MPM to create the lingual roll of the interproximal point. | Figure 6. The proper shape and position of the rolled interproximal point, which will ensure covering the lingual opening of the prep. |
After completing the Class III on tooth No. 10 with the MPM, the adjacent restoration was addressed in a step-by-step fashion. The matrix was modified in order to create a complete wrap-around effect and act as a lingual wall to support the placement of the first composite increment. The interproximal point was rolled into the body of the MPM, which resulted in enough matrix film length to cover the lingual opening of the preparation when held against the lingual aspect of the tooth (Figures 5 and 6).
The matrix was positioned from the labial approach through the interproximal contact areas and into the gingival sulcus surrounding the cervical portion of the tooth. A stabilizing collar of a light-curable resin (Heliobond [Ivoclar Vivadent]) was applied to the outside of the MPM to fixate it to the dried adjacent teeth and gingival tissues. This created a sealed system for proper isolation of the bonding site and formed the perfect LOC for the final restoration (Figure 7). It is important to note that placing a preshaped wedge of plastic (or wood) could distort the final shape of the MPM, creating a negative LOC.
To maintain the MPM as a lingual wall, the operator can hold it against the lingual with a finger or, preferably, tack it to the surface of the unetched portion of the preparation outside of boundary of the prepared portion of the tooth. Using an explorer point (or other suitable instrument), hold the MPM against the lingual portion of the tooth (Figure 8). Apply any one of a number of light-curable unfilled resins (such as Heliobond, OpalDam [Ultradent Products], or Complete [Cosmedent]) from the edge of the MPM to the unetched lingual tooth structure; hold it in place while curing the resin to form the lingual wall of the mold. Cure this resin with an LED light source for 10 seconds (SmartLite Focus [Dentsply Sirona Restorative]). Creating this fixed mold eliminates the “flash” formed around loose fitting matrices. This minimizes the need for trimming and polishing in those critical subgingival areas that can occur when noncustom matrices are not fixed solidly (Figure 9).
With the matrix firmly in place, the Class III composite becomes a straightforward task. Acid-etching (Email Preparator [Ivoclar Vivadent]) was done using a total-etch technique. Then, the tooth was rinsed and dried prior to the application of a universal enamel-dentin bonding agent (Prime & Bond Elect [Dentsply Sirona Restorative]), per the manufacturer’s directions.
An aesthetic layering technique was used in a 2-step modality. The first composite layer was applied in a thin layer as a lingual wall using a flowable resin (Filtek Supreme Ultra Flowable Restorative shade dentin opaque [3M]); then cured for 20 seconds with an LED light source of at least 1,000 mW/cm2 (SmartLite Focus). Next, the dentin-replacement layer (Empress Direct, Dentin Shade A2 [Ivoclar Vivadent]) was injected using a unit-dose carpule that was preheated over the cured opaque lingual layer to a volume that was short of the labial form of the tooth. These unit dose carpules were heated to 130°F using a composite resin warming device (Calset [AdDent]) that greatly enhanced the wetting ability of the body composites. Prior to the application of the top or enamel layer, this layer was cured for 20 seconds from the labial and lingual directions using the LED light source. Another heated carpule (Empress Direct Enamel Shade A2) was applied and compress-formed by using the sides of a paddle-shaped No. 3 brush (Cosmedent) to form the outer layer of the restoration. Next, the stabilizing resin collar was removed following the completion of the restoration by tugging at the resin collar with a 7/8 Bates Scaler (American Eagle) and removing the MPM with a hemostat.
 |
 |
| Figure 7. Proper placement of the MPM on tooth No. 9 from the labial aspect. Note the excellent seal and creation of the LOC. | Figure 8. The explorer holds the interproximal point tight against the lingual prior to securing with the light-curable stabilizing resin. |
 |
 |
| Figure 9. Applying the stabilizing resin (OpalDam [Ultradent Products]) and curing for 10 seconds to create the lingual wall with the MPM. | Figure 10. Final view of the completed Class II composites. |
Anatomical shaping is best done using the spiral-bladed finishing burs (such as H48L-010 and H379-016 [Brasseler USA]). The final polish was then imparted using abrasive cups and points (Astropol [Ivoclar Vivadent]) (Figure 10).
CLOSING COMMENTS
The molding and shaping of plastic parts, be it in industry or in dentistry, demands the use of a fixed and nonyielding mold to confine the plastic to the desired shape. The matrix system (MPM) discussed and demonstrated in this clinical case report fulfills the requirement to create a fixed mold for injection molding using dental composites.
References
- Fahl N Jr. A polychromatic composite layering approach for solving a complex class IV/direct veneer-diastema combination: Part I. Pract Proced Aesthet Dent. 2006;18:641-645.
- Dietschi D. Free-hand composite resin restorations: a key to anterior aesthetics. Pract Periodontics Aesthet Dent. 1995;7:15-25.
- Vanini L. Conservative composite restorations that mimic nature. A step-by-step anatomical stratification guide. Journal of Cosmetic Dentistry. 2010;26:80-98.
- Magne P, Holz J. Stratification of composite restorations: systematic and durable replication of natural aesthetics. Pract Periodontics Aesthet Dent. 1996;8:61-68.
- Felippe LA, Monteiro S Jr, De Andrada CA, et al. Clinical strategies for success in proximoincisal composite restorations. Part II: Composite application technique. J Esthet Restor Dent. 2005;17:11-21.
- Sabatini C. Direct resin composite approach to orthodontic relapse. Case report. N Y State Dent J. 2012;78:42-46.
- Bereznicki T, Welch L. An alternative approach to cosmetic space closure. Dent Today. 2012;31:152-155.
- Nahsan FP, Mondelli RF, Franco EB, et al. Clinical strategies for esthetic excellence in anterior tooth restorations: understanding color and composite resin selection. J Appl Oral Sci. 2012;20:151-156.
- Peyton JH. Direct restoration of anterior teeth: review of the clinical technique and case presentation. Pract Proced Aesthet Dent. 2002;14:203-210.
Dr. Belvedere began “injection molding” composite in 1985 and has been teaching continuing education to practicing dentists for more than 40 years. He is a Diplomate of the American Board of Aesthetic Dentistry and an adjunct professor at the University of Minnesota School of Dentistry, where he is the co-director of the its contemporary and aesthetic dentistry level postgraduate course. He can be reached via email at velvytooth@aol.com.
Disclosure: Dr. Belvedere, with the cessation of production of the Contour Strip by Ivoclar Vivadent, improved the proprietary die-cut outline and is currently the manufacturer of the Margin Perfect Matrix; as such, he
offers the product to the profession through its website.
Dr. Lambert is a Diplomate of the American Board of Aesthetic Dentistry and a Fellow of the American College of Dentists, the Pierre Fauchard Academy, the Academy for Sports Dentistry, and the American Society for Dental Aesthetics. He presents progressive composite dentistry workshops internationally and is a clinical mentor and speaker for the contemporary aesthetic and implant dentistry program at the University of Minnesota School of Dentistry and the Catapult Group. He can be reached via email at ddssmile@aol.com.
Disclosure: Dr. Lambert has a financial interest in Margin Perfect Matrix, Ltd.
Also by These Authors
The Ultimate Bonding Experience
Creating the “Perfect” Class V Composite: The Matrix Is Key
Direct Fiber-Reinforced Composite Bridges


